
In our lab tests using integrating spheres, thermal imaging cameras, and aging racks, we’ve seen how a suitable aluminum profile can stabilize strip temperature and improve long-term consistency. This article explains what matters most, why it matters on site, and how to make better decisions for LED lighting projects.
Practical note: before specifying a profile for a critical project, collect the strip datasheet, expected run lengths, ambient conditions, and any enclosure drawings. These items allow a rapid pre-check of whether a candidate profile and diffuser will meet thermal and aesthetic goals.
1. What is a heat sink aluminium profile and why is it used in LED lighting?
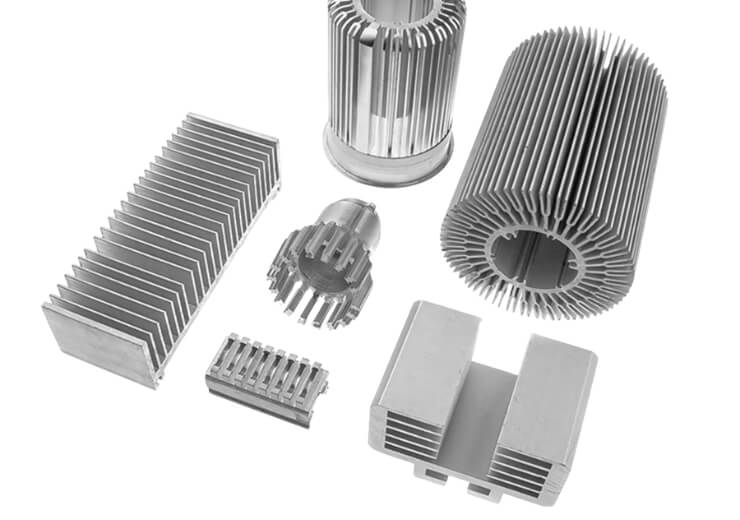
A heat sink aluminium profile is an extruded aluminum channel or housing that works as both a mounting base and a thermal path. In LED lighting, it is commonly used with flexible LED strips, rigid bars, linear fixtures, cabinet lights, shelf lights, architectural lines, and display lighting. The aluminum absorbs heat from the PCB and spreads it over a larger surface so it can dissipate into the air.
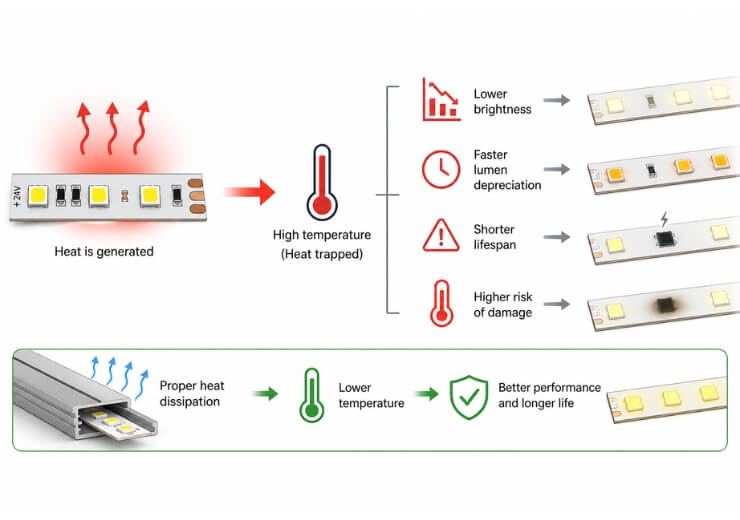
LED chips do not like heat buildup. Even if the fixture still turns on, high junction temperature can reduce output, shift color, and shorten useful life. We often see installers struggle with projects where LED strips are applied directly onto wood, painted steel, or plastic. The strip works at the start, but the system runs hotter and ages faster.
A profile also solves mechanical problems. It creates a straight mounting line, protects the strip from handling damage, supports diffuser covers, and gives the project a finished look. In retail shelving, under-cabinet lighting, and hotel joinery, that combination of thermal function and neat appearance is why profiles are widely specified.
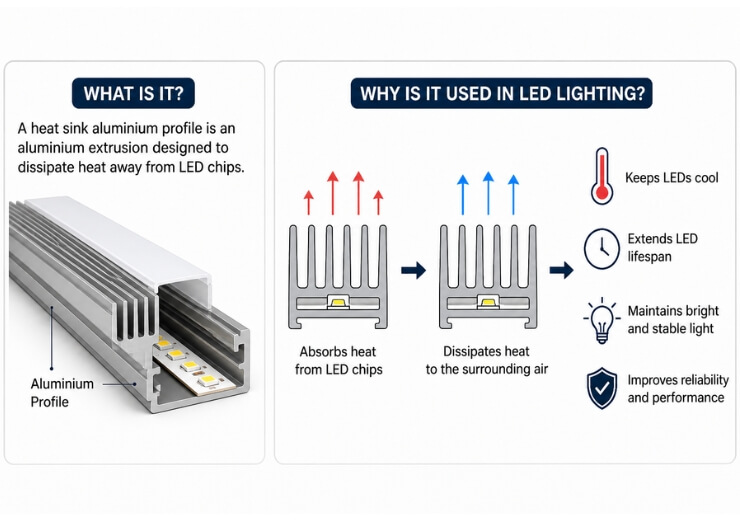
Practical tip: choose a profile that matches the strip width to ensure maximum base contact. Use a thin layer of thermally conductive adhesive or tape recommended for LEDs to improve heat transfer where mechanical clips do not provide full contact.
| Function | What the profile does | Why it matters |
|---|---|---|
| Heat dissipation | Pulls heat from LED PCB | Extends LED life and stabilizes output |
| Mounting | Provides flat installation surface | Improves straightness and adhesion |
| Protection | Shields strip from touch and dust | Reduces damage during use and cleaning |
| Appearance | Hides LED tape and wiring | Creates a cleaner fixture finish |
| Optics support | Holds diffuser or lens | Improves glare control and light uniformity |
2. How does heat affect LED strips and modules?
Heat is a key reason LED systems lose performance over time. The LED produces light efficiently, but some input power becomes heat, and that heat must move away from the diode and PCB quickly. If it stays trapped, junction temperature rises and lumen output falls.
In our lab tests using integrating spheres, a hotter strip often shows lower lumen maintenance after aging. In thermal imaging, the same LED strip mounted on a proper aluminum profile can run several degrees cooler than the same strip mounted on MDF board. That temperature difference matters over thousands of hours.
Three common field examples: continuous linear strips in narrow wooden recesses that dim over months; supermarket shelf strips where warm temperature weakens adhesive; and outdoor signage where solar gain increases internal heat.
Extend the point: increased temperature also accelerates driver electrolytic capacitor wear and can increase the risk of solder joint fatigue. Consider driver thermal placement, allowing ventilation around both the driver and the profile to maximise life for the entire system.
| Temperature issue | Likely effect on LED system | Commercial impact |
|---|---|---|
| High junction temperature | Faster lumen depreciation | Earlier replacement |
| Poor heat transfer | Color shift over time | Client complaints |
| Overheated adhesive area | Strip detachment | Rework cost |
| Trapped heat in recess | Driver and PCB stress | Shorter service life |
| Repeated thermal cycling | Solder fatigue | Intermittent failures |
3. What profile features affect heat dissipation the most?
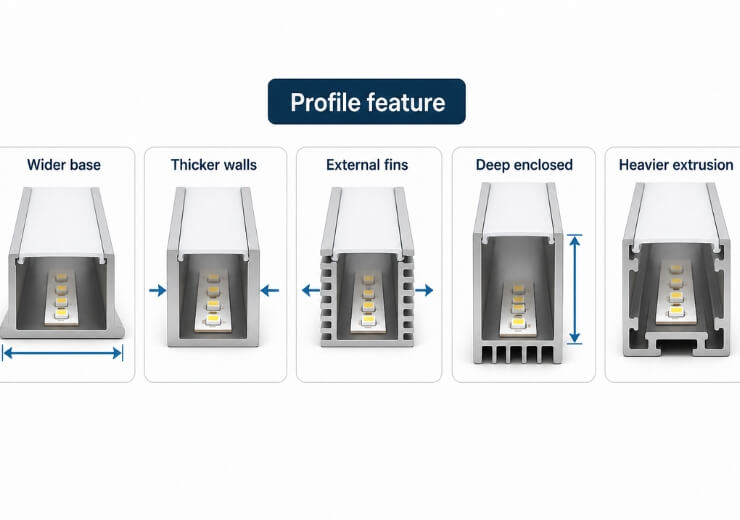
Shape, wall thickness, total mass, exposed surface area, and contact quality with the LED strip all influence thermal performance. A deep decorative channel may look good but perform worse than a wider, heavier extrusion if airflow is limited.
The base width affects contact area with the strip PCB. A narrow base under a wide strip reduces transfer. Heavier profiles can absorb and spread heat more effectively. External fins increase surface area and help release heat into air in open installations.
Surface finish plays a role: anodizing improves corrosion resistance and appearance, while thermal behavior still depends mostly on geometry and airflow. A fully enclosed profile may reduce convective cooling compared with an open design.
Design guidance: for long linear runs consider periodic breaks for thermal dissipation or additional mounting points that act as heat bridges to building structure. For high-output strips, look for extrusions designed with integrated fins or ribs and confirm with thermal testing rather than relying on visual inspection alone.
| Profile feature | Thermal effect | Selection note |
|---|---|---|
| Wider base | Better contact with PCB | Good for high-density strips |
| Thicker walls | More thermal mass | Helps stabilize temperature |
| External fins | More surface area | Useful in open-air applications |
| Deep enclosed channel | Can trap heat | Review airflow carefully |
| Heavier extrusion | Better heat spreading | Often worth the extra cost |
 4. Which aluminum alloy and finish are usually used?
Anodized silver is common for architectural lighting. Powder coating is used where color matching matters. Heavy decorative coating can slightly reduce heat transfer, so very high-power applications should be reviewed case by case.
Production quality matters: inconsistent extrusion can cause assembly issues even if thermal performance is acceptable.
Recommendation: ask suppliers for alloy documentation and sample finishes. Where environment or hygiene is a concern (kitchen, wet areas), select finishes with proven corrosion resistance and confirm any coatings do not outgas or degrade under elevated temperatures.
| Material option | Typical use | Practical advantage |
|---|---|---|
| 6063 aluminum | Standard LED profiles | Good extrusion quality and finish |
| Anodized surface | Indoor architectural use | Corrosion resistance and clean look |
| Powder-coated surface | Decorative fixtures | Color matching |
| Bare aluminum | Internal use | Direct thermal contact, lower cost |
| Precision extrusion | Custom lighting | Better fit and assembly consistency |
5. How do I choose the right profile size for LED strip power?
Profile sizing should start with strip wattage per meter, ambient temperature, installation environment, and run length. A low-power strip in open air can work well in a slim profile. A high-density strip in a sealed cove may need a larger section.
As a practical rule, higher wattage needs more aluminum mass and more airflow. Wattage alone is not enough: in a cool office a 14.4W/m strip may perform well in a medium profile, while in a warm enclosed cabinet 9.6W/m can run hot.
Calculation help: estimate the heat flux per meter (W/m) and compare against the profile thermal dissipation data if available. If supplier data is missing, assume conservative margins and specify a heavier profile, or insist on sample thermal runs to validate choices.
| LED strip load | Suggested profile class | Typical application |
|---|---|---|
| Up to 4.8W/m | Slim profile | Accent lighting, furniture edges |
| 4.8W/m to 9.6W/m | Standard profile | Cabinets, shelves, displays |
| 9.6W/m to 14.4W/m | Medium/heavy profile | Cove lighting, task lighting |
| 14.4W/m to 20W/m | Heavy-duty profile | Commercial linear runs |
| Above 20W/m | Engineered thermal housing | High-output architectural fixtures |
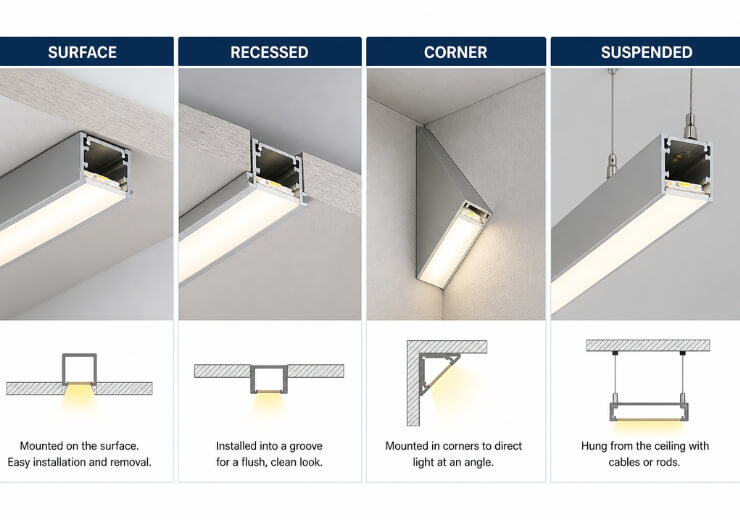
6. What is the difference between surface, recessed, corner, and suspended profiles?
Surface profiles mount directly to a face and usually have better airflow exposure. Recessed profiles sit inside a groove for a flush appearance but surrounding material can limit cooling. Corner profiles are used at angles in cabinets and displays. Suspended profiles are larger, for pendant linear fixtures and higher-output boards.
Each type requires different installation planning. Recessed runs need routing that keeps the base in good thermal contact and may require ventilation slots. Suspended profiles can incorporate active heat management or larger fins because they aren’t constrained by surrounding materials.
| Profile type | Main use | Thermal note | Installation note |
|---|---|---|---|
| Surface | Direct mounting | Better airflow | Fast and simple |
| Recessed | Flush appearance | Surrounding material affects cooling | Needs routing or groove |
| Corner | Angled light output | Moderate airflow | Good for cabinets and displays |
| Suspended | Pendant fixtures | Can handle larger thermal loads | Needs hanging hardware |
| Plaster-in | Seamless architectural line | Review enclosed heat build-up | Early planning required |
7. How do diffuser covers and accessories affect performance?
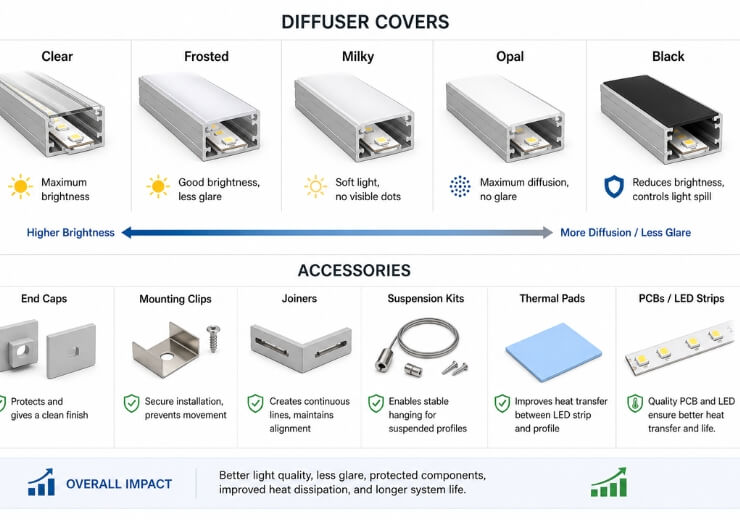
Diffusers change light softness, transmission, and glare control. Opal covers hide LED dots better, while clear covers give higher transmission. Enclosed covers can slightly reduce airflow around the strip, so for higher-output applications check the thermal path.
End caps, clips, gaskets, mounting brackets, and joiners all influence final quality. Poorly fitting end caps allow dust ingress. Weak clips can cause sag in long runs.
Installation suggestion: when specifying diffusers, request transmission data (percentage of light transmitted) and sample pieces. For cleanroom or hygienic applications choose diffusers that can be reliably cleaned without scratching; scratches reduce transmission and can trap dirt.
| Accessory | Main role | Possible trade-off |
|---|---|---|
| Clear diffuser | Maximum light output | More visible LED dots |
| Opal diffuser | Better light blending | Lower transmission |
| Semi-clear diffuser | Balance of output and comfort | Moderate dot visibility |
| Metal clips | Secure mounting | Need accurate spacing |
| End caps | Protect ends and improve finish | Poor fit can reduce quality impression |
8. What should I check during installation?
Key checks: surface cleanliness, straight mounting, correct power supply sizing, strip-to-profile bonding, cable routing, expansion allowance, and diffuser fit. Profiles work best when the strip has full, clean contact with the aluminum base.
Common field errors include dusty routed grooves, uneven painted surfaces, and debris under the strip that reduce thermal transfer. Driver placement in unventilated pockets above the profile is another frequent cause of heat issues.
Field checklist: always clean surfaces with isopropyl alcohol, use consistent clip spacing to avoid sag, allow expansion gaps at profile joins for thermal movement, and mark driver access points in installation drawings to prevent late-stage rework.
| Installation checkpoint | What to verify | Risk if ignored |
|---|---|---|
| Channel surface | Clean, flat, dry | Weak adhesion and poor heat transfer |
| Strip bonding | Full contact with base | Hot spots |
| Power feed plan | Correct voltage and cable size | Voltage drop |
| Mounting alignment | Straight and stress-free | Visible waviness |
| Driver location | Ventilated and accessible | Overheating and service issues |
9. How do I compare 12V vs 24V systems with aluminum profiles?
Voltage choice affects current, cable sizing, voltage drop, and even strip performance along the profile. For the same wattage, a 24V strip draws less current than 12V, reducing voltage drop and connector stress on long runs.
24V systems are often better for longer linear installations. A 12V system still makes sense in short runs and compact products. Electrical behavior supports thermal planning but does not replace it.
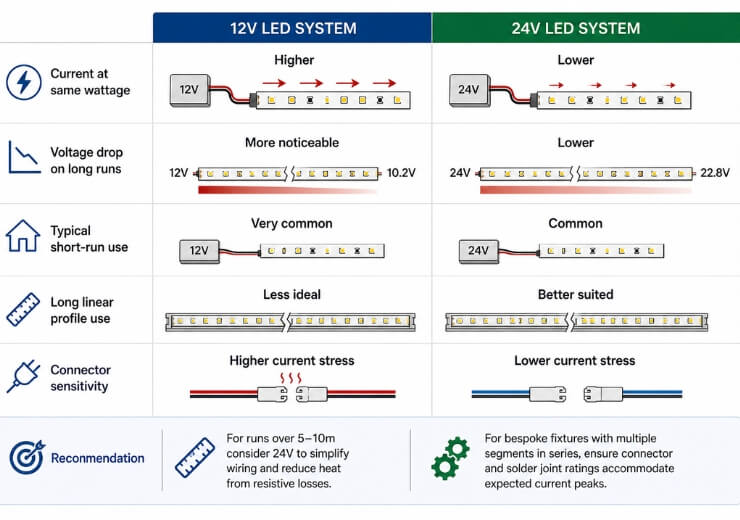
Recommendation: for runs over 5–10m consider 24V to simplify wiring and reduce heat caused by resistive losses. For bespoke fixtures where multiple segments are joined in series, ensure connector and solder joint ratings accommodate expected current peaks.
| Factor | 12V LED strip | 24V LED strip |
|---|---|---|
| Current at same wattage | Higher | Lower |
| Voltage drop on long runs | More noticeable | Lower |
| Typical short-run use | Very common | Common |
| Long linear profile use | Less ideal | Better suited |
| Connector sensitivity | Higher current stress | Lower current stress |
10. What mistakes, tests, and buying checks matter before ordering?
Choose profiles by thermal and production performance, not just appearance. Review thermal capacity, extrusion straightness, cover transmission, accessory fit, dimensional tolerance, and packaging before committing.
A sample review should include: assemble the set with strip, cover, clips, and end caps; run a thermal test at actual wattage and ambient conditions; and inspect straightness and finish across multiple samples.
Pro tip: request thermal images, aging test records, and real assembly photos, not just drawings.
Supplier negotiation tips: include a small batch sample order with defined acceptance criteria in the purchase agreement. Confirm warranty terms address thermal failure modes and clarify responsibilities for custom extrusions or finishes that affect heat dissipation.
| Pre-order check | What to ask for | Why it matters |
|---|---|---|
| Thermal review | Operating temp data or images | Confirms cooling suitability |
| Extrusion tolerance | Section drawing and sample fit | Prevents assembly issues |
| Diffuser transmission | Clear vs opal data | Helps output planning |
| Straightness | Long-sample inspection | Avoids installation defects |
| Packaging method | Protection for long lengths | Reduces transport damage |
Heat sink aluminium profiles are more than simple accessories. They affect thermal control, light consistency, mechanical reliability, and the finished look. Evaluate strip wattage, installation style, airflow, diffuser choice, and profile quality together for more reliable outcomes.
If unsure about sizing, thermal behavior, or voltage drop for a planned installation, send your drawings or application details to an engineering team for review before ordering.
Conclusion
Selecting the right heat sink aluminium profile means balancing thermal capacity, mechanical fit, and installation conditions.
Match profile mass and geometry to strip wattage and site ventilation, verify diffuser transmission and accessory fit, and run a sample thermal test under real conditions. That combination reduces field failures, maintains lumen output, and protects warranty and reputation.
Final reminder: include maintenance and inspection intervals for critical installations. A simple yearly check for dust build-up, end cap seal integrity, and any signs of adhesive failure will help catch issues early and extend the effective life of the installation.
FAQ
Q1: What is a heat sink aluminium profile?
A heat sink aluminium profile is an extruded aluminum channel or housing used to mount LED strips or modules and transfer heat away from them. It also improves protection, appearance, and installation accuracy.
Q2: Do all LED strips need an aluminum profile?
No. Very low-power strips in short decorative runs may work without one. But for better lifespan, cleaner mounting, and more stable performance, aluminum profiles are usually recommended.
Q3: Does a bigger profile always cool better?
Not always, but in many cases a larger and heavier profile provides better heat spreading. Actual performance still depends on airflow, strip power, enclosure design, and installation method.
Q4: Is anodized aluminum better than bare aluminum for LED profiles?
Anodized aluminum is often preferred for corrosion resistance, appearance, and consistency. Bare aluminum can still perform well thermally, but surface quality and project environment should be considered.
Q5: How can I check if a profile is suitable for my project?
Review strip wattage, ambient temperature, installation space, run length, diffuser type, and profile dimensions. A sample test with thermal imaging or temperature measurement is the best way to confirm suitability.
