
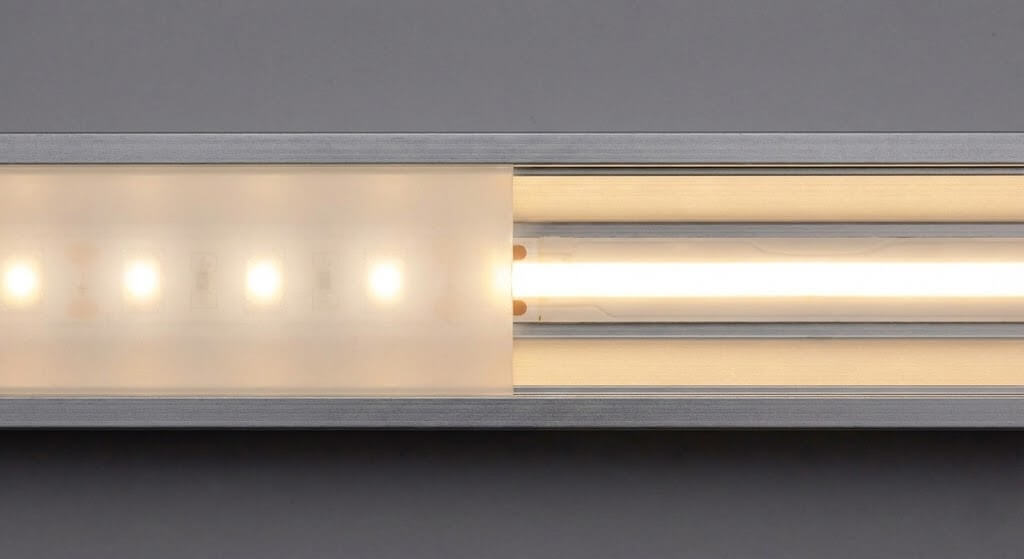
LED channel diffusers are translucent covers that snap or slide into an LED aluminum profile (channel). Their job is to spread light, hide individual LED dots, reduce glare, and protect the LED strip from dust and accidental contact. You need them when a project demands a clean lighting line, predictable visual comfort, and fewer callbacks.
If you’ve ever installed a strip and got “zebra dots” on a wall, harsh glare in a corridor, or a client who hated the look up close, you already know the problem. The pain shows up fast: rejected handovers, rework costs, and reputation damage for installers or product teams. Here’s the deal. A well-matched diffuser and profile turns a raw LED strip into a lighting fixture you can stand behind.
From our manufacturing floor perspective, we see the same failure patterns repeat across regions. In our lab tests using integrating spheres and thermal imaging cameras, diffuser choice shows up in glare ratings, perceived uniformity, and even long-term lumen maintenance because of heat and contamination control. This article breaks down what diffusers are, how to select them, and where they pay you back.
1. What is an LED channel diffuser, in plain terms?

What the diffuser does (and what it doesn’t)
An LED channel diffuser is the “lens” for linear lighting. It takes point sources (individual LED chips) and turns them into a smoother luminous surface. While it does not magically fix a poorly selected strip, wrong spacing, or severe voltage drop. It just controls how the light leaves the channel.
We often see installers struggle with this expectation gap. Example one: a 60 LED/m strip in a shallow channel, clear cover, mounted at eye level in a retail aisle. Hotspots are guaranteed. Example two: a mirror backlight in a hotel bathroom that looks fine head-on, then shows dots in reflections. Example three: an under-cabinet run where the customer complains about glare while seated at a dining counter.
Typical construction
Most diffusers are polycarbonate (PC) or acrylic/PMMA, shaped as flat, domed, or deep opal “milk” styles. They can be snap-in, slide-in, or end-cap retained.
Why it hits the bottom line
A diffuser is low cost compared with labor. One extra site visit costs more than several meters of the right cover.
2. Why do LED strips look “dotty” and why does a diffuser fix it?
The dot problem: LED pitch vs viewing distance
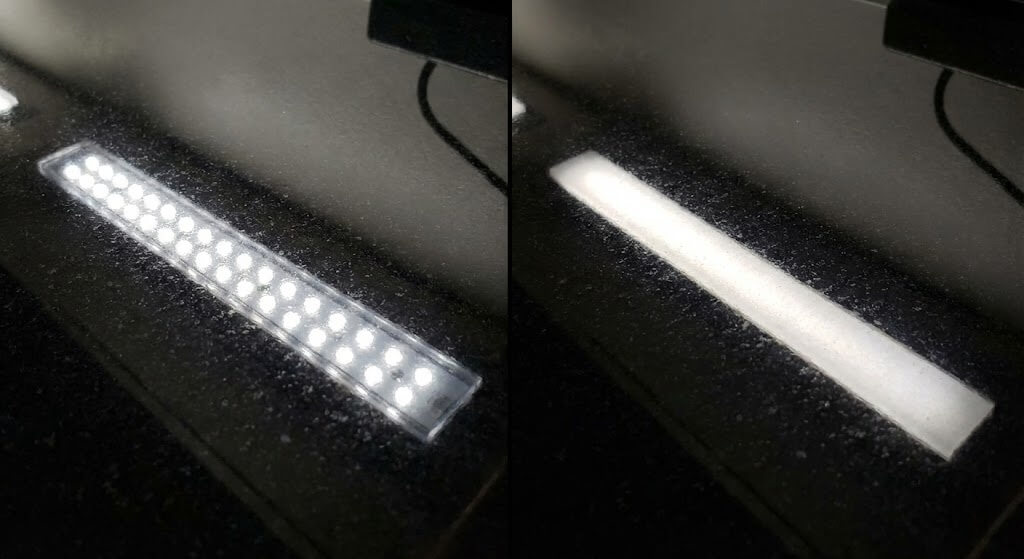
Dotting happens because the LED pitch (distance between LEDs) is visible through the cover. The closer the viewer and the thinner the optical distance from LED to diffuser, the more dots you see.
We tested this against a standard 12V strip at 60 LED/m in a 10 mm deep profile. With a clear cover, dotting stayed obvious at 1–2 meters. Swapping to an opal diffuser reduced dot visibility, yet the strip still wasn’t “neon-like” at close range. With a deeper profile (15–20 mm) and opal, it became a continuous line for most commercial viewing distances.
Three field examples
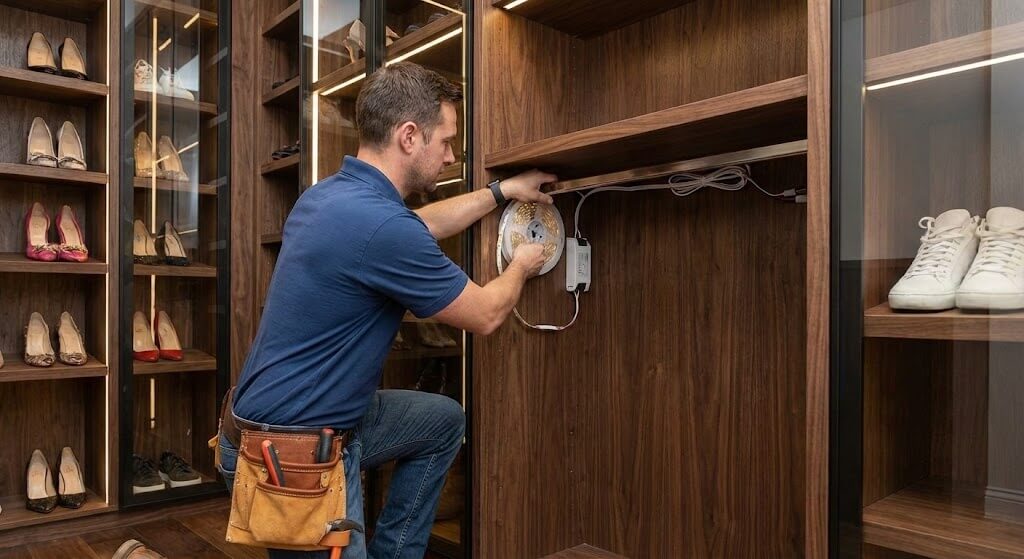
Example one: office corridors with wall grazing. A frosted cover reduced harsh pixel reflection on semi-gloss paint. Example two: a bar shelf display. Clear cover created sparkling dots on glass bottles; an opal cover calmed it down. Example three: furniture lighting inside a wardrobe. A domed diffuser helped spread light across folded clothes.
Quick reference table: dot-free design drivers
| Design factor | What happens if it’s too small | Practical fix |
|---|---|---|
| LED pitch (LED/m) | Dots show through | Use higher density strip or COB |
| Profile depth (LED-to-lens gap) | Dots and glare increase | Choose deeper channel |
| Diffuser haze/opacity | Too clear shows points | Pick frosted/opal |
| Viewing distance | Close viewing reveals dots | Adjust mounting or optics |
3. What problems do diffusers solve beyond aesthetics?
Glare control and visual comfort
Glare is a business problem. A bright linear source in the wrong place triggers complaints, failed inspections in some workplaces, and rework. A diffuser increases apparent emitting area and lowers peak luminance.
In our lab tests using integrating spheres, the luminous flux changes modestly with diffuser choice, yet perceived comfort changes a lot. That matters in offices, hospitals, classrooms, and hospitality corridors.
Protection and maintenance
A diffuser is also a barrier. Example one: food prep areas where grease aerosols settle on exposed strips and change color. For example two: industrial cabinets where metal dust can short exposed solder pads. And example three: outdoor soffits where insects and moisture create contamination.
Light distribution and product consistency
If you build a lighting product (shelves, mirrors, signage), the diffuser standardizes output across units. It reduces “unit-to-unit” visual variation caused by small LED placement differences.
But there’s a catch. A diffuser can trap heat if the profile is undersized or installed without airflow. That leads to faster lumen depreciation.
4. What diffuser materials should you choose: PC vs PMMA?
Material behavior in real installations
Polycarbonate (PC) is tough and impact resistant. Acrylic/PMMA has better optical clarity and can look cleaner, yet it is more brittle.
We once saw an airport maintenance team crack PMMA covers during winter servicing because the cover was flexed in low temperature. In contrast, a retail chain using PC covers reported fewer breaks during fixture cleaning. Another case: a museum display demanded the cleanest look and minimal tint shift; PMMA performed well visually.
Heat, UV, and chemical exposure
PC generally tolerates impact and can be formulated for UV stability. PMMA has strong UV stability but can craze with some solvents. In kitchens, aggressive cleaners can attack the wrong plastic.
Vs. comparison table (mandatory)
| Parameter | Polycarbonate (PC) diffuser | Acrylic (PMMA) diffuser |
|---|---|---|
| Impact resistance | High (good for service areas) | Medium/low (can crack if flexed) |
| Optical clarity | Good | Very good |
| UV stability (typical) | Good with UV grade | Naturally strong |
| Temperature toughness | Wider practical range | Can become brittle in cold |
| Chemical resistance | Varies by grade | Varies; watch solvents |
| Typical use | Commercial, industrial, public areas | Display, decorative, premium look |
Pro Tip from the VST Technical Team: “If the site has frequent maintenance or public access, we bias toward PC covers. A cover that survives cleaning saves more money than a small gain in clarity.”
5. What diffuser finishes exist, and how do they affect output?
Clear, frosted, opal, and black-channel styles
Clear covers give maximum transmission but show LED points and glare. Frosted covers add haze and reduce dotting. Opal covers smooth the line most, with the biggest lumen loss. Black-channel diffusers can hide the internal channel when off, popular in high-end interiors.
We often see three outcomes:
- A clear cover in a shallow channel looks “cheap” up close, even with premium LEDs.
- A frosted cover is a common middle ground for under-cabinet and cove lighting.
- Opal is used where the line itself is the design feature, like hotel headboards and reception desks.
Lumen impact: what to expect
You won’t get the same delivered lux after adding a diffuser. Plan for it. In our lab tests using integrating spheres, typical losses ranged from single digits for clear to 20–35% for heavy opal, depending on thickness and haze.
Output planning table
| Diffuser finish | Dot hiding | Glare reduction | Typical light transmission* | Typical applications |
|---|---|---|---|---|
| Clear | Low | Low | 85–95% | Utility lighting, hidden channels |
| Frosted | Medium | Medium | 70–85% | Cabinets, coves, wall wash |
| Opal | High | High | 55–75% | Visible linear lines, hospitality |
| Black (smoke/black opal) | Medium/high | Medium/high | 40–70% | Premium interiors, “off-state” look |
*Ranges depend on material, thickness, and surface.
6. How do profile depth and diffuser geometry change the look?
Optical distance is your best friend
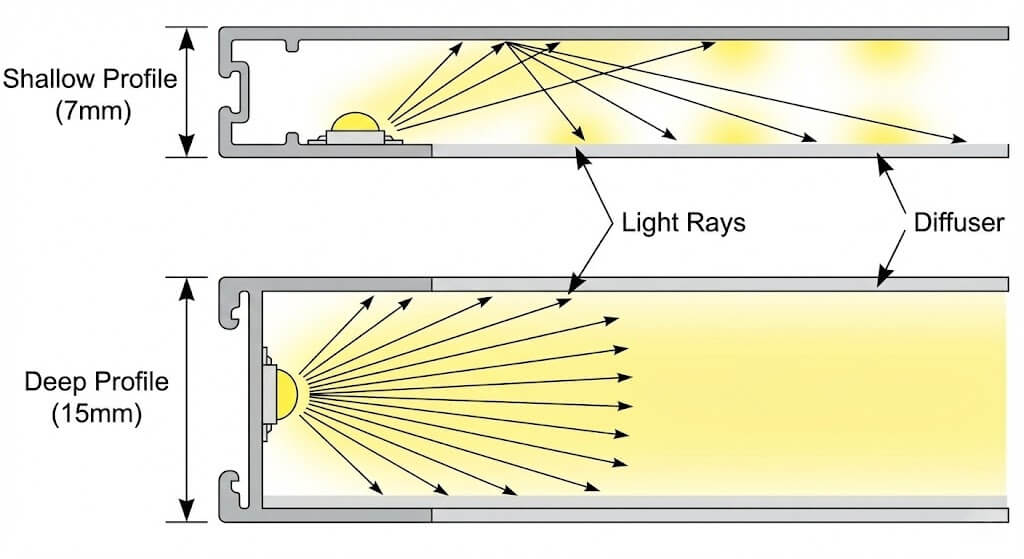
If you want a continuous line, depth matters as much as diffuser haze. A shallow 7–8 mm channel rarely hides 60 LED/m dots at close range. A 15–20 mm deep channel gives the diffuser room to blend light.
When we tested this against a standard 12V strip, moving the diffuser just 5–8 mm farther from the LEDs reduced visible segmentation more than swapping clear to frosted in the shallow channel.
Flat vs domed vs “high” lenses
Flat lenses look clean and sit flush. Domed lenses spread light wider and can reduce edge darkening. High opal lenses can give a “neon bar” feel, but need mechanical clearance.
Field examples:
- Stair nosing profiles: domed diffusers reduce harsh angles.
- Wall grazing coves: deeper channels prevent scalloping.
- Retail shelves: flat diffusers avoid snagging and look tidy.
Geometry table
| Geometry | Visual effect | Mechanical note | Typical use |
|---|---|---|---|
| Flat | Clean line, more directional | Lowest projection | Cabinets, coves |
| Domed | Wider beam, softer edges | Slight projection | Pathways, shelves |
| High opal | Strong dot hiding | Needs clearance | Feature lines, signage |
7. How do LED type and density change diffuser selection (SMD vs COB)?
SMD strips need more optical help
SMD strips have spaced emitters. The diffuser and depth do most of the blending. If you are locked into a shallow profile, raise LED density or change the LED technology.
COB strips reduce dotting but still need a cover
Common Myth: “COB strips don’t need a diffuser.”
Reality: COB reduces point visibility, yet a cover still matters for glare, cleaning protection, and consistent surface finish. We’ve seen COB strips installed open in a wardrobe and still cause discomfort because the emitting surface is bright at eye level.
Three practical examples
Example one: a reception desk edge. COB plus frosted cover gave a continuous line with controlled glare. Example two: a refrigerated display shelf. SMD with opal cover reduced sparkle on packaging film. Example three: an outdoor sign box. COB with a UV-stable PC diffuser improved wipe-down durability.
SMD vs COB table
| Factor | SMD strip | COB strip |
|---|---|---|
| Dot visibility | Higher | Lower |
| Works in shallow profile | Often poor | Better |
| Glare risk | Medium/high | Medium/high (still bright) |
| Typical diffuser choice | Frosted/opal | Frosted/clear depending on position |
8. What specs should you check on diffuser data sheets?
Transmittance, haze, thickness, and color shift
For projects with brand standards (retail chains, hotel groups), you need repeatable optics. Ask for transmittance (%), haze (%), thickness, and whether the diffuser has UV stabilization.
In our lab tests using integrating spheres, two “opal” covers from different sources differed by over 10% in transmission at the same thickness. That changes delivered lux and can push a project out of spec.
Mechanical and fit tolerances
Covers that fit too tight slow down LED installation. Covers that fit loose can rattle, bow, or pop in high temperature cycles. We once saw a long corridor run where thermal expansion caused a poorly matched snap-in cover to creep out near the center.
Spec checklist table
| Spec to verify | Why it matters | Quick target ranges |
|---|---|---|
| Light transmission | Delivered lux and power planning | 55–95% depending on finish |
| Haze | Dot hiding and comfort | 40–95% |
| UV grade | Yellowing risk near windows/outdoors | Ask for UV-stable grade |
| Operating temperature | Fit, warping, long life | Match site conditions |
| Flammability rating | Safety and compliance | Request according to region |
9. How do you choose the right diffuser for your application?
Match diffuser to viewing angle and surface reflectance
Gloss paint, mirrors, stainless steel, and glass amplify dotting and glare. In those areas, a diffuser that looks “fine” on site mockups can fail once furniture and reflective finishes are in place.
Three quick scenarios:
- Luxury hotel bathroom: opal or high haze to avoid mirror reflections.
- Open office: frosted plus deeper profile to reduce line glare.
- Machinery task light: clear or light frost for maximum lux on the work plane, but keep it out of direct sightlines.
A simple decision table
| Application | Typical priority | Recommended diffuser | Channel depth note |
|---|---|---|---|
| Under-cabinet task | Lux on countertop | Frosted or clear | Medium depth reduces glare |
| Cove/indirect | Uniform line reflection | Frosted/opal | Deeper helps blending |
| Feature line visible | No dots, smooth line | Opal/high opal | Deep channel strongly preferred |
| Public areas | Durability | PC, frosted/opal | Robust profile, good fit |
| Outdoor (covered) | UV and contamination | UV-grade PC | Seal and drainage planning |
Quick cost reality check
If a diffuser drops flux by 25%, you may raise wattage or shorten spacing. That is still cheaper than rework after client rejection.
Misalignment, contamination, and thermal issues
Most diffuser complaints aren’t “bad plastic.” They are handling and installation habits.
We often see installers struggle with:
- Touching inner lens surfaces with oily gloves, then sealing the channel. Smears show as streaks when lit.
- Cutting covers too tight. Thermal expansion pushes end caps or creates bowing.
- Mounting profiles on uneven substrates. The diffuser snaps in under stress and pops out later.
Field examples: a supermarket cove where dust was trapped inside before closing; the line looked patchy. A bus interior where vibration loosened a loose-fit cover. A cold-storage room where a brittle cover cracked during maintenance.
Troubleshooting and checklist table
| Symptom | Likely cause | Practical fix |
|---|---|---|
| Visible dots | Shallow profile, low LED density, clear lens | Deeper profile, higher density/COB, frosted/opal |
| Uneven brightness along run | Voltage drop, poor power injection | Feed from both ends, thicker cable, 24V option |
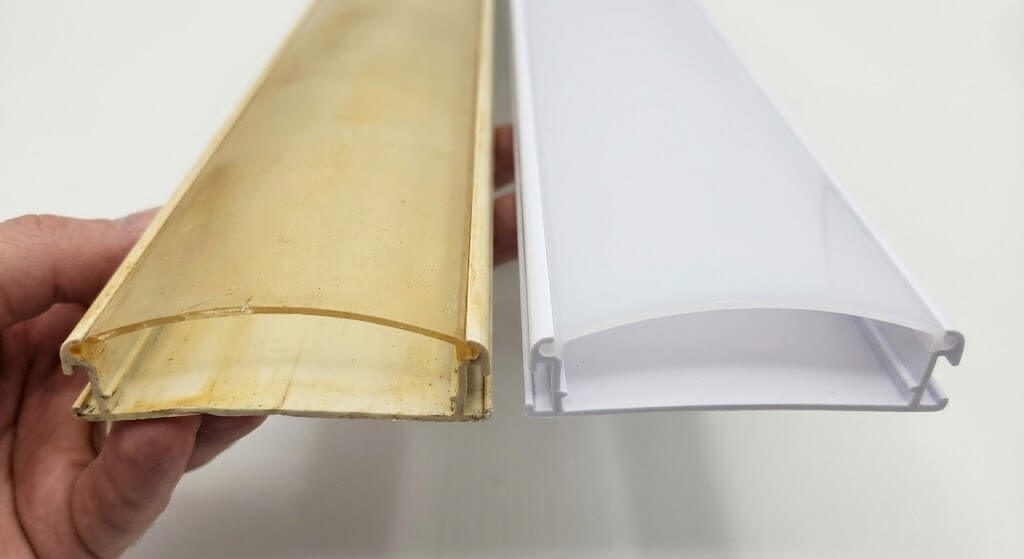
| Yellowing after months | Non-UV grade material, high heat | UV-grade cover, improve thermal path |
| Cover pops out | Wrong tolerance, substrate warping | Match profile/cover set, add clips, straighten mounting |
| Streaks or shadows | Smudges, debris inside channel | Clean handling, blow out channel, re-close |
Conclusion
LED channel diffusers turn raw strips into lighting you can install with confidence: smoother lines, less glare, better protection, and more predictable results. Material, finish, profile depth, and LED type all interact, so treat the diffuser as part of the optical system, not an accessory. If you’re unsure which cover will meet the “no dots” expectation in a specific space, send our engineering team your profile depth, LED type, and a photo of the mounting position. We’ll sanity-check the selection and suggest a test setup before you commit to a full run.
FAQ
Q1: What are LED channel diffusers?
LED channel diffusers are translucent covers that fit into aluminum LED profiles to spread light, hide LED points, reduce glare, and protect the strip from dust and contact.
Q2: How does an LED diffuser reduce glare?
It increases the apparent emitting area and adds haze, which lowers peak luminance seen from common viewing angles. The result is a softer line that’s easier on the eyes.
Q3: Do COB LED strips still need a diffuser?
Often yes. COB reduces dotting, yet a diffuser still helps with visual comfort, cleaning protection, and a consistent surface finish across fixtures.
Q4: Which diffuser is best for “no dots” linear lighting?
A high-haze opal diffuser combined with a deeper profile and a higher-density or COB strip gives the best shot at a continuous line at close viewing distances.
Q5: Why did my diffuser turn yellow over time?
Common causes are non-UV-stable plastic near sunlight, elevated temperatures from poor heat dissipation, or harsh cleaning chemicals. A UV-grade cover and better thermal design reduce the risk.
