
1. What heat problem do high-power LED tapes create?
High-power LED tapes convert part of their input power into light, but a large share becomes heat at the LED junction, PCB, solder pads, and adhesive layer. Understanding the causes and warning signs of LED strip light overheating is essential because, when heat cannot leave the tape efficiently, junction temperature rises and long-term performance declines. Brightness drops. Phosphor ages faster. Adhesive dries out. In the field, this looks like yellowing silicone, dead sections, and visible color drift between zones.
We often see installers struggle with 20W/m and 24W/m tapes in narrow decorative channels. The tape works for the demo, but enclosed coves or wood shelves trap heat. A luxury hotel corridor may run 12 hours per day. A retail display can run even longer. That duty cycle changes everything.
Common Myth: higher wattage always means better brightness. In practice, effective LED heat-sink thermal management is essential because excessive operating temperature accelerates light-output degradation and shortens useful LED life. Reality: lumen efficiency, thermal path, and drive current decide usable output. A 19.2W/m tape on a proper heat sink may hold lumen output better than a 24W/m tape inside a thin channel.
| LED tape power | Heat risk level | Suggested channel type | Typical use case |
|---|---|---|---|
| 4.8–9.6W/m | Low | Slim aluminum profile | Shelves, soft accents |
| 12–14.4W/m | Medium | Standard surface or recessed profile | Cove lighting, cabinets |
| 18–20W/m | High | Wide aluminum profile with thicker base | Retail, work areas |
| 24–30W/m | Very high | Heat-sink profile with fins or large body | Linear task light, signage |
The following short demonstration shows how an aluminum profile acts as a heat sink for LED tape and why better heat dissipation supports longer life and more stable light output.
2. Which channel materials transfer heat most reliably?
A properly engineered aluminum profile for LED strip lighting is the standard cooling choice for high-power tape because it balances thermal conductivity, weight, cost, extrusion flexibility, and corrosion resistance. Copper conducts heat better, but it is costly, heavy, and rarely practical for long commercial runs. Comparing aluminium versus plastic channels for LED lights makes the thermal difference clear, because plastic should not be relied upon as the primary heat path for high-output LED tape.
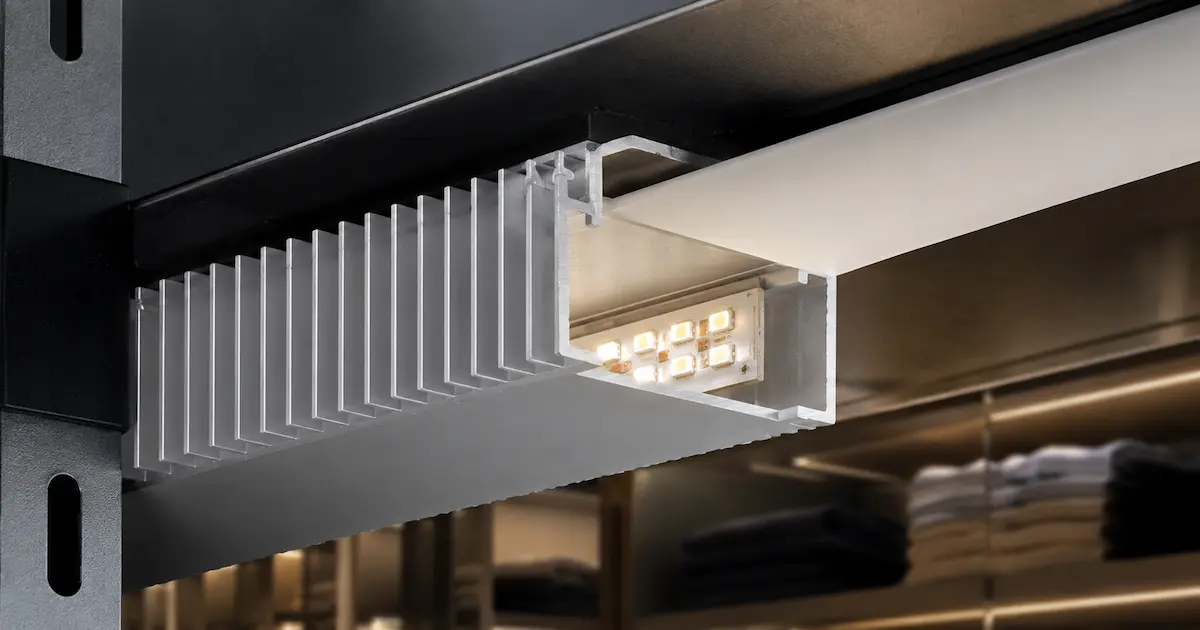
The aluminum grade and wall thickness matter. Many profiles look similar in photos, yet a 0.8mm decorative extrusion cannot perform like a 1.5mm or 2.0mm thick heat-sink body. Anodized aluminum also protects against oxidation, which is useful in humid sites and long supply chains.
In our lab tests using integrating spheres and thermal imaging cameras, we compare lumen decay at controlled temperatures. The difference between a thin channel and a heavy aluminum profile is easy to see after aging. The heavy profile keeps the LED surface cooler, so flux maintenance improves.
| Material | Thermal performance | Cost level | Practical note |
|---|---|---|---|
| Plastic | Poor | Low | Use only as diffuser or cover, not heat sink |
| Thin aluminum | Fair | Low | Suitable for low to mid-power tapes |
| Thick aluminum | Strong | Medium | Best balance for most projects |
| Finned aluminum | Strongest | Medium-high | Best for 20W/m and above |
| Copper | Excellent | High | Rare for long LED tape projects |
3. Which channel shapes cool high-wattage strips better?
Channel shape decides how heat moves from the tape to the surrounding air, while the documented thermal conductivity of 6063-T5 aluminum helps explain why this extrusion alloy is widely suited to heat-dissipating profile designs. A flat, wide base gives better contact with the LED strip PCB. A taller body stores more thermal mass. External fins increase surface area, which helps heat leave the aluminum into surrounding air.
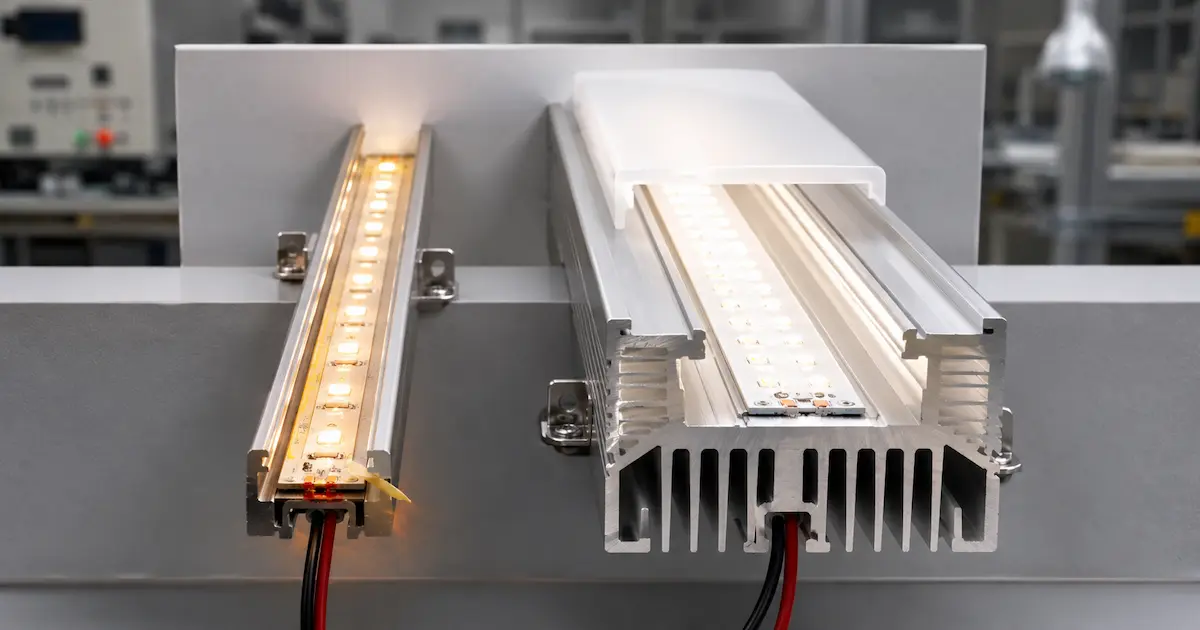
For high-power LED tapes, surface-mounted channels often cool better than very narrow recessed profiles because more aluminum remains exposed to air. A substantial deep LED channel can provide strong cooling and optical mixing when its aluminum body is large enough and the surrounding recess allows heat to escape. Suspended linear profiles can cool well because air can move around the full body.
Here’s the deal: the worst choice is usually the very slim “micro” channel used for visual neatness. It hides the strip, but it cannot carry enough heat for demanding wattages.
| Channel shape | Cooling rating | Visual effect | Best fit |
|---|---|---|---|
| Slim U-channel | Low | Minimal line | Low wattage furniture lighting |
| Standard U-channel | Medium | Clean line | 12–14.4W/m tape |
| Wide flat profile | High | Wider light line | Retail shelves, coves |
| Deep recessed profile | Medium-high | Flush finish | Ceilings, joinery, walls |
| Finned heat-sink profile | Very high | Technical look | 20–30W/m tape, long duty cycle |
| Suspended linear profile | High | Architectural line | Offices, counters, showrooms |
4. How much aluminum mass and surface area do you need?
There is no single channel size that works for every project because thermal capacity must be matched to wattage, airflow, ambient temperature, operating time, and the expected rate of LED lumen depreciation. Applying practical solutions to LED strip heat issues begins with matching channel mass and exposed surface area to the tape wattage, ambient temperature, airflow, and operating schedule. As a practical rule, tapes above 14.4W/m should not rely on narrow channels. Tapes above 20W/m need wider aluminum, thicker walls, fins, or direct contact with a metal mounting base.
Three field examples make this clear. In a restaurant bar shelf, a 19.2W/m tape inside a narrow channel caused adhesive failure near the power feed. In an office cove, the same tape worked well in a 25mm wide aluminum body with open airflow. In a display cabinet, a 24W/m tape required a custom extrusion because the cabinet back panel trapped heat.
Pro Tip from VST Technical Team: “If the channel feels too hot to keep your finger on after one hour, check the tape wattage, airflow, and mounting surface before approving the batch.”
| Project condition | Recommended channel direction | Reason |
|---|---|---|
| 14.4W/m in open air | Standard aluminum profile | Moderate heat load |
| 19.2W/m in cove | Wide profile, open top cavity | Better surface area |
| 24W/m in cabinet | Finned or custom heat-sink profile | Low airflow needs more metal |
| High ambient above 35°C | Oversized aluminum body | Less temperature headroom |
| 24/7 operation | Conservative thermal design | Reduces lumen depreciation |
5. Do diffusers and covers affect LED tape cooling?
The selected LED channel diffuser affects both optical output and thermal behavior by changing light transmission, internal air volume, and the amount of heat retained around the tape. A milky PC cover softens dotting and improves visual comfort, but it also holds warm air inside the channel. A clear cover has less light loss but may show LED points. A tall diffuser can create more internal air volume, while a sealed cover can trap heat if the profile has no ventilation.
But there’s a catch. Many buyers select diffusers only by appearance. That can create two losses at once: less light output through the cover and higher LED temperature inside the channel. For long corridors or retail shelves, this can lead to more power consumption for the same visual brightness.
In our lab tests using integrating spheres, a milky diffuser often reduces measured lumen output. The exact drop depends on material and thickness, but 10–35% is common. Thermal camera checks then show whether the trapped heat is acceptable for the selected tape.
| Cover type | Light loss range | Heat effect | Recommended use |
|---|---|---|---|
| No cover | 0% | Best cooling | Hidden coves, service areas |
| Clear PC cover | 5–12% | Low heat trap | Display shelves needing output |
| Frosted cover | 10–25% | Medium heat trap | Visible architectural lines |
| Opal/milky cover | 20–35% | Higher heat trap | Dot-free premium appearance |
| Sealed waterproof cover | 15–35% | Highest heat trap | Wet zones only with proper sizing |
6. How does the mounting surface change cooling performance?
The mounting surface can help or hurt the channel. Aluminum mounted to steel, aluminum sheet, tile, concrete, or stone can reject heat better than aluminum mounted to MDF, PVC, foam board, or painted wood. Wood and plastic act as thermal insulators, so heat stays in the channel.
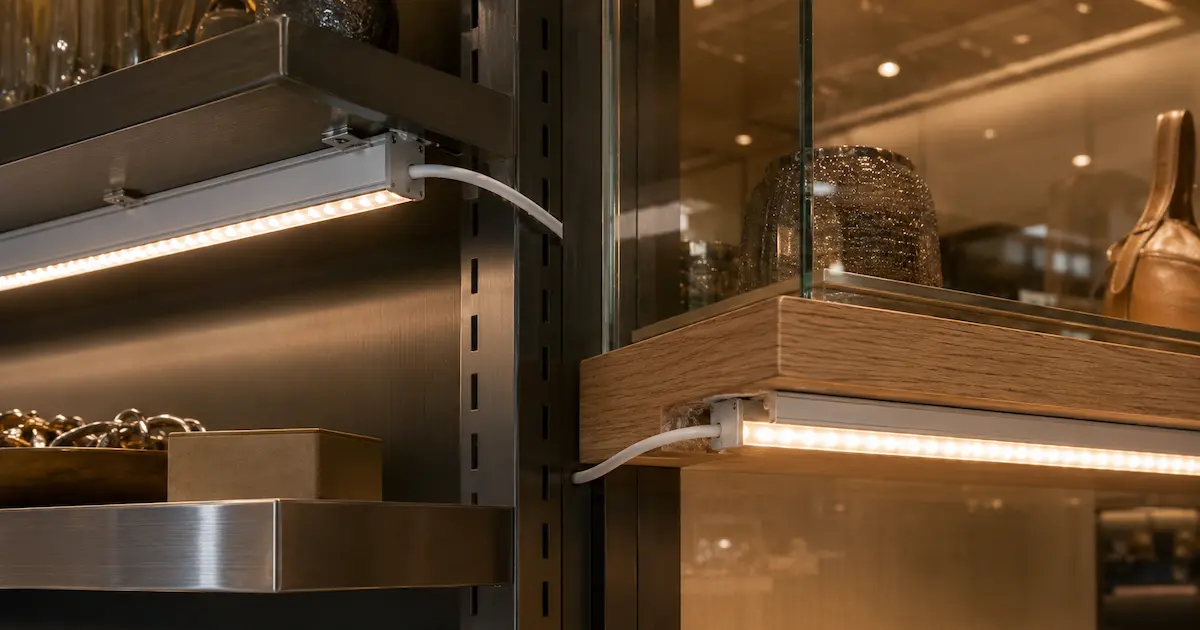
We once saw a project fail because a strong 24V tape was installed in a neat aluminum channel on a wooden display shelf. The channel itself was decent, but the shelf trapped heat below and glass trapped heat above. After several weeks, the tape dimmed near the feed side. The repair required lower wattage tape and a wider profile.
For contractors, this affects labor and warranty. A bad mounting surface may turn a good product into a callback.
| Mounting surface | Thermal support | Risk level | Practical advice |
|---|---|---|---|
| Aluminum panel | Excellent | Low | Best for display and machine lighting |
| Steel frame | Strong | Low | Use proper isolation where needed |
| Concrete or tile | Good | Low-medium | Use solid contact and suitable fasteners |
| Painted gypsum | Fair | Medium | Use wider profiles for high wattage |
| Wood or MDF | Poor | High | Oversize the channel or lower wattage |
| Plastic board | Poor | High | Avoid high-power tapes unless tested |
7. How do voltage and LED strip design affect channel choice?
Voltage does not directly cool the tape, but it affects current, voltage drop, copper loss, and heat distribution. For long runs, 24V tapes usually perform better than 12V tapes because current is lower for the same wattage. Lower current reduces loss along the copper PCB and keeps brightness more even.
When we tested this against a standard 12V strip, the 24V version showed less voltage drop over longer runs under the same power class. That means less uneven brightness and less local heating near feed points. For 5m decorative runs, either may work. For commercial coves, counters, and shelves, 24V is usually the safer path.
LED package type matters too. COB tapes spread light continuously but still need cooling. High-density SMD tapes may look smooth under a diffuser, yet they create many heat points along the PCB.
| Item | 12V LED tape | 24V LED tape |
|---|---|---|
| Current at same wattage | Higher | Lower |
| Voltage drop risk | Higher | Lower |
| Long run suitability | Limited | Better |
| Heat near feed points | More likely | Less likely |
| Driver availability | Wide | Wide |
| Best use | Short furniture runs | Commercial linear projects |
8. Which channels work best for indoor architectural projects?
Indoor architectural projects need a balance between cooling, appearance, installation speed, and maintenance access. For hotel coves, offices, retail shelves, and residential-style commercial spaces, wide surface-mounted aluminum profiles are often the most practical. Recessed profiles look cleaner, but the cavity must allow heat to escape.
In a luxury hotel lobby, the client may demand dot-free light. That pushes the project toward COB tape or opal covers. The channel must then compensate for cover loss and extra trapped heat. In a supermarket shelf, output and serviceability may matter more than a perfect line, so a clear or frosted cover on a wider profile may give better ROI.
We often see installers struggle with pre-soldered leads, corner wiring, and tight joinery. A channel with enough internal wiring space can save real labor. It also reduces solder stress at tape joints.
| Indoor application | Preferred channel | Key reason |
|---|---|---|
| Hotel cove | Wide surface or deep recessed profile | Heat control plus clean look |
| Retail shelf | Wide flat profile | Bright output and service access |
| Office linear light | Suspended or recessed linear profile | Professional finish |
| Display cabinet | Wide profile with clear cover | Output with manageable heat |
| Stair detail | Standard recessed profile | Moderate power, protected tape |
9. Which channels are safer for outdoor or wet locations?
Outdoor and wet locations add moisture, UV exposure, dust, and high ambient temperature. Waterproof LED tapes with silicone sleeves or extrusion add thermal resistance, so they usually need larger aluminum channels than indoor bare PCB tapes. The internationally recognized degrees of protection provided by enclosures classify resistance to dust and water ingress, but an IP rating does not by itself solve heat buildup inside a sealed LED channel.
For facade lighting, signage, canopy edges, and patio lines, use anodized aluminum profiles with drainage planning and UV-resistant covers. Avoid sealing both ends without thinking about condensation. In tropical markets or hot regions, ambient temperature can sit above 35°C at night. That leaves less cooling headroom.
Safety also affects compliance. CE, RoHS, UL, or CB project needs may require compatible drivers, wire sizes, insulation, and mounting methods. The channel is only one part of the system.
| Outdoor factor | Cooling impact | Channel recommendation |
|---|---|---|
| Silicone-coated tape | Higher thermal resistance | Use wider aluminum body |
| Direct sun before operation | Higher starting temperature | Avoid dark enclosed profiles |
| Rain and condensation | Corrosion and short risk | Use anodized profile and drainage |
| Dust buildup | Lower heat release | Plan cleaning access |
| High ambient temperature | Reduced thermal margin | Use lower wattage or larger heat sink |
10. How should you specify, install, and test cooling channels before bulk orders?
A complete LED profile and driver calculation should begin with wattage per meter, system voltage, run length, driver margin, ambient temperature, duty cycle, diffuser type, mounting surface, and IP rating. Then select a channel with enough metal and airflow. Do not wait until site installation to find out the profile is too small.
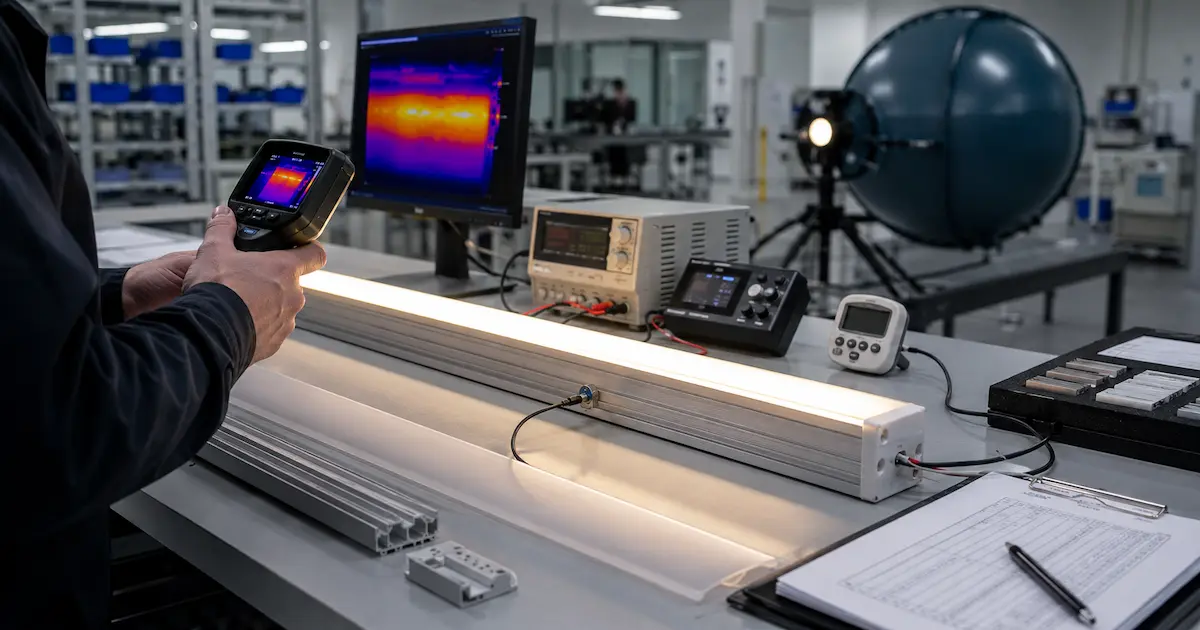
From our manufacturing floor perspective, a good sample approval process includes thermal measurement after at least one hour of operation, lumen reading before and after aging, adhesive check, and diffuser inspection. For large projects, ask for production photos, batch labels, and test data. This reduces sourcing anxiety and protects project schedules.
Here is a quick checklist you can use before purchase approval.
| Check item | Pass sign | Failure sign | Fix |
|---|---|---|---|
| Surface temperature | Stable after 60–90 minutes | Keeps rising | Larger channel or lower wattage |
| Tape adhesion | No peeling | Edges lifting | Clean surface, use clips, reduce heat |
| Brightness uniformity | Even along run | Dim far end | Use 24V, feed both ends, shorter runs |
| Diffuser condition | No yellowing | Yellow or warped cover | Change cover material or lower heat |
| Driver loading | 80–90% rated load | Driver too hot | Use larger driver or split circuits |
| Wiring space | No strain | Tight bends at solder pads | Use wider channel or custom leads |
Final Recommendation
A high-power LED strip channel should be selected according to thermal load, aluminum mass, exposed surface area, mounting substrate, diffuser type, and duty cycle—not appearance alone. Thick aluminum, wide contact, exposed surface area, and good mounting surfaces reduce failures and protect project margin. Covers, waterproof sleeves, voltage drop, and duty cycle all change the result. If you are unsure about the wattage or voltage drop calculation for your project, send our engineering team your layout. We’ll check the thermal path and wiring plan manually.
Conclusion
Choosing the right cooling channel comes down to matching the channel’s thermal capacity to the tape’s heat output and the installation environment. Prioritize aluminum mass, contact area, and exposed surface (or fins) for tapes above 14.4W/m, and always consider mounting substrate, diffuser type, ambient temperature, and duty cycle. Test a full assembly—tape, diffuser, and channel—under expected operating conditions before bulk purchase. When in doubt, oversize the channel or lower the tape wattage to protect lumen maintenance and warranty obligations. Proper specification and sample testing save time, cost, and callbacks.
FAQ
Q1: What channel gives the best cooling for high-power LED tapes?
A wide, thick aluminum channel with good surface area gives the strongest practical cooling. Finned heat-sink profiles work best for 20W/m to 30W/m tapes, especially where airflow is limited or daily operating hours are long.
Q2: Can I use a slim LED profile for 24W/m tape?
Usually no. A slim decorative profile may work for a short demo, but it often overheats during long operation. Use a wider or finned profile, or reduce the tape wattage.
Q3: Does a diffuser make LED tape hotter?
Yes, a diffuser can trap warm air inside the profile. Milky and sealed covers create more heat buildup than clear covers. Test the full assembly, not just the tape.
Q4: Is 24V LED tape cooler than 12V LED tape?
At the same wattage, 24V tape usually has lower current and less voltage drop. This can reduce uneven heating along longer runs, but the tape still needs a proper aluminum channel.
Q5: How hot is too hot for an LED tape channel?
If the channel is too hot to touch comfortably after one hour, treat it as a warning. Measure surface temperature, check the tape data sheet, and consider a larger profile or lower wattage.
