
Corner LED channels are aluminum profiles designed to hold LED strip lights at angled joints, cabinet corners, ceiling edges, wall intersections, shelves, and display structures. They improve light direction, reduce glare, protect strips, and create cleaner architectural lines in commercial, retail, hospitality, and residential projects. Architectural Lighting Inspiration: Using Corner LED Channels to Improve Spaces.
Many projects fail at the detail level. The LED strip may be bright enough, but visible dots, hot spots, weak adhesive, poor heat control, and messy corner joints lead to callbacks. Those callbacks cost margin and damage trust with architects, contractors, and end users.
Corner LED channels solve these issues by giving the strip a stable mounting surface, a controlled beam angle, and a finished appearance. From our manufacturing floor perspective, a good aluminum profile is not just an accessory. It is part of the lighting system, especially in long runs, tight millwork, and public spaces where appearance and service life matter.
1. How do corner LED channels change architectural lighting results?
Corner LED channels change a project by turning a flexible strip into a controlled linear luminaire. That sounds simple, but the field result can be dramatic. A bare LED strip in a ceiling cove may work for a sample board. In a hotel corridor, the same strip can show dots, sagging tape, color shifts from heat, and uneven wall grazing.
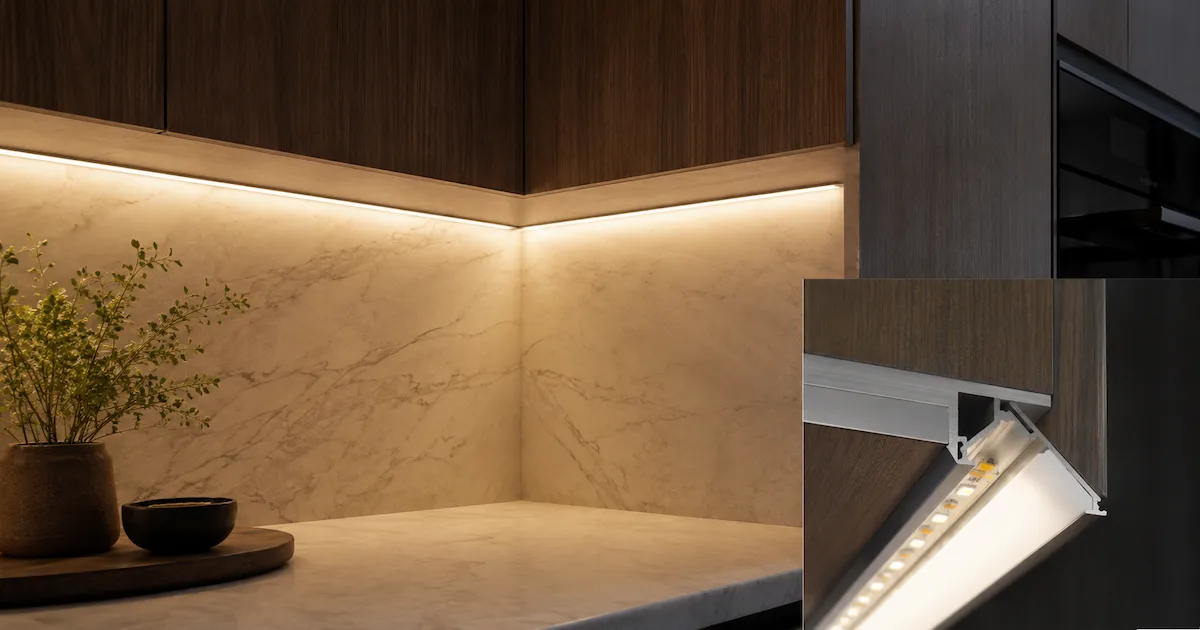
Here’s the deal: corners are where many lighting details look unfinished. A 45-degree aluminum channel can redirect light across a surface without exposing the LED package. In a retail shelf, it can wash products evenly from the front corner. In a kitchen cabinet, it can send light toward the worktop instead of into the user’s eyes. In a staircase handrail, it can guide foot traffic while keeping hardware hidden.
We often see installers struggle with adhesive-only LED strips on dusty plaster, raw timber, or powder-coated metal. The channel provides mechanical fixing through clips or screws. It also spreads heat away from the PCB.
| Architectural Issue | Bare LED Strip Result | Corner LED Channel Result |
|---|---|---|
| Visible LEDs | Dotted line, poor finish | Softer linear output with diffuser |
| Corner mounting | Tape failure risk | Secure clips or screws |
| Heat buildup | Faster lumen drop | Better thermal path |
| Beam direction | Light spills randomly | Angled, controlled direction |
| Maintenance | Hard to replace cleanly | Cover can be removed for service |
2. Where do corner LED channels work best in real projects?
Corner LED channels work best where two surfaces meet and the designer needs a clean diagonal beam. Typical locations include wall-to-ceiling coves, cabinet interiors, display shelves, wardrobe rails, reception counters, stair edges, bar backs, bathroom niches, and hotel headboards.
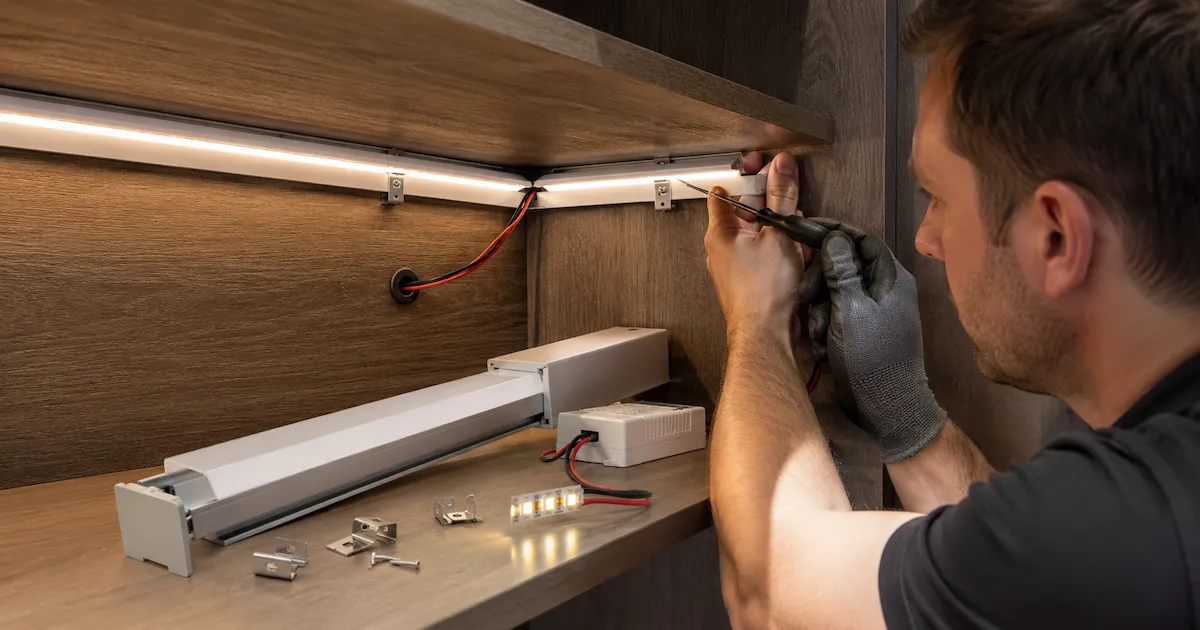
In a luxury hotel lobby, corner channels can sit inside timber reveals and wash stone panels without exposing light sources. In a pharmacy shelf system, they can sit at the front vertical corner and direct light across product labels. In a residential wardrobe, a low-power strip inside a small LED strip corner profile can make garments visible without bulky fixtures.
But there’s a catch. Not every corner needs the same output. A museum display may need low glare and high CRI. A supermarket shelf may need higher lumen density and quick replacement. An outdoor façade detail may need weather protection, UV-stable diffuser material, and drainage planning.
The table below gives practical starting points.
| Application Area | Suggested CCT | Suggested CRI | Typical Power | Design Goal |
|---|---|---|---|---|
| Hotel corridor cove | 2700K–3000K | 90+ | 8–12 W/m | Warm, calm glow |
| Retail shelving | 3500K–4000K | 80–90 | 10–14 W/m | Clear product visibility |
| Wardrobe lighting | 3000K–4000K | 80+ | 6–10 W/m | Soft task light |
| Stair guidance | 2700K–3500K | 80+ | 4–8 W/m | Safe low-level guidance |
| Display cabinet | 3000K–5000K | 90+ | 8–15 W/m | Accurate color rendering |
Before choosing the profile angle, diffuser, and strip specification, this neutral lighting-design video gives readers a useful visual overview of how light placement, temperature, and control affect the final space.
3. Which corner profile angle and size should you specify?
Most corner LED channels are built around 30-degree, 45-degree, or 60-degree light direction. The 45-degree LED profile is the most common because it balances wall wash and direct task lighting. Yet profile size matters just as much as angle.
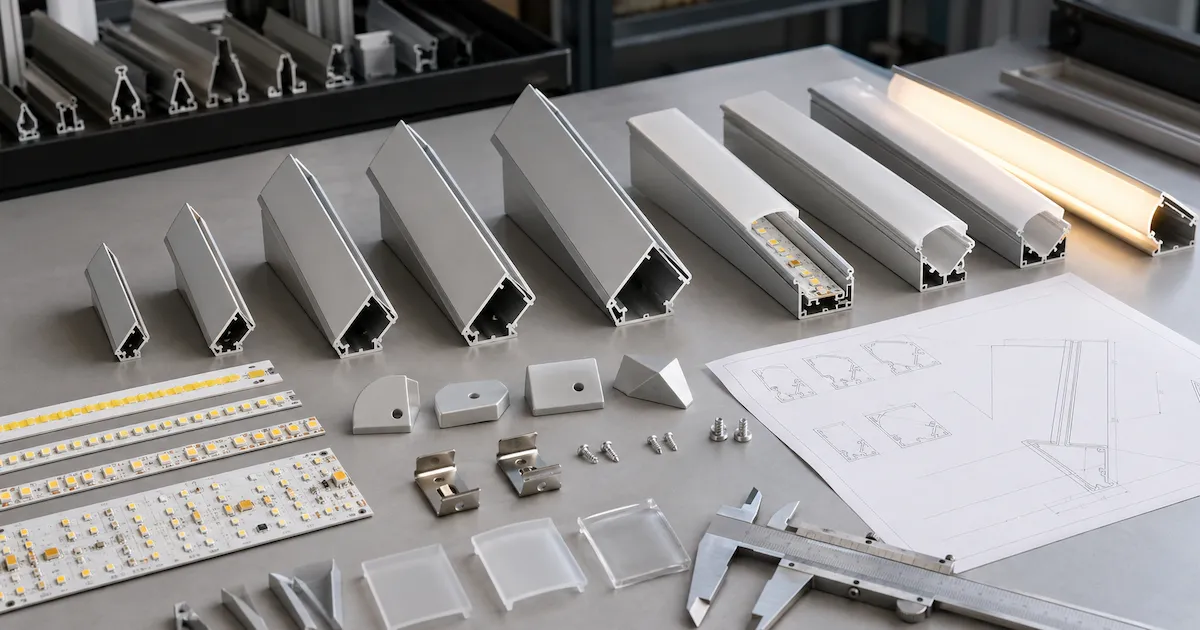
A slim profile looks elegant in furniture, but it may not fit high-density COB strips or wider 12 mm PCBs. A deeper profile helps blend LED dots because the diffuser sits farther from the chips. This is especially useful with SMD strips at 60 LEDs per meter. For dot-free output, COB strip or high-density 120–240 LEDs per meter often performs better.
In our lab tests using integrating spheres, we measured how diffuser thickness and profile depth affect delivered lumens. A milky diffuser may reduce output by 15% to 35%, depending on material and opacity. That loss is not a defect. It is the price of smoother light.
Pro Tip from the VST Technical Team: “Choose the channel after choosing the strip width, wattage, and visual requirement. Many project delays start when the profile is selected from appearance alone.”
| Profile Feature | Small Corner Channel | Medium Corner Channel | Large Corner Channel |
|---|---|---|---|
| PCB width fit | 5–8 mm | 8–12 mm | 10–15 mm |
| Best use | Furniture, shelves | Cabinets, coves | Commercial millwork |
| Dot reduction | Limited | Good | Better |
| Heat handling | Low to medium | Medium | Higher |
| Visual impact | Very discreet | Balanced | Stronger architectural line |
4. What LED strip specs matter inside corner LED channels?
The profile is only half the system. The LED strip determines brightness, color quality, dimming behavior, and long-term reliability. For corner LED channels, I usually review five strip specs before approving a sample: voltage, wattage per meter, PCB width, LED density, and CRI.
Voltage affects long runs. Wattage affects heat. PCB width affects fit. LED density affects dot visibility. The color rendering index affects how materials and products appear. Ignore one of these, and a neat detail can become a service problem.
A field example: we once saw a retail shelf project use a narrow corner channel with a high-power strip rated above 18 W/m. The light looked strong during commissioning. After several months, sections became dim because heat had nowhere to go. The contractor had to replace both strip and profile.
When we tested this against a standard 12V strip, a 24V strip showed less voltage drop across a longer run at the same power level. For many commercial runs over 5 meters, 24V is the safer choice.
| Specification | Recommended Range | Why It Matters |
|---|---|---|
| Voltage | 24V for longer runs | Reduces current and voltage drop |
| Power | 6–14 W/m for many channels | Controls heat and driver load |
| PCB width | Match channel inner width | Prevents forced fitting |
| LED density | 120 LED/m or COB for smooth lines | Reduces dotting |
| CRI | 80+ general, 90+ premium areas | Improves material and product color |
5. Should you choose 12V or 24V for corner LED channel projects?
For short furniture pieces, 12V can work well. For longer architectural runs, 24V is usually more practical. The reason is current. At the same wattage, a 24V strip draws half the current of a 12V strip. Lower current reduces voltage drop, cable heating, and brightness loss at the far end.
What’s the real story? Voltage drop is one of the most common hidden problems in linear lighting. A 10-meter run might look fine near the driver, then appear warmer and dimmer near the far end. In hotel corridors or retail lines, that difference is easy to see.
Use parallel wiring for longer runs. Feed power from both ends where needed. Keep driver loading around 80% of rated capacity for cooler operation and service margin. If dimming is involved, match the driver to the control system, such as TRIAC, 0–10V, DALI, DMX, or PWM.
| Item | 12V LED Strip | 24V LED Strip |
|---|---|---|
| Best run length | Short sections | Medium to long sections |
| Current at same wattage | Higher | Lower |
| Voltage drop risk | Higher | Lower |
| Cutting interval | Shorter, more flexible | Longer, less flexible |
| Common use | Small cabinets, signage | Coving, shelves, commercial lines |
| Driver availability | Very common | Very common |
6. How do diffusers affect glare, dotting, and usable light?
Diffusers shape the final visual quality of corner LED channels. Clear covers transmit more light but show LED points. Frosted covers reduce dotting while keeping good output. Milky covers give the smoothest line, but they reduce delivered lumens more than clear or frosted versions.
This is where it gets interesting. Many buyers compare strip lumen data only, then wonder why the installed line is darker. The diffuser, channel depth, and surface reflectance all change the final result. A black interior shelf absorbs light. A white plaster cove reflects more light. A brushed metal counter can create glare even with a diffuser.
For office shelving, frosted diffusers often balance brightness and comfort. For decorative coves, choosing the best diffuser options for soft light usually makes the line look cleaner.. For task lighting under cabinets, a semi-frosted cover with a higher CRI strip may give better worktop visibility.
In our aging racks, we also review diffuser yellowing risk under heat. Low-grade plastic can change color faster, especially in warm channels or near windows. For long service life, PC diffusers with UV resistance are safer for demanding projects.
| Diffuser Type | Light Transmission | Dot Control | Best Use | Trade-Off |
|---|---|---|---|---|
| Clear | High | Low | Hidden coves, high output needs | Visible LED points |
| Frosted | Medium-high | Medium | Shelves, task areas | Slight output loss |
| Milky | Medium | High | Decorative lines, visible profiles | Higher lumen loss |
| Black lens | Low-medium | Medium | Dark interiors, premium finish | Lower brightness |
7. How should installers mount corner LED channels for fewer callbacks?
Good installation starts before the installer opens the carton. Confirm channel length, cutting plan, cable exit direction, screw locations, end caps, and driver access. Small mistakes at this stage create large delays on-site.
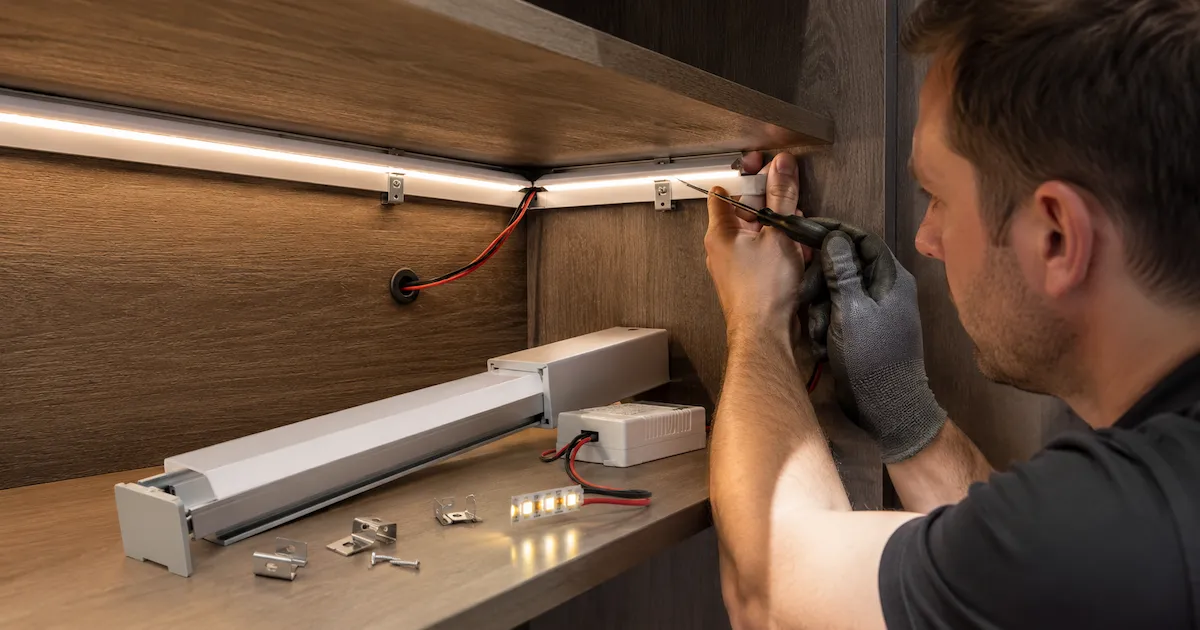
We often see installers struggle with corners where the channel meets cabinet hardware, hinges, glass clips, or stone returns. A dry fit prevents this. When you install corner LED channels, cut aluminum with a fine-tooth saw, remove burrs, clean the surface, then mount clips or screws at regular intervals. Avoid relying only on adhesive tape for permanent commercial work.
Cable exits deserve special care. A clean 3–5 mm drilled exit can protect wires from sharp aluminum edges. Use grommets where vibration or movement may occur. For furniture makers, pre-soldered leads can save real labor because installers don’t need to solder in tight spaces.
The checklist below is a practical site reference.
| Installation Step | Field Check | Risk If Skipped |
|---|---|---|
| Dry fit profile | Check length and obstructions | Recutting, visible gaps |
| Clean mounting surface | Remove dust, oil, residue | Loose clips or tape failure |
| Deburr cut ends | Smooth sharp aluminum | Wire damage, injury risk |
| Test strip before fitting diffuser | Confirm polarity and dimming | Rework after assembly |
| Leave driver access | Plan service location | Costly ceiling or cabinet opening |
| Run burn-in test | Operate before handover | Missed connection faults |
8. What heat, material, and IP rating details affect service life?
Heat is the quiet killer in LED strip systems. Corner LED channels help by spreading heat through aluminum, but they are not magic. A high-wattage strip in a tiny sealed profile can still run hot. Heat raises junction temperature, which reduces lumen output and can shift color over time.
From our manufacturing floor perspective, wall thickness, alloy quality, surface finish, and diffuser fit all affect the final product. A heavier aluminum profile can provide the best heat dissipation for LEDs compared with a very thin one, but the real design must match strip wattage and ambient temperature.
For dry indoor furniture, IP20 strips are easy to use and service. In bathrooms, kitchens, or outdoor coves, IP65 or IP67 may be needed. Yet waterproof coating can trap heat. That means you may need lower wattage or a larger channel.
Common Myth: Higher wattage always means better brightness. Reality: brightness depends on lumen efficiency, thermal control, diffuser loss, and target surface distance. A 10 W/m strip with 120 lm/W can outperform a 14 W/m strip with poor heat handling.
| Condition | Recommended Choice | Reason |
|---|---|---|
| Dry cabinet interior | IP20 strip in aluminum channel | Better heat release, easy service |
| Kitchen splash risk | IP65 coated strip | Protection from moisture and cleaning |
| Outdoor façade recess | IP67 strip plus sealed wiring | Weather resistance |
| High ambient temperature | Lower wattage or larger profile | Controls thermal stress |
| Long daily operating hours | Quality PCB and driver margin | Reduces early failure risk |
9. What common failures should buyers prevent during specification?
Most failures are predictable. They come from mismatched components, weak power design, rushed installation, or unclear specifications. If you supply lighting systems to contractors or local project clients, preventing these issues protects your margin.
A common field example is color mismatch between batches. In a long corridor, one replacement section can look slightly green or pink compared with the original. This leads to client complaints even if both strips are labeled 3000K. Use clear binning requirements and record batch data for future orders.
Another example is driver noise or flicker in dimming projects. The strip may be fine, but the dimmer and driver are not compatible. Always test the actual driver, dimmer, controller, and strip combination before mass installation.
Here’s a quick troubleshooting table for site teams.
| Failure Mode | Likely Cause | Practical Fix |
|---|---|---|
| Far end is dim | Voltage drop | Use 24V, feed both ends, shorten run |
| Dots visible | Low LED density or shallow channel | Use COB, deeper profile, milky diffuser |
| Strip falls down | Adhesive only, dusty surface | Use clips, screws, cleaned surface |
| Flicker when dimmed | Driver/control mismatch | Test compatible dimming protocol |
| Color varies by section | Mixed batches or poor binning | Specify bin tolerance and batch tracking |
| Diffuser yellows | Low-grade plastic or excess heat | Use better PC diffuser and lower wattage |
10. How can procurement teams specify corner LED channels with less risk?
A clear specification saves time for everyone: buyer, factory, installer, and end client. The profile drawing should include outer size, inner PCB width, length tolerance, finish, diffuser type, end caps, mounting clips, packaging, and any pre-processing such as drilling or custom cutting.
For LED strips, specify voltage, wattage, CCT, CRI, LED density, PCB width, IP rating, binning tolerance, reel length, solder lead length, connector type, and dimming method. For drivers, specify input voltage, output voltage, wattage margin, dimming protocol, power factor, certificates such as RoHS, and installation environment.
A procurement field example: a distributor ordered corner channels and strips from separate suppliers. The strip was 12 mm wide, while the channel inner base allowed only 10 mm. The shipment arrived on time, but the project stalled. A single compatibility check would have prevented the delay.
Use samples before bulk orders. Request drawings, test reports, thermal data where available, and production photos for custom runs. Clear documentation reduces disputes and speeds local approval.
| Specification Item | What to State | Why It Protects the Project |
|---|---|---|
| Channel size | Outer and inner dimensions | Confirms strip fit and visual line |
| Finish | Anodized, white, black, custom color | Matches architectural surfaces |
| Diffuser | Clear, frosted, milky, black | Controls output and glare |
| Strip data | Voltage, wattage, CCT, CRI, density | Matches performance target |
| Wiring | Lead length, exit side, connector | Reduces on-site labor |
| Certificates | CE, RoHS, UL, CB where needed | Supports local compliance |
Conclusion
Corner LED channels improve the look, reliability, and serviceability of architectural LED strip lighting. The best results come from matching profile size, strip wattage, diffuser type, voltage, driver, and installation method before the project reaches site. Treat the channel as part of the lighting system, not a decorative cover. If you are unsure about voltage drop, profile fit, or heat limits for a project, send your drawings to our engineering team. We’ll review the details manually and give practical feedback.
FAQ
Q1: What are corner LED channels?
LED strip corner profiles are angled aluminum profiles that hold LED strips at corners or surface intersections. They guide light, protect the strip, support heat dissipation, and create a finished linear lighting detail.
Q2: Are corner LED channels better than mounting LED strips directly?
Yes, for most professional installations. Direct mounting is faster, but channels give better mechanical support, cleaner appearance, safer cable handling, and improved thermal control.
Q3: Can I use COB LED strips inside corner LED channels?
Yes. COB strips are often a strong choice because they create a continuous light line with less dotting, especially under frosted or milky diffusers.
Q4: What voltage is best for long corner LED channel runs?
For longer runs, 24V is usually better than 12V because it reduces current and voltage drop. For very long runs, use parallel wiring and feed power from both ends.
Q5: Do corner LED channels need waterproof LED strips?
Only in wet, damp, or cleaning-prone areas. Dry indoor applications often work better with IP20 strips because they release heat more easily and are simpler to service.
