
Fixing Emergency light battery issues can leave you in the dark when you need illumination the most. This guide will help you understand how to fix emergency light battery problems, ensuring your safety during power outages. By addressing these issues promptly, you can maintain reliable lighting and avoid being unprepared during an emergency.

Fixing emergency light battery issues involves identifying the problem, replacing faulty batteries, and performing regular maintenance.
Here’s a Quick Overview To Help You Get Started:
- Identify the Problem: Check for common signs of battery failure, such as dimming light output, shorter emergency duration, or failure to light up during a test. Understanding these signs will help you pinpoint the exact issue.
- Gather Necessary Tools: Ensure you have the essential tools for the job, including a screwdriver, voltage tester, replacement battery, and gloves. Having the right tools will make the process smoother and safer.
- Replace the Faulty Battery: Turn off the power to the emergency light before starting. Open the light casing using a screwdriver and carefully disconnect the faulty battery. Install the new battery, ensuring all connections are secure.
- Perform Regular Maintenance: Test your emergency lights monthly to ensure they are working correctly. Replace the batteries every 3-5 years, depending on the type, to maintain optimal performance.
- Troubleshoot Common Issues: If your emergency light doesn’t work after replacing the battery, check for proper connections and ensure the battery is compatible. Use a voltage tester to verify the battery charge and inspect the light fixture for any damage.
By following these steps, you can effectively manage and resolve emergency light battery issues, ensuring your lights are always ready to provide safety during power outages.
Keep reading for a detailed guide on fixing emergency light battery issues, including identifying common problems, replacing batteries, and troubleshooting tips to keep your emergency lights functioning optimally. This comprehensive guide will equip you with the knowledge and skills needed to maintain your emergency lighting system effectively.
Identifying Common Emergency Light Battery Issues
Understanding the common issues associated with emergency light batteries can help you diagnose and fix problems quickly, ensuring your lights are always ready when needed.
Signs of Battery Failure
Identifying signs of battery failure early can prevent complete lighting failure during emergencies. Here are the common indicators that your emergency light battery may need attention:
- Dimming Light Output: If the light output is noticeably dimmer than usual, this is a clear sign that the battery is losing its capacity and cannot provide sufficient power.
- Shorter Emergency Duration: Emergency lights are designed to last for several hours during a power outage. If your light’s duration is significantly shorter than it used to be, the battery is likely failing.
- Failure to Light Up During a Test: Most emergency lights have a test button. If pressing this button doesn’t activate the light or if the light flickers, it indicates a problem with the battery.

Causes of Battery Issues
Several factors can contribute to battery problems in emergency lights. Understanding these causes can help you prevent issues and extend the life of your batteries.
- Age of the Battery: Over time, all batteries degrade and lose their ability to hold a charge. Ni-Cd, Ni-MH, and Li-ion batteries each have different lifespans, but generally, batteries should be replaced every 3-5 years.
- Poor Maintenance: Regular maintenance is crucial for the longevity of your emergency light battery. Failure to perform regular checks and maintenance can lead to premature battery failure.
- Incorrect Battery Type: Using the wrong type of battery for your emergency light can cause compatibility issues and reduce performance. Always ensure you are using the correct battery type as specified in the light’s manual.
By recognizing these signs and understanding the underlying causes, you can take proactive steps to maintain your emergency lighting system and ensure it functions properly when you need it most.
Step-by-Step Guide to Fixing Emergency Light Battery Issues
Fixing emergency light battery issues can be straightforward if you follow these detailed steps. Ensuring your emergency lights are operational can provide safety and peace of mind during power outages.
Identifying the Problem
Before you start fixing the battery issue, it’s essential to identify the exact problem. Here’s how you can do it:
- Check for Signs of Battery Failure: Look for indicators such as dimming light output, shorter emergency duration, and failure to light up during a test. These signs suggest that the battery may be failing.
- Assess the Age and Condition of the Battery: Determine how old the battery is. Batteries typically need replacement every 3-5 years. If the battery is within this age range, it might be the cause of the issue.
- Verify the Battery Type: Ensure the battery type matches the specifications of your emergency light. Using the wrong type of battery can cause compatibility issues and affect performance.
Gathering Tools and Safety Precautions
Having the right tools and following safety precautions is crucial for a successful and safe battery replacement.
- Essential Tools:
- Screwdriver: Necessary for opening the light casing. Ensure you have the correct type (Phillips or flat-head) based on the screws used in your emergency light.
- Voltage Tester: Used to confirm that the power is off before you start working on the emergency light.
- Replacement Battery: Ensure the replacement battery matches the specifications of the old one.
- Gloves: Protect your hands from any sharp edges and provide better grip while handling components.
- Safety Tips:
- Turn Off Power: Always turn off the power supply to the emergency light before beginning any work to prevent electrical shocks.
- Wear Gloves: Wearing gloves protects your hands from sharp edges and improves grip.
- Use a Voltage Tester: Double-check that the power is off using a voltage tester. This step is crucial for your safety.
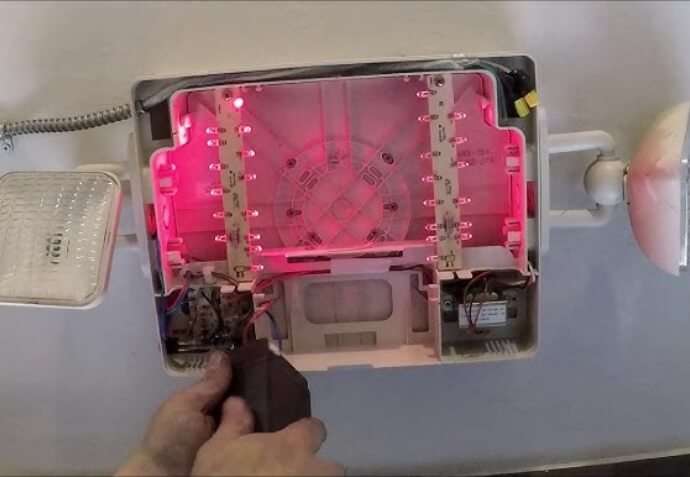
Removing the Faulty Battery
Once you’ve gathered your tools and ensured safety, you can proceed to remove the faulty battery.
- Open the Casing:
- Use the screwdriver to remove the screws holding the light casing.
- Carefully lift or slide the casing to expose the battery compartment. Be gentle to avoid damaging any internal components.
- Disconnect the Faulty Battery:
- Observe how the battery is connected to the emergency light. Note the wiring setup, as you will need to reconnect the new battery in the same manner.
- Carefully disconnect the wires from the faulty battery. This may involve unclipping connectors or unscrewing terminals.
Installing the New Battery
With the faulty battery removed, you can now install the new one. Follow these steps to ensure a secure and correct installation.
- Place the New Battery:
- Position the new battery in the holder, ensuring it fits snugly and securely.
- Make sure the battery is oriented correctly according to the polarity indicators (+ and -) on the battery and the holder.
- Connect the Wires:
- Reconnect the wires to the new battery, matching the setup of the old battery. Ensure all connections are secure and tight.
- If the old battery had clips, attach them to the new battery’s terminals. If it required screws, use the screwdriver to fasten the connectors.
Proper installation is critical to the functionality of your emergency light. Ensure all connections are firm and correctly placed.
Testing the Emergency Light
After installing the new battery, it’s essential to test the emergency light to ensure everything is working correctly.
- Turn the Power Back On:
- Once the new battery is installed and all connections are secure, replace the light casing and tighten the screws.
- Restore the power supply to the emergency light.
- Press the Test Button:
- Most emergency lights have a test button that allows you to check if the light is functioning correctly. Press this button to test the light.
- Observe the light to ensure it illuminates properly. If the light works, your DIY emergency light battery replacement is successful.
If the light doesn’t work, recheck the connections and ensure the battery is properly installed. Refer to the troubleshooting section if issues persist.
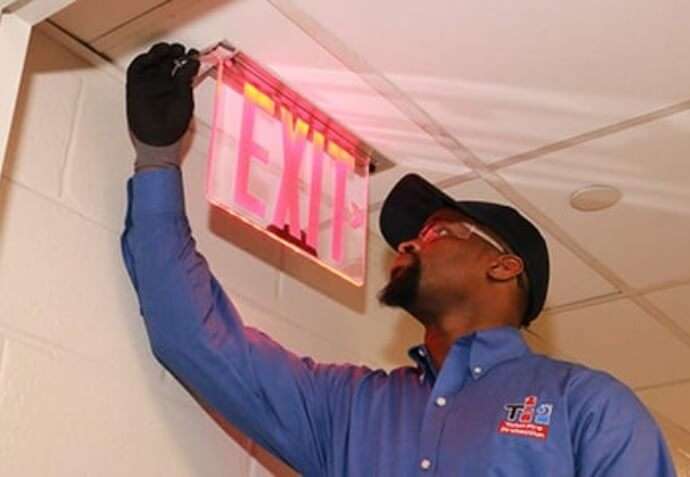
By following these detailed steps, you can confidently perform a DIY emergency light battery replacement, ensuring your lights are always ready to provide safety during power outages. Regular maintenance and proper battery handling are key to the longevity and reliability of your emergency lighting system.
Choosing the Right Battery for Your Emergency Light
Selecting the right battery is crucial for ensuring the reliability and longevity of your emergency light. Here are the common types of batteries used in emergency lights and where you can buy them:
Types of Batteries:
Ni-Cd (Nickel-Cadmium): Nickel-Cadmium batteries are known for their durability and reliability. They can withstand numerous charge and discharge cycles, making them a popular choice for emergency lights. However, they have a memory effect, which can reduce their capacity if not fully discharged before recharging.
- Advantages: Durable, reliable, capable of many charge cycles.
- Disadvantages: Memory effect, contains toxic cadmium which requires proper disposal.
Ni-MH (Nickel-Metal Hydride): Nickel-Metal Hydride batteries offer a longer life and higher capacity compared to Ni-Cd batteries. They are less prone to the memory effect, making them more efficient for emergency lighting purposes.
- Advantages: Longer life, higher capacity, less affected by memory effect, more environmentally friendly.
- Disadvantages: Higher self-discharge rate compared to Ni-Cd batteries, slightly more expensive.
Li-ion (Lithium-Ion): Lithium-Ion batteries are the latest in battery technology and are increasingly popular in emergency lighting systems. They are lightweight, have no memory effect, and offer a long lifespan. Although more expensive, their superior performance and longevity often justify the cost.
- Advantages: Lightweight, no memory effect, long lifespan, high energy density.
- Disadvantages: More expensive, requires protection circuitry to maintain safe operation.

Where to Buy
There are several places where you can purchase batteries for your emergency light, each with its own advantages:
- Hardware Stores:
- Local hardware stores often carry a variety of batteries suitable for emergency lights. Brands like Duracell, Energizer, and Panasonic are commonly available.
- Pros: Immediate availability, ability to speak with knowledgeable staff.
- Cons: Limited selection compared to online retailers.
- Online Retailers:
- Platforms like Amazon, eBay, and specialized battery suppliers offer a wide range of batteries for emergency lights. You can find specific brands and types, often at competitive prices.
- Pros: Wide selection, customer reviews, and often lower prices.
- Cons: Requires waiting for shipping, risk of counterfeit products (ensure you buy from reputable sellers).
- Specialty Stores:
- Stores specializing in emergency lighting systems often carry a wide range of batteries and other related components. These stores may provide better guidance on selecting the right battery for your specific model.
- Pros: Expert advice, high-quality products.
- Cons: Can be more expensive, limited physical locations.
- Direct from Manufacturers:
- Some battery manufacturers sell directly to consumers through their websites. This can ensure you are getting a genuine product with a warranty.
- Pros: Authentic products, warranty, and customer support.
- Cons: Potentially higher prices, shipping costs.
Regular Maintenance Tips
Proper maintenance of your emergency light ensures it functions effectively when needed. Regular maintenance and careful handling can significantly extend the life of your emergency light and its battery.
Testing and Replacing Batteries
Regular testing and timely replacement of batteries are crucial for maintaining your emergency lighting system. Here are some tips:
- Test Monthly:
- Regular testing ensures that your emergency light is functioning correctly. Most emergency lights have a test button that allows you to simulate a power outage. Press this button once a month to check if the light activates properly.
- Monthly testing helps identify any potential issues early, so you can address them before an actual emergency occurs.
- Replace Batteries Every 3-5 Years:
- Even if your emergency light seems to be working fine, the battery’s performance can degrade over time. Depending on the type of battery (Ni-Cd, Ni-MH, or Li-ion), it is recommended to replace the batteries every 3-5 years.
- Regularly replacing the batteries ensures that your emergency light will provide reliable illumination during a power outage.

Extending Battery Life
Proper handling and storage of your batteries can significantly extend their life. Here are some tips to maximize battery longevity:
- Store in a Cool, Dry Place:
- Heat and humidity can adversely affect battery life. Store your batteries in a cool, dry place to prevent degradation.
- Avoid storing batteries in places where they might be exposed to extreme temperatures or moisture, such as garages or attics.
- Avoid Overcharging:
- Overcharging can shorten the lifespan of your battery. Follow the manufacturer’s guidelines on charging times and practices.
- If your emergency light has an automatic charging feature, ensure it is functioning correctly. Some modern emergency lights come with built-in overcharge protection, but it’s always best to monitor the charging process.
By following these maintenance tips and handling your batteries with care, you can ensure that your emergency light is always ready to perform when needed. Regular testing and timely battery replacement are key to maintaining the reliability and effectiveness of your emergency lighting system.
Troubleshooting Common Issues
Even with proper maintenance, you might encounter issues with your emergency lights.
Here’s how to troubleshoot and fix common problems:
Common Problems and Solutions
- Dimming Light Output:
- Solution: Check all connections to ensure they are secure. Also, assess the battery life; if the battery is old, it may need replacing.
- Shorter Emergency Duration:
- Solution: If your emergency light does not last as long as it should during power outages, it’s likely time to replace the old batteries with new ones.
- Failure to Light Up:
- Solution: Verify that all connections are secure and correct. Use a voltage tester to check the battery’s charge. If the battery is dead, replace it with a new one.
Advanced Troubleshooting Tips
- Inspect the Light Fixture for Damage:
- Sometimes the issue might not be with the battery but with the light fixture itself. Check for any visible damage or wear and tear that might affect the operation.
- Reset the Light:
- Some emergency lights have a reset button or a specific procedure to reset the unit. Consult your light’s manual for instructions on how to perform a reset.
- Consult the Manual for Additional Guidance:
- Your emergency light’s manual can provide specific troubleshooting steps and guidance tailored to your particular model.
Safety Considerations
Handling batteries safely is crucial to prevent accidents and ensure the longevity of your emergency light system.
Here are some safety tips to keep in mind:
Handling Batteries Safely
- Dispose of Old Batteries According to Local Regulations:
- Batteries contain harmful chemicals that can be hazardous to the environment if not disposed of properly. Follow your local regulations for battery disposal, which might involve taking them to a recycling center or hazardous waste facility.
- Avoid Touching Battery Terminals Directly:
- When handling batteries, avoid touching the terminals directly to prevent short circuits or electric shocks. Use gloves and handle the batteries by the body, not the terminals.

Ensuring Light Readiness
To ensure your emergency lights are always ready to use, incorporate the following practices into your maintenance routine:
- Regularly Check and Test Your Emergency Lights:
- Consistent testing and visual inspections can help identify potential issues before they become major problems. Check for any signs of damage or wear on the light casing and battery.
- Keep Spare Batteries on Hand for Quick Replacement:
- Having spare batteries available can ensure that your emergency lights are always operational. Store these spare batteries properly to maintain their charge and readiness.
Conclusion
In conclusion, fixing emergency light battery issues is crucial for maintaining reliable safety lighting. By detecting issues, replacing faulty batteries, and performing regular maintenance, you can keep your emergency lights always ready.
Regularly checking and maintaining your emergency lights ensures they function correctly when you need them most. This comprehensive guide provides all the information you need to troubleshoot and fix emergency light battery issues effectively, ensuring the safety and preparedness of your home during power outages.
By taking these proactive steps, you can maintain reliable emergency lighting and provide peace of mind for you and your family.
