
1. What is the simplest professional mounting method?
The simplest professional method is a slim aluminum LED channel bonded to glass with clear 3M VHB-style tape. For most indoor display cases, glass shelves, partitions, and retail counters, this gives the cleanest appearance with the least installation time.
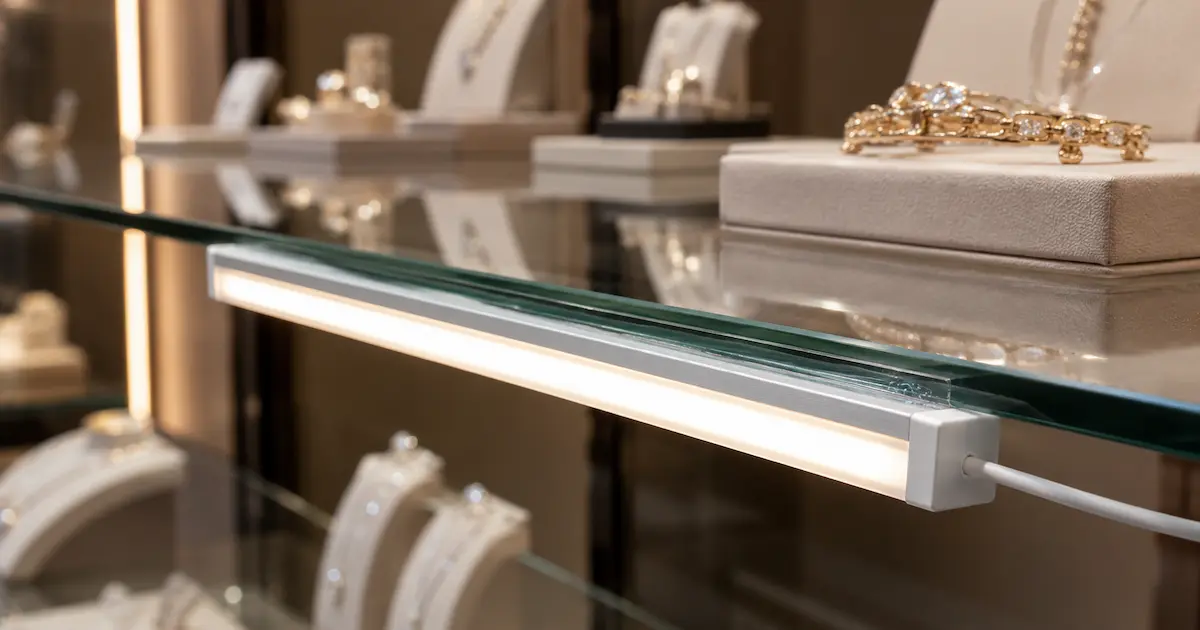
Here’s the deal: the tape must match both surfaces. Glass is smooth and non-porous. Aluminum may be anodized, powder-coated, or raw. Clear acrylic VHB tape works well where the adhesive line may be visible. Black foam VHB can work on black frames, but it looks poor on exposed clear glass.
Three common field examples show why this matters:
- In a jewelry display cabinet, clear tape behind a 10 mm micro profile creates a discreet LED strip light inside a glass cabinet without introducing visible screws or bulky mounting hardware.
- In a hotel glass partition, a wider frosted diffuser hides LED dots and adhesive shadow.
- In a supermarket chilled display, standard tape may fail because of low temperature and moisture, so silicone backup is safer.
| Mounting method | Best use case | Visual result | Serviceability | Risk level |
|---|---|---|---|---|
| Clear VHB tape | Indoor glass shelves and cabinets | Clean and nearly invisible | Medium | Low if surface is prepared |
| Neutral-cure silicone | Moist or curved glass areas | Slight bead may show | Low to medium | Low after full cure |
| Edge clips or clamps | Frameless glass edges | Visible hardware | High | Very low |
| UV glass adhesive | Permanent decorative work | Very clean | Low | Medium due to removal difficulty |
| Drilled glass fasteners | New glass made with holes | Strong but costly | High | Low, but only before tempering |
2. Which LED tape light channel works best on glass?
A low-profile LED channel is usually the best choice for glass because it creates less visual bulk while still protecting the strip and providing a flat bonding surface. It spreads heat, protects the strip, and gives the adhesive a flat bonding surface. Plastic channels may look simple, but they often warp under heat and can yellow near high-output LED tape.
For glass, the channel shape matters. A flat-back surface gives the tape more contact area. A round or angled profile may look attractive, but the reduced bonding area makes installation less forgiving. Narrow profiles leaving only 4–5 mm of adhesive width can work for short runs, but they are not safe for long vertical runs or public areas.
Use these practical size rules:
- 6–10 mm inner width for low-power 5 mm or 8 mm LED strips.
- 12–17 mm inner width for standard 10 mm strips and COB tape.
- 18 mm or wider for high-output strips or dual-row LED tape.
- Frosted diffuser for visible lines, clear diffuser for highest light output.
| Channel feature | Recommended choice | Why it matters for glass mounting |
|---|---|---|
| Back shape | Flat back | Gives full adhesive contact |
| Material | Aluminum alloy | Helps heat transfer from LED tape |
| Diffuser | Frosted PC cover | Reduces LED spotting on reflective glass |
| End caps | Pre-drilled or cable-out type | Keeps wiring clean at shelf edges |
| Finish | Silver, black, or white anodized | Match frame color and hide adhesive line |
Pro Tip from the VST Technical Team: “For glass shelves, choose the channel after checking the viewing angle, not only the strip width. A perfect electrical spec can still look cheap if LED dots reflect in the glass.”
3. How should you prepare glass before bonding?
Surface preparation decides whether the installation lasts for weeks or years. Glass may look clean, yet it often carries fingerprints, release agents, silicone residue, dust, or cleaner films. These invisible contaminants weaken the bond, which is why proper surface preparation for VHB tape applications is essential before attaching the aluminum channel.
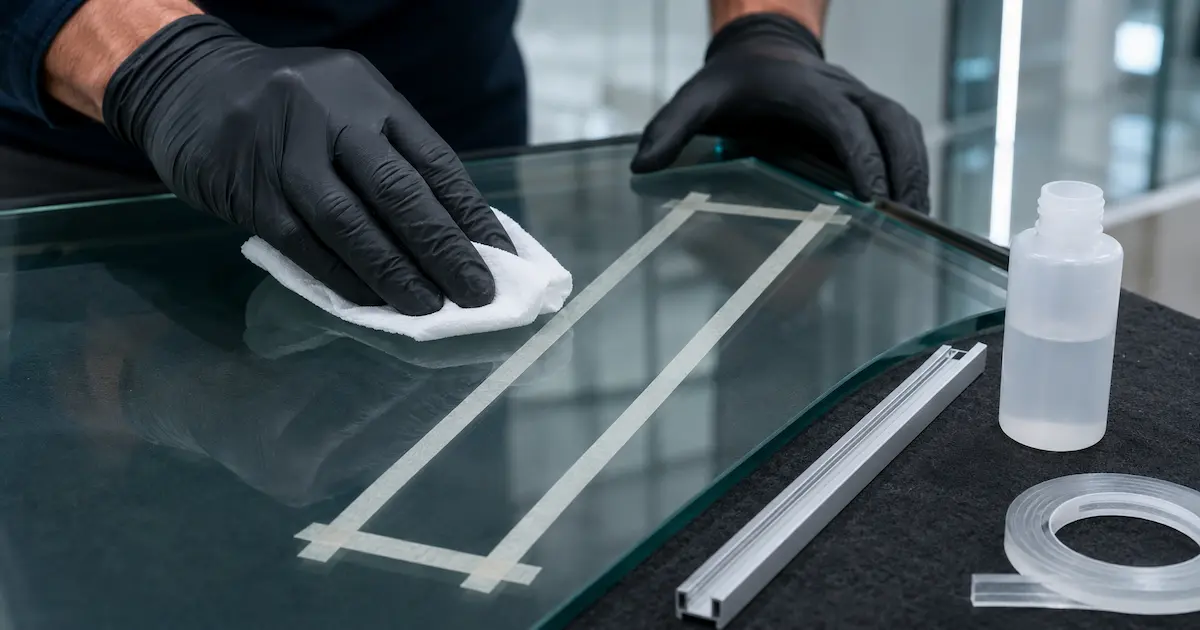
Follow the recommended process for applying 3M VHB tapes, beginning with careful surface cleaning so the adhesive can develop a strong and consistent bond. Wipe the bonding zone with isopropyl alcohol, then use a lint-free cloth. Do not use household glass cleaner before bonding; many leave anti-static or fragrance residues. Let the glass dry fully before tape contact.
In retail fit-outs, installers often clean the whole cabinet, then touch the exact bonding area while positioning the channel. That one fingerprint can become the starting point for adhesive failure.
| Step | Action | Field note |
|---|---|---|
| 1 | Mark the channel line with removable tape | Avoid permanent marker on exposed glass |
| 2 | Clean glass with 70–99% IPA | Use lint-free cloth only |
| 3 | Clean aluminum channel back | Remove oil from handling or machining |
| 4 | Dry for 2–5 minutes | Do not bond onto wet solvent film |
| 5 | Apply firm pressure for 30–60 seconds | Pressure activates adhesive wet-out |
| 6 | Wait before full load | 24 hours is better for high-bond tape |
Adhesive failure often traces back to surface preparation, not adhesive brand. That affects your bottom line because one return visit can cost more than the adhesive used on the full project. The following video demonstrates practical surface-preparation and VHB tape application techniques for creating a dependable bond between materials such as aluminum and glass.
4. Which adhesive or tape should you specify?
For most indoor glass work, clear VHB acrylic tape is the fastest and cleanest choice. It bonds well to smooth glass, gives a neat finish, and avoids cure time. However, it does not suit every environment.

A silicone glass and metal building sealant with a neutral-cure formulation is a practical option when the installation needs moisture resistance, gap filling, or backup retention between glass and an aluminum channel. Use neutral-cure, not acidic cure, because acidic silicone can attack metals and create corrosion risk. UV adhesive looks very clean but is not maintenance-friendly; once cured, removal may damage the channel, diffuser, or glass coating.
Higher bond strength on a data sheet does not always mean better field performance. Temperature range, surface energy, thickness, and peel direction matter.
| Adhesive type | Cure time | Best temperature range | Removal difficulty | Recommended use |
|---|---|---|---|---|
| Clear acrylic VHB tape | None, full bond grows over time | Indoor controlled sites | Medium | Glass shelves, cabinets, partitions |
| Foam VHB tape | None | Indoor frames, painted surfaces | Medium | Dark frames or hidden backs |
| Neutral-cure silicone | 24–48 hours | Damp or high-variation sites | Medium to high | Bathrooms, chilled displays, backup bead |
| UV glass adhesive | Minutes with UV lamp | Decorative permanent fixing | High | Short decorative segments |
| Hybrid polymer adhesive | Several hours | Heavy-duty indoor projects | High | Large channels, uneven contact |
For procurement teams, state adhesive type, width, thickness, and color. A vague line like “double-sided tape included” invites inconsistent supply and onsite replacement.
5. Should you use 12V or 24V LED tape in glass channels?
For most glass-channel installations longer than two meters, a 24V LED strip is easier to manage than a 12V version because it draws less current and reduces voltage-drop problems. It reduces current for the same wattage, which lowers voltage drop and allows cleaner wiring. That is especially useful on glass, where cable hiding is difficult.
A 5-meter 12V run often shows more visible dimming at the far end than a comparable 24V version at the same power per meter. For glass shelves, rear feeding from both ends or hiding the driver in the frame keeps brightness even.
| Parameter | 12V LED tape | 24V LED tape |
|---|---|---|
| Current at same wattage | Higher | Lower |
| Voltage drop risk | Higher | Lower |
| Cut interval | Often shorter | Often longer |
| Driver availability | Very common | Very common for commercial work |
| Best use | Short shelves, small signs | Long cabinets, retail counters |
| Cable size pressure | Higher | Lower |
Plan power injection for long or high-wattage runs. Hiding the driver in a frame or ceiling pocket protects aesthetics and simplifies service.
6. How does heat affect LED channels mounted on glass?
Because glass is not an effective heat sink, understanding how an LED aluminum channel increases LED strip life is important when the profile must carry most of the thermal load. If strip wattage exceeds the profile capacity, LED life drops, diffuser color shifts, and adhesive can soften.
Use wattage with care:
- 4.8–9.6 W/m: safe for slim channels in most display work.
- 10–14.4 W/m: use a larger aluminum profile and check heat.
- Above 15 W/m: test the full assembly before approval, especially with adhesive mounting.
| Strip type | Typical power | Dot visibility | Heat level | Best glass use |
|---|---|---|---|---|
| SMD 2835 low density | 4.8–9.6 W/m | Medium | Low | Basic shelf lighting |
| SMD high density | 9.6–14.4 W/m | Lower | Medium | Retail display lines |
| COB LED tape | 8–12 W/m | Very low | Medium | Premium cabinets and mirrors |
| High-output tape | 15–24 W/m | Low | High | Only with larger profiles and testing |
Heat dissipation is often ignored in adhesive-mounted glass work. Excess heat leads to adhesive creep, LED color shift, and early returns.
7. What is the step-by-step installation process?
Following a professional LED aluminum channel installation guide makes glass-mounted projects faster, keeps the channel aligned, and reduces costly removal or rework. Do a dry fit before peeling any tape liner. Check channel length, cable exit, diffuser slide direction, and end cap clearance.
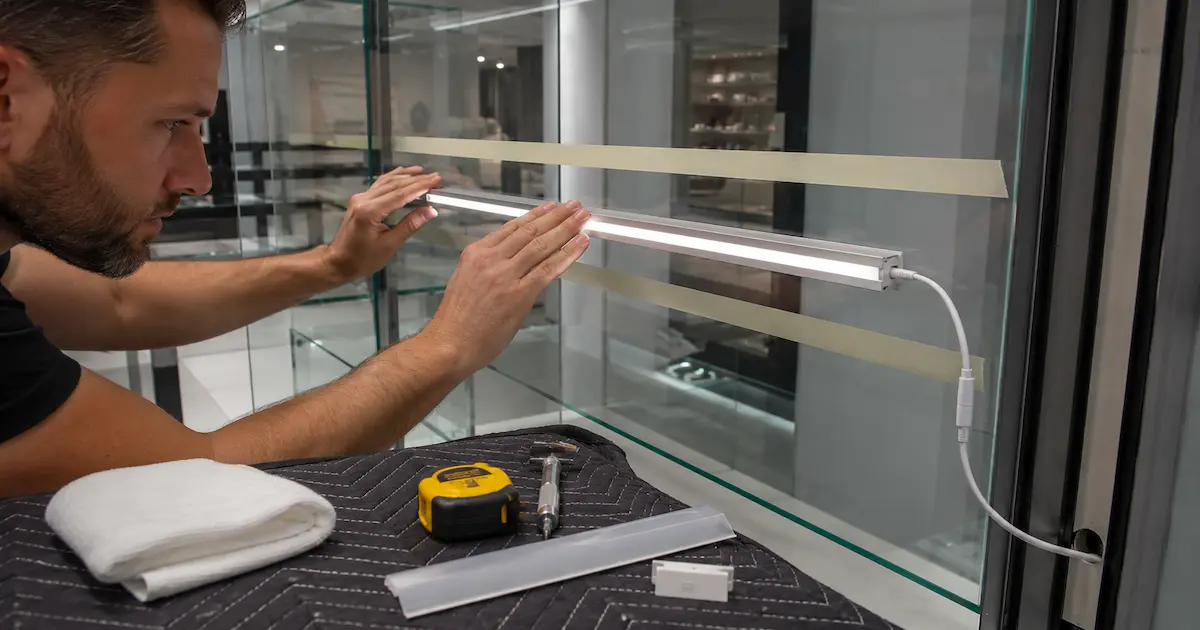
Step 1: Measure and cut the aluminum profile; deburr the edge so it does not scratch the glass.
Step 2: Install the LED tape inside the channel on a clean surface; press along the copper pads and PCB, not just the LED areas.
Step 3: Solder or connect the lead wire, then test the strip before bonding.
Step 4: Clean the glass and channel back.
Step 5: Apply adhesive tape to the channel, not the glass; trim neatly.
Step 6: Position with a jig or masking-tape guide; press firmly.
Step 7: Add silicone backup points if vertical, overhead, or exposed to vibration.
Step 8: Install diffuser and end caps after the bond is stable.
| Installation checkpoint | Pass criteria | Why it matters |
|---|---|---|
| Dry fit complete | Channel aligns with marks | Prevents visible crooked lines |
| Electrical test done | Full strip lights evenly | Avoids removal after bonding |
| Cable route confirmed | Wire hidden or protected | Keeps the glass design clean |
| Adhesive pressure applied | 30–60 seconds along full length | Improves wet-out and bond strength |
| Cure or dwell time respected | No load during early bond time | Reduces early release risk |
For rollouts, a simple jig saves minutes per shelf and significant labor across many installs.
8. What mistakes cause channels to fall off glass?
Most failures come from rushed installation or mismatched materials. The channel rarely falls because “glass is hard to bond.” It falls because the adhesive never had a fair chance.
Common issues include bonding onto silicone-contaminated glass, using narrow tape on heavy channels, and omitting backup clips in high-vibration areas.
| Symptom | Likely cause | Fix |
|---|---|---|
| Channel peels from one end | Poor pressure or contaminated glass | Remove, clean with IPA, use wider tape |
| Tape stays on glass but leaves channel | Oily or coated aluminum back | Abrade lightly if allowed, clean, reapply tape |
| Diffuser turns yellow | Excess heat or low-grade plastic | Use better PC diffuser and lower wattage |
| Far end looks dim | Voltage drop | Use 24V tape, larger cable, or power injection |
| Adhesive creeps downward | Heat plus channel weight | Add neutral silicone or clips |
| Visible LED dots reflect in glass | Channel too shallow or diffuser too clear | Use COB tape or deeper frosted profile |
Glass installations punish shortcuts. A five-minute cleaning and testing routine can prevent a full evening of corrective work.
9. What specifications should be written into a commercial order?
Write mounting details into the order. Do not leave them as assumptions. Define channel model, length tolerance, surface finish, diffuser type, LED tape voltage, wattage per meter, CCT, CRI, adhesive type, lead wire length, connector type, and packing method.
| Specification item | Example value | Why buyers should define it |
|---|---|---|
| Channel length | 1000 mm ±1 mm | Clean fit on glass shelves |
| Adhesive | Clear acrylic VHB, 10 mm width | Consistent mounting quality |
| LED tape | 24V COB, 10 W/m, CRI90 | Smooth line and stable current |
| CCT tolerance | 3000K, 3-step SDCM | Avoids visible color mismatch |
| Lead wire | 300 mm, red/black, pre-soldered | Saves site wiring time |
| Test requirement | 100% lighting test before packing | Reduces dead-on-arrival claims |
Small accessories cause big delays: wrong end caps, missing diffuser clips, short cables, or mismatched tape can halt installation.
10. How do you maintain and service glass-mounted LED channels?
Plan maintenance before installation. Specify removable diffusers and keep driver access outside the glass assembly (side frame, service box, cabinet base, or ceiling slot). Label driver outputs and polarity.
For cleaning, advise staff not to spray liquid directly onto the channel edge. Spray onto a cloth, then wipe. Repeated liquid entry can attack the tape edge, corrode solder joints, or create spotting inside the diffuser.
| Maintenance item | Recommended interval | Check method |
|---|---|---|
| Visual bond inspection | 3–6 months in public areas | Look for edge lift or creep |
| Diffuser cleaning | Monthly or as needed | Soft cloth, mild cleaner only |
| Driver temperature check | During service visits | Touch-safe check or thermal camera |
| Voltage check | If dimming appears | Measure input and far end voltage |
| Cable strain check | After furniture movement | Confirm no pulling at solder joint |
For high-profile sites, these steps keep visible lines working and reduce emergency service calls.
Conclusion
Bond flat-back aluminum channels to well-cleaned glass using clear VHB tape for fast, neat installs; add neutral-cure silicone or mechanical clips where load, moisture, or vibration create risk. Use 24V tape for longer runs, choose diffusers and channel depth to hide dots, and require pre-tested, pre-labeled assemblies for repeatable results.
FAQ
Q1: Can I mount LED tape light channels on glass without drilling?
Yes. Clear VHB tape is the most common no-drill method for indoor glass. For vertical, overhead, damp, or public installations, add neutral-cure silicone or edge clips for backup retention.
Q2: Will adhesive tape damage glass if removed?
Usually no, if the glass is plain and uncoated. Removal can be harder on tinted, filmed, painted, or coated glass. Use heat and slow peeling, then clean residue with a suitable solvent.
Q3: Is silicone better than VHB tape for glass-mounted LED channels?
Silicone is better for moisture, gaps, and backup support. VHB tape is faster, cleaner, and easier for straight indoor runs. Many professional projects use both: tape for positioning and silicone for safety backup.
Q4: Should I use COB LED tape inside glass-mounted channels?
A COB LED strip is a strong choice when the light line is visible or reflected by glass because its closely packed light source creates a smoother appearance with fewer visible dots. It reduces dotting and gives a smoother line, though heat and driver sizing still need proper checks.
Q5: How long should I wait after bonding the channel to glass?
Press the channel firmly during installation and avoid stress right away. Many high-bond tapes reach stronger adhesion after 24 hours. For heavy or vertical channels, allow more dwell time before full load.
