
Proper lighting is crucial for sports fields, ensuring players and spectators can see clearly during games and events. Wiring flood lights for sports fields is a complex but essential task that ensures optimal performance and safety. This comprehensive guide will provide detailed, step-by-step instructions to help you wire flood lights for sports fields effectively.

Whether you are lighting a community sports field or a professional stadium, following these guidelines will help you achieve a well-lit and safe environment. Wiring flood lights for sports fields involves several key steps to ensure effective and safe installation.
Here’s a Quick Overview To Get You Started:
- Prepare the Installation Area:
- Select suitable locations for the flood lights to ensure maximum illumination.
- Clear any obstructions and clean the area to ensure a stable installation.
- Mount the Flood Lights:
- Secure the led flood lights to poles or structures using brackets and bolts.
- Position the lights to ensure even coverage across the field.
- Wire the Flood Lights to the Power Source:
- Turn off the power at the main circuit breaker.
- Connect the flood lights to the power source using appropriate wiring techniques. Ensure all connections are secure and properly insulated.
- Set Up Control Systems:
- Install control systems such as timers, sensors, or remote controls to manage the lighting effectively.
- Ensure all connections are weatherproof and protected from the elements.
- Configure and Test the System:
- Configure the control systems for optimal performance, setting timers and adjusting sensors as needed.
- Test the entire system to ensure all lights function correctly and provide even illumination.
By following these steps, you can successfully wire flood lights for sports fields, ensuring a safe and well-lit environment for all activities. For a more detailed breakdown of each step, continue reading. We’ll cover everything from preparing your installation area to troubleshooting common issues.
While the initial overview provides a basic understanding of wiring flood lights for sports fields, there’s much more to learn to ensure a successful installation. In the next sections, we’ll take a closer look at the essential components of sports field flood lights and the tools and materials needed.
This detailed guide will equip you with the knowledge to effectively wire your sports field flood lights, ensuring they perform optimally and last for years.
Understanding Sports Field Flood Light Components

Sports field flood lights consist of several key components, each playing a crucial role in the system’s functionality:
- Flood Light Fixtures:
- These are the primary sources of illumination. They are typically high-intensity LED lights designed to cover large areas with bright, even lighting.
- Mounting Brackets and Poles:
- These components secure the flood lights at a height that provides maximum coverage. The brackets ensure the lights are stable and correctly positioned.
- Power Supply:
- The power supply provides the necessary electrical energy to the flood lights. It can be connected to the sports field’s main electrical system.
- Control Systems:
- These systems include timers, motion sensors, and remote controls that allow you to manage the lighting. They help optimize energy use and ensure the lights are only on when needed.
- Wiring and Connectors:
- The wiring connects all components, allowing electrical current to flow from the power supply to the flood lights. Waterproof connectors are essential for outdoor installations to protect against moisture and weather conditions.
Understanding the function of each component helps in proper installation and maintenance, ensuring your sports field flood lights operate effectively and efficiently.
Tools and Materials You’ll Need
Having the right tools and materials is crucial for a smooth installation process. Here’s what you’ll need:
Tools Required:
- Screwdriver set (Phillips and flat-head)
- Drill with various drill bits
- Wire strippers/cutters
- Pliers
- Voltage tester
- Ladder or scaffolding (for reaching high installation points)
- Electrical tape
Additional Materials:
- Wire nuts (for securing electrical connections)
- Waterproof connectors (for outdoor installations)
- Mounting screws and anchors (appropriate for the installation surface)
- Control system components (timers, sensors, remote controls)
- User manual (for reference to specific model instructions)
- Safety goggles and gloves (for protection during installation)
These tools and materials will help you efficiently wire and install your sports field flood lights. Proper preparation ensures a hassle-free process, allowing you to enjoy the benefits of enhanced lighting with minimal effort.
Step-by-Step Wiring Guide

Preparing the Installation Area
Selecting and preparing the installation site is the first crucial step in wiring flood lights for sports fields. Proper preparation ensures maximum illumination and safety.
Selecting the Installation Site:
- Choose Strategic Locations: Position flood lights around the perimeter of the sports field to ensure even coverage and avoid shadows.
- Consider Height and Distance: Mount the lights at a height that provides broad coverage without blinding players or spectators. The optimal height is typically 30 to 50 feet for sports fields.
- Accessibility to Power Source: Ensure the selected locations are close to electrical sources or have the capability to run wiring efficiently.
Preparing the Site:
- Clear Obstructions: Remove any objects, branches, or debris that could interfere with the installation or light coverage.
- Level the Ground: For pole-mounted lights, ensure the ground is level and stable to support the weight and height of the poles.
- Mark Locations: Use markers or paint to outline where each flood light will be installed.
Tips for Optimal Placement:
- Height and Angle: Position the lights at an angle that covers the entire field without creating glare. Tilting the lights slightly downward can help achieve this.
- Spacing: Space the lights evenly around the field to avoid dark spots and ensure uniform illumination.
Mounting the Flood Lights
Mounting the flood lights correctly ensures stability and optimal light distribution. Follow these steps:
Mounting Instructions:
- Assemble the Mounting Bracket: Attach the mounting bracket to the flood light if it isn’t pre-assembled. Use the screws provided in the kit.
- Position the Bracket: Hold the bracket against the pole or structure and mark the drill holes with a pencil.
- Drill Holes: Use a drill with an appropriate bit to drill holes at the marked spots. Ensure the holes are deep enough to accommodate the anchors.
- Insert Anchors: Insert wall anchors into the drilled holes if you’re mounting on a material like brick or concrete.
- Secure the Bracket: Align the bracket with the drilled holes and screw it securely into place. Make sure it is firmly attached and does not wobble.
- Attach the Flood Light: Once the bracket is secure, attach the flood light to the bracket and adjust its angle as needed.

Importance of Positioning:
- Proper positioning ensures the flood light covers the desired area effectively, enhancing both safety and visibility for players and spectators.
Wiring the Flood Lights to the Power Source
Wiring the flood lights to the power source is a critical step that requires caution and precision. Follow these instructions:
Wiring Instructions:
- Turn Off the Power:
- Switch off the power at the main circuit breaker to avoid any electrical hazards.
- Access the Wiring Compartment:
- Remove the cover of the wiring compartment on the flood light.
- Connect Wires:
- Black Wire (Hot): Connect the black wire from the flood light to the black wire from the power source.
- White Wire (Neutral): Connect the white wire from the flood light to the white wire from the power source.
- Green or Bare Wire (Ground): Connect the green or bare wire from the flood light to the ground wire from the power source.
- Secure Connections:
- Use wire nuts to secure the connections. Twist the wires together tightly and screw the wire nuts on.
- Wrap the connections with electrical tape for added safety and insulation.
- Replace the Wiring Compartment Cover:
- Once all connections are secure, replace the cover and screw it tightly.
Safety Tips for Handling Electrical Connections:
- Always double-check that the power is off before touching any wires.
- Use insulated tools to prevent accidental shocks.
- If you’re unsure about any step, consult a professional electrician.
Setting Up Control Systems
Control systems allow for efficient management of your flood lights, enhancing convenience and energy efficiency.
Here’s how to set them up:
Control Systems Setup Instructions:
- Identify Control System Components: Gather all components, such as timers, motion sensors, and remote control receivers.
- Mount Control Systems: Mount the control system components in accessible locations, ensuring they are protected from weather and tampering.
- Connect Wires: Connect the control system wires to the flood lights and power source following the manufacturer’s instructions. This typically involves connecting additional wires to the main power lines and flood light terminals.
- Secure Connections: Use waterproof connectors and electrical tape to secure and insulate all connections. Ensure all connections are tight and protected from the elements.
Ensuring Secure and Weatherproof Connections:
- Use waterproof connectors to protect against moisture and weather conditions.
- Apply a silicone sealant around the wiring compartment if necessary for additional protection.
Configuring the Lighting System
After wiring the components, configuring the control systems is the next step to customize your lighting setup.
Here’s how:
Configuration Instructions:
- Power On the System: Turn the power back on at the main circuit breaker.
- Set Up Control Systems: Use the user manual to set up timers, motion sensors, and remote controls. This usually involves setting the desired on/off times and sensor sensitivity.
- Adjust Settings:Configure the brightness settings, duration of illumination, and sensor sensitivity using the control system’s interface. Experiment with different settings to achieve the desired lighting effects.
Tips for Using Timers, Sensors, and Remote Controls:
- Timers: Use timers to automatically turn the lights on and off at specific times, saving energy and ensuring the field is lit only when needed.
- Motion Sensors: Adjust sensor sensitivity to ensure the lights activate when movement is detected within the desired range.
- Remote Controls: Use remote controls for convenient manual operation and quick adjustments.
Testing the System
Testing your flood light system is crucial to ensure everything is working correctly.
Follow these steps:
Testing Instructions:
- Test Each Light: Turn on the system and check that each flood light illuminates correctly. Walk around the field to ensure even coverage.
- Check Control Systems: Test the timers, motion sensors, and remote controls to ensure they are functioning as expected. Adjust settings as needed.
- Verify Coverage: Ensure the lights cover the entire field evenly. Adjust the angle and position of any lights that create shadows or do not illuminate their designated areas.
Troubleshooting Common Issues:
- Lights Not Turning On: Ensure all wire connections are secure and the power is on. Check the control system settings.
- Uneven Illumination: Adjust the position and angle of the flood lights to ensure even coverage across the field.
- Intermittent Operation: Inspect the wiring for loose connections and ensure the control systems are functioning correctly.
By following these detailed steps, you can successfully wire your flood lights for sports fields, ensuring a well-lit and safe environment for all activities. Proper installation and testing ensure long-lasting performance and reliability.
Troubleshooting Common Issues
During the installation of sports field flood lights, you may encounter several common problems. Here’s how to address them effectively:
Lights Not Turning On:
- Solution: Ensure that the power is switched on at the circuit breaker. Check all wire connections to make sure they are secure and correctly matched. Verify that the control systems are properly configured and powered.
Uneven Illumination:
- Solution: Adjust the angle and position of the flood lights to ensure even coverage across the field. Ensure that all lights are mounted at the same height and angle to prevent shadows or dark spots.
Intermittent Operation:
- Solution: Inspect the wiring for any loose or corroded connections. Ensure that all connectors are secure and protected from moisture. Check the control system settings to ensure consistent operation.
Lights Flickering:
- Solution: Verify that the power supply is stable and sufficient for the flood lights. Check for any loose connections or damaged wires. If using an extension cord, ensure it is rated for the power requirements of the flood lights.
FAQs:
- Can I wire sports field flood lights myself? Yes, with the right tools and instructions, you can wire sports field flood lights yourself. Follow safety guidelines and consult a professional if needed.
- What should I do if my control system isn’t working? Check the power supply and connections. Reset the control system and reconfigure the settings according to the user manual.
Maintenance Tips for Sports Field Flood Lights
To ensure your sports field flood lights work efficiently year-round, regular maintenance is essential. Follow these best practices:
Regular Cleaning:
- Clean the flood light lenses and the control systems with a soft cloth to remove dust and debris. This ensures optimal light output and performance.
- Wipe down the motion sensors (if equipped) to prevent false triggers or failures.
Inspect Connections:
- Periodically inspect all electrical connections for signs of wear or corrosion. Tighten any loose connections and replace damaged wires immediately.
- Ensure all waterproof connectors and seals are intact to prevent water ingress.
Adjust Settings Seasonally:
- Adjust the control system settings according to seasonal changes. Increase brightness and adjust lighting schedules during darker months.
Check and Replace Bulbs:
- Regularly check the bulbs for any signs of wear or burnout. Replace them as needed to maintain consistent lighting. Use high-quality, compatible bulbs to ensure long-lasting performance.
Test Functionality:
- Regularly test the control systems by cycling through the settings to ensure everything is functioning correctly. Make necessary adjustments to the settings if needed.
Protect from Weather:
- Use waterproof connectors and apply silicone sealant around exposed wiring connections to protect against moisture and harsh weather conditions. Cover the control systems if they are not weatherproof.
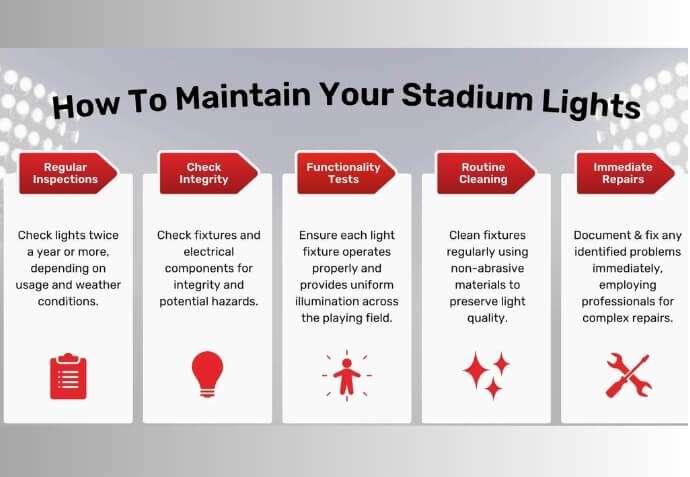
By following these maintenance tips, you can ensure that wiring flood lights for sports fields provides reliable and efficient lighting, enhancing safety and visibility throughout the year. Proper maintenance will extend the life of your lighting system and ensure it remains in optimal working condition, keeping your sports facilities well-lit and functional.
Additional Resources
These resources provide step-by-step instructions and visual demonstrations to help you through the installation process.
- Recommended Online Communities and Forums:
- Home Improvement Stack Exchange: A community where you can ask questions and share your experiences with home improvement projects.
- Reddit: Home Improvement: Join discussions and get advice from other DIY enthusiasts and professionals.
Conclusion
In this page, we have covered the essential steps for wiring flood lights for sports fields, from preparing the installation area to configuring the control systems. Following these instructions will help you improve your sports field’s visibility and safety with efficient, reliable lighting.
Proper maintenance ensures your flood light system remains effective year-round. Feel free to share your success stories or ask further questions in the comments below. With these tips, you can confidently wire your sports field flood lights and provide a well-lit environment for all sporting activities.
