
Buying LED strip lights looks simple until the wrong specification causes dim sections, color mismatch, adhesive failure, driver overload, or expensive site rework. A proper led strip light buying guide starts with the application, then matches voltage, brightness, IP rating, control method, heat management, and installation details to that use case. That is the short answer.
If you source strip lights for shelves, cove lighting, retail displays, furniture, signage, hospitality, or architectural projects, small mistakes can turn into callbacks, delay handover, and damage your margin. We often see installers struggle with strips selected by price alone.
The fix is a structured buying process based on technical performance and field conditions. In our lab tests using integrating spheres, thermal imaging, and aging racks, the differences between similar-looking strips are often larger than buyers expect. This article gives you a practical framework to choose correctly.
1. What should you define before comparing LED strip lights?
The biggest buying mistake happens before anyone reads a datasheet. People compare products without defining the job. That creates confusion because one strip may be perfect for under-cabinet lighting and totally wrong for a wet outdoor handrail or a 15-meter hotel corridor.
Start with these questions:
- Is the strip for accent lighting, task lighting, display lighting, signage, or indirect architectural lighting?
- Is the installation indoor, outdoor, refrigerated, or high-temperature?
- Will the strip be visible as a line of light or hidden inside a profile?
- Is the priority brightness, uniformity, color quality, dimming, or cost?
- What is the run length from power feed to end?
Here is the practical point.
A boutique display shelf may need high CRI and clean light on products. A warehouse marker line may care more about visibility and durability. A hotel cove may need perfect consistency across many rooms.
| Project Type | Main Priority | Typical Risk if Wrong Strip Is Chosen |
|---|---|---|
| Retail display | High CRI and clean appearance | Products look dull or distorted |
| Hotel cove | Color consistency | Visible mismatch between rooms |
| Outdoor facade | IP protection and stable power | Water ingress and early failure |
| Furniture lighting | Easy installation and low heat | Adhesive failure or tight-space overheating |
| Signage | Brightness and driver matching | Uneven illumination or dead sections |
If you define the application clearly, the rest of the buying process becomes much easier.

Add a simple scope document to every purchase order that records intended mounting surface, hours of operation per day, expected ambient temperature, and acceptance criteria (e.g., max ΔCCT across a project).
This prevents mismatched expectations later and creates a reference for testing and warranty claims.
2. Should you choose 12V or 24V LED strip lights?
This is one of the most common buying questions, and the answer affects voltage drop, cutting length, driver count, and installation flexibility. In many commercial jobs, 24V is the safer option for longer runs. However, 12V still has value where short runs and tighter cut points matter.
When we tested this against a standard 12V strip, the 24V version kept more stable brightness over longer distances. That matters in reception desks, long cabinets, and corridor coves. We once saw a 12V strip used on a long retail fixture fade noticeably near the end. The product was not defective. The system design was wrong.
A 12V strip can still be useful in display cases, vehicles, small joinery projects, and short furniture sections where frequent cut points are needed. But there’s a catch. If you push 12V too far, the brightness falloff becomes visible fast.
| Feature | 12V LED Strip | 24V LED Strip |
|---|---|---|
| Best for | Short runs | Medium to long runs |
| Voltage drop risk | Higher | Lower |
| Cutting interval | Usually shorter | Usually longer |
| Driver current | Higher for same wattage | Lower for same wattage |
| Common use case | Small displays, furniture | Commercial projects, long coves |
As a general rule, choose 24V for longer, cleaner installations and 12V where fine cutting flexibility is the bigger need. Also consider hybrid approaches: use 24V for long trunk runs with 12V branches on short, bespoke elements.

When planning, do a simple voltage-drop calculation: estimate current per meter, cable length, and allowable voltage loss (usually 2–3%). This will tell you whether multi-feed or higher voltage is needed.
3. How do brightness, wattage, and lumen output really work?
Many buyers compare strip lights by wattage only. That creates bad decisions.
Common myth: higher wattage always means better brightness.
Reality: lumen efficiency, LED chip quality, optical design, and diffusion all matter. A higher wattage strip may generate more heat without delivering proportionally better useful light.
In our lab tests using integrating spheres, we measure lumens, not marketing claims. Two strips with similar power ratings can perform very differently. One may produce strong usable output with stable color. Another may look harsh, run hotter, and lose output sooner.
Think in application terms:
- For mood lighting in a restaurant cove, moderate lumen output often works better than extreme brightness.
- For task lighting under cabinets, higher lux on the work surface matters more than raw wattage.
- For illuminated shelving, uniformity may matter more than peak output.
| Buying Metric | What It Tells You | Why It Matters |
|---|---|---|
| Wattage per meter | Power consumption | Helps size drivers and heat load |
| Lumens per meter | Actual light output | Better than wattage for brightness comparison |
| Lumens per watt | Efficiency | Better operating value |
| Beam appearance | Dotting or smoothness | Affects visual quality |
| Thermal behavior | Heat during operation | Affects lifespan and stability |
So, do not buy strip lights by wattage alone. Ask for lumen data, test conditions, and profile recommendations. When possible, request photometric files or test samples and measure lux on the actual surface where the light will be seen.

Small changes in diffuser depth, angle, or mounting distance can change perceived brightness dramatically without changing power.
4. What color temperature and CRI should you buy?
Color mistakes are expensive because they are visible immediately. If the light looks too cold, too yellow, or inconsistent from one reel to another, clients notice at once. That leads to rejection, replacement costs, and awkward conversations on site.
The basic buying choice is color temperature. Warm white such as 2700K to 3000K suits hospitality, residential joinery, and premium interiors. Neutral white around 4000K is common in retail, offices, and practical work areas. Cooler ranges like 5000K or 6500K fit some task-focused environments but can feel harsh in decorative spaces.
CRI matters just as much. For product displays, clothing stores, beauty areas, museums, food presentation, and branded interiors, low CRI can make surfaces look flat or inaccurate. We often see installers struggle with this in shops where merchandise color is part of the sale.
A field example: a cosmetics counter used a low-CRI strip and skin tones looked unnatural. Another project in a bakery improved product appearance dramatically after switching to higher CRI. In a hotel corridor, the issue was not CRI alone but batch consistency between renovation phases.
| Application | Suggested CCT | Suggested CRI |
|---|---|---|
| Hotel, restaurant, lounge | 2700K–3000K | 90+ |
| Retail general lighting | 3500K–4000K | 80+ or 90+ |
| Fashion, cosmetics, premium display | 3000K–4000K | 90+ |
| Office joinery and shelves | 4000K | 80+ |
| Food display | Depends on product tone | 90+ preferred |
This is why binning and batch control matter to your bottom line. One mismatch across a visible project can trigger full replacement.

Ask suppliers for Δu’v’ or ΔCCT tolerances, and if possible, secure reels for a single project from the same production batch. When projects are phased, plan to keep spare reels from the same production run for repairs.
5. Which IP rating is right for the environment?
IP rating tells you how well the strip resists dust and water. Buyers often overbuy or underbuy here. If you use an indoor strip in a damp location, failure can happen early. If you specify a heavily protected strip where it is not needed, you may pay more and lose heat dissipation.
Here’s the deal. IP20 is common for dry indoor areas inside profiles or furniture. IP54 or IP65 may fit splash-prone or lightly exposed areas. IP67 and IP68 are used for harsher outdoor or wet conditions, depending on construction and installation method.
But the environment is not just about rain. Consider cleaning chemicals, steam, UV exposure, ambient temperature, and whether cable entry points are sealed correctly. We once saw an outdoor strip fail, not because of the strip body, but because the end cap sealing and connector treatment were poor.
| IP Rating | Typical Use | Main Limitation |
|---|---|---|
| IP20 | Dry indoor use | No moisture protection |
| IP54 | Light dust and occasional splash | Not for heavy washdown |
| IP65 | Splash-prone zones | Check heat and sealing details |
| IP67 | Temporary immersion resistant setups | Installation quality matters |
| IP68 | Continuous wet environments in some designs | Verify actual construction data |
Always match IP rating to the true site condition, not the sales label alone. If using silicone or epoxy-coated strips, confirm how connectors and seams are treated.
For washdown or food areas, verify any chemical resistance ratings and confirm you can access the strip for maintenance without breaking seals unnecessarily.
6. Why do LED density, PCB width, and strip construction matter?
Two strips can share the same voltage and color temperature yet behave very differently because of their construction. LED density affects dot visibility and uniformity. PCB width affects current handling, thermal stability, and mechanical strength. Copper thickness affects voltage stability. Adhesive quality affects installation reliability.
For example, a low-density strip may look fine when hidden behind a deep diffuser, but not in a shallow aluminum profile where individual points become visible. COB strips reduce spotting and create a smoother line, which is useful in premium hospitality and retail joinery. SMD strips still work very well in many projects, especially where cost control and serviceability matter.
From our manufacturing floor perspective, PCB and copper choices matter more than many buyers think. A narrow, thin board carrying higher load can run hotter and age faster. We have seen cabinet projects where cheap adhesive detached after months because heat and substrate preparation were ignored.
| Construction Factor | What to Check | Why It Matters |
|---|---|---|
| LED density | LEDs per meter | Affects smoothness and brightness distribution |
| PCB width | 5mm, 8mm, 10mm, 12mm and up | Affects fit, heat, and current handling |
| Copper weight | Thickness or oz rating | Helps reduce resistance issues |
| Adhesive backing | Brand and substrate compatibility | Impacts installation reliability |
| SMD vs COB | Point source vs line effect | Affects visual finish |
Buyers focused on long-term performance should ask about the full strip construction, not only the LED chip name.
Also check connector and prewired lead specifications if you expect to solder or crimp in the field. Poorly rated leads or cheap connectors commonly underperform the strip itself and become the weakest link.
7. How should you match drivers, dimmers, and controls?
A good strip with a bad power system still fails in the field. Driver sizing, dimming compatibility, startup load, cable loss, and control protocol must be checked as one system. We often see installers struggle with flicker complaints that are actually caused by dimmer-driver mismatch rather than the strip itself.
A practical approach is simple:
- Calculate total wattage with headroom, often 20% to 30%.
- Confirm constant voltage output matches strip voltage.
- Check dimming protocol such as PWM, 0-10V, DALI, TRIAC, or RF controller.
- Review cable length and current per channel.
- Split long runs into suitable feed points.
In a restaurant bar project, a poorly matched TRIAC dimmer caused visible instability at low levels. In a display fixture, an undersized driver overheated and shut down intermittently. In a cove lighting job, central power location created too much cable loss despite correct strip selection.
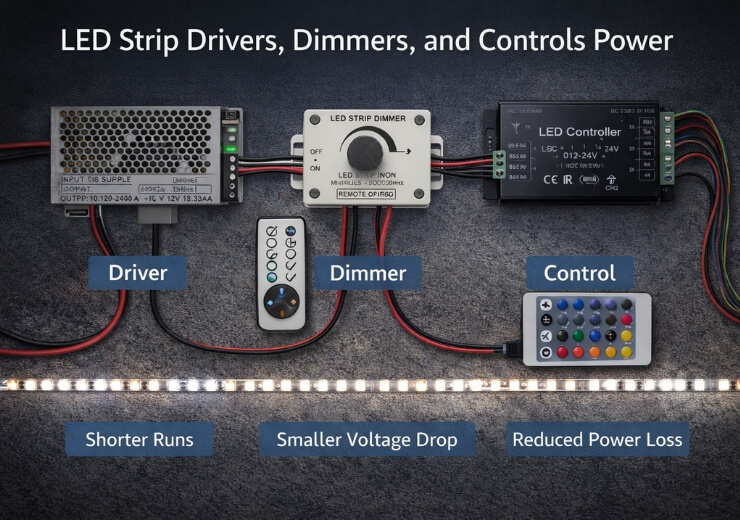
Our Chief Engineer notes that heat dissipation is often ignored in power supply cavities. A driver in a sealed box may fail earlier even if the electrical math looks correct.
| System Item | What to Verify | Common Failure |
|---|---|---|
| Driver wattage | Total load plus headroom | Overload shutdown |
| Output voltage | 12V or 24V match | Strip damage or no start |
| Dimming protocol | Controller compatibility | Flicker or unstable dimming |
| Cable gauge | Current and distance | Voltage loss and overheating |
| Feed layout | Single-end or multi-feed | Uneven brightness |
Good buying decisions always include the full power and control chain. When possible, request a compatibility statement from the driver manufacturer and run an initial commissioning test at low and high dimming levels. Document every controller model used and keep a troubleshooting log for the first week of operation to catch intermittent issues.
8. Do aluminum profiles and heat management really matter?
Yes, especially in higher-output strips or enclosed installations. Heat is one of the main reasons strip lights lose output, shift color, or fail early. People focus on LED chips and ignore thermal design. That is risky.
In our lab tests using thermal imaging cameras, strips mounted on proper aluminum profiles consistently run cooler than strips fixed directly to poor surfaces. That lower operating temperature supports better lumen maintenance and adhesive stability. In a wood cabinet, in a plaster recess, and in a retail shelf, the thermal path can be completely different.
Profiles do more than manage heat. They improve appearance, protect the strip, support diffusion, and simplify installation. In premium projects, profile depth and diffuser choice often decide whether the line looks smooth or dotted.
We once saw a high-output strip installed directly onto painted MDF in a narrow cove. The result was rising temperature, weak adhesive hold, and early color shift. The product was blamed, but the real problem was missing heat management.
| Installation Method | Heat Handling | Visual Result | Typical Risk |
|---|---|---|---|
| Bare strip on surface | Weak to moderate | Visible dots possible | Shorter life in high load |
| Strip in aluminum profile | Better | Cleaner finish | Higher material cost |
| Deep profile with diffuser | Better | Smooth light line | Needs space planning |
| Enclosed cavity without airflow | Poor | Depends on diffuser | Heat buildup |
If the strip runs many hours per day, thermal planning should never be treated as optional.
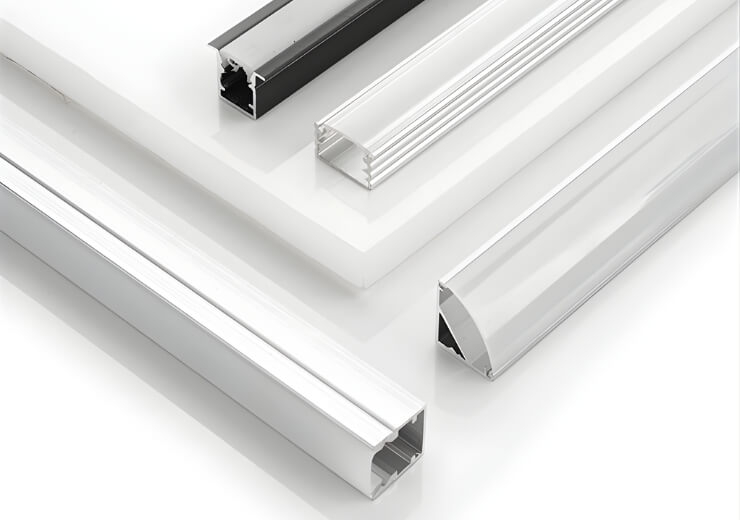
In addition to aluminum profiles, consider thermal pads, proper adhesive selection for high-temperature operation, and leaving enough ventilation space around drivers and junctions.
9. What quality checks should you request from a supplier?
Data sheets are useful, but they are not enough. You need evidence that the strip performs consistently from batch to batch. This is where many buying problems begin. The sample looks fine. The production order behaves differently.
Ask for practical quality details:
- Photometric test data with clear conditions
- CCT and CRI tolerance information
- PCB and component specification
- Aging test process
- Adhesive and solder quality details
- Certification relevant to your market
- Production photos or inspection records if needed
In our lab tests using integrating spheres, we verify lumen output and color values because paper claims alone do not protect a project. We also use aging racks and thermal imaging because some issues only appear after sustained operation.
A field example from retail fit-out: a buyer mixed reels from inconsistent batches and got visible color variation. Another case involved poor solder joints on prewired sections, causing intermittent failures during transport. A third case involved unverified IP claims that did not match real outdoor exposure.
| Quality Check | What It Confirms | Why Buyers Should Care |
|---|---|---|
| Integrating sphere data | Real output and color | Reduces claim mismatch |
| Aging test | Early-life stability | Lowers failure risk |
| Thermal imaging | Heat concentration | Predicts reliability |
| Certification review | Compliance alignment | Supports market access |
| Batch control records | Consistency | Prevents visible project mismatch |
This is where honest technical documentation protects both safety and margin. Also request supplier traceability for key components (LED chips, drivers, adhesives) and a clear warranty policy covering batch-related color or lumen shifts.
10. What final buying checklist helps you avoid costly mistakes?
Before placing an order, run through a short approval checklist. It sounds basic, but this step prevents many expensive errors.
Ready for the good part?
Most strip light failures can be traced back to just a few decisions made too quickly: wrong voltage, weak thermal design, poor IP match, incompatible dimming, or no allowance for voltage drop.
Use a checklist like this before approval:
| Checkpoint | Yes/No | Notes |
|---|---|---|
| Application and environment clearly defined | ||
| 12V or 24V chosen based on run length | ||
| Lumens per meter confirmed | ||
| CCT, CRI, and batch consistency reviewed | ||
| IP rating matched to real exposure | ||
| PCB width and construction checked | ||
| Driver, dimmer, and controls matched | ||
| Aluminum profile or thermal path planned | ||
| Certifications confirmed | ||
| Pilot sample tested in real condition |
My advice is simple. Test one full system before committing to volume. Install it on the real substrate, with the real driver, in the real ambient condition. We often see this small step save major rework later.
The right strip is not the cheapest reel. It is the one that performs reliably in your actual project. Add clear acceptance criteria to purchase orders (e.g., max ΔCCT 3-step MacAdam or specific lux at distance) and insist on on-site sign-off procedures when commissioning.
Conclusion
A solid led strip light buying guide is really a decision process: define the application, choose the right voltage, compare lumen output instead of wattage alone, match color and CRI to the space, select the proper IP rating, check construction quality, and plan the power and thermal system as one package. That is what protects project quality, safety, and margin.
If you are unsure about voltage drop, profile selection, or dimming compatibility for a specific job, send your layout to a technical team and review it before ordering.
Small procurement steps—documented site conditions, supplier test evidence, pilot installation, and clear warranty terms—significantly reduce risk. When you combine those with basic electrical checks and thermal planning, most costly site failures become avoidable.
FAQ
Q1: What is the best voltage for LED strip lights?
For short runs and tight cut intervals, 12V can work well. For longer runs in commercial installations, 24V is usually the better choice because it reduces voltage drop and current load.
Q2: How do I choose the right brightness for an LED strip?
Use lumens per meter, not just wattage. Accent lighting needs less output, task lighting needs more usable light on the surface, and display lighting often needs a balance of brightness and uniformity.
Q3: Is higher wattage always better in LED strips?
No. Higher wattage does not automatically mean better performance. Efficiency, thermal design, and optical result matter just as much as power consumption.
Q4: What IP rating should I buy for outdoor LED strip lights?
That depends on exposure. Light splash areas may use IP65, while harsher wet locations may need IP67 or IP68. Check the whole installation method, including connectors and end seals.
Q5: Why do some LED strip lights show different colors between reels?
Batch variation, weak binning control, or inconsistent phosphor quality can cause visible mismatch. For multi-area projects, ask for controlled batch consistency and test reels side by side before installation.
