
Corner LED diffusers influence interior design by turning exposed corner light sources into smooth, controlled lines of light that reduce glare, hide LED dotting, and visually “draw” the geometry of a space. They also affect maintenance, heat handling, and installation speed, which ties directly to callbacks and project handover quality.
Corners are where lighting mistakes show up fast: uneven brightness, visible pixels, harsh glare on glossy walls, and profiles that don’t sit flush. Those issues can trigger client rejection, rework, and schedule pressure.
This article explains how corner LED diffusers change aesthetics and performance, what to specify (material, strip type, voltage, mounting, thermal path), and how to avoid typical failure modes. Most “design problems” with linear lighting are specification problems—and they’re preventable with a few disciplined choices.
1. What are corner LED diffusers, and why do designers specify them?

Corner LED diffusers are optical covers (often paired with aluminum corner profiles) designed to sit in 90° wall-wall, wall-ceiling, or cabinet corners. Their job is simple: convert a line of point sources into a clean, continuous luminous surface.
A corner isn’t just a mounting location—it’s a visual boundary. Light placed there can act like a “drawing tool” for the room, outlining edges and guiding attention.
Corner diffusers are usually specified to:
- Reduce LED dot visibility on short viewing distances
- Control glare for occupants and for camera capture
- Protect the strip from dust, cleaning, and finger contact
- Create repeatable geometry across long corridors or multiple rooms
Installers often get last-minute “make it look continuous” requests after drywall or millwork is closed. A corner diffuser system sets channel width, diffuser type, and mounting method before site variability takes over.
Field examples we see often:
- Hotel corridor coves that need consistent lines across long runs
- Retail display shelves where packaging reflects pixels
- Meeting rooms where video calls amplify glare complaints
| Corner application | Common design goal | Typical risk without diffuser | Practical spec note |
|---|---|---|---|
| Wall-ceiling cove | “Floating ceiling” line | Hotspots on painted ceiling | Use higher density or COB + deeper channel |
| Cabinet interior | Uniform task light | Harsh glare at eye level | Choose opal diffuser + low UGR approach |
| Feature wall corner | Architectural outline | Visible dots on matte finish | Match diffuser transmittance to brightness budget |
2. How do diffuser materials change the look and service life?

Diffuser material is not a cosmetic detail. It changes light loss, color shift, scratch resistance, and how the diffuser ages under heat and cleaning chemicals.
In testing, swapping only the diffuser can shift delivered lumens significantly. The spread between “clear” and “opal” can be large—often 15–35% lumen loss depending on thickness and surface treatment. That loss is not “bad”; it’s the tradeoff for dot-free appearance and lower glare.
Material choices you’ll see most:
- Polycarbonate (PC): strong, good heat resistance, common for architectural profiles
- PMMA (acrylic): high clarity, more brittle, scratches easier on job sites
- Silicone: flexible, good sealing for wet zones, can attract dust if the surface is tacky
Some low-cost diffusers yellow faster under heat, shifting perceived CCT over time. On white walls, clients notice.
| Diffuser material | Visual effect | Durability notes | Typical use case |
|---|---|---|---|
| PC opal | Best dot hiding, soft line | Good impact resistance; watch UV grade | Corners in public areas, corridors |
| PC frosted | Balance of output and diffusion | Scratches can show on glossy surface | Offices, retail, residential |
| PMMA clear/frosted | High output, crisp edge | Brittle; cracks during cutting | Short runs, protected locations |
| Silicone opal | Very uniform, seamless look | Can hold dust; check chemical resistance | Bathrooms, outdoor rated channels |
Practical rule: if the profile is in a high-touch zone (shops, schools, transport), PC opal usually survives the real world better.
3. Which strip + diffuser combinations avoid hotspots in corners?
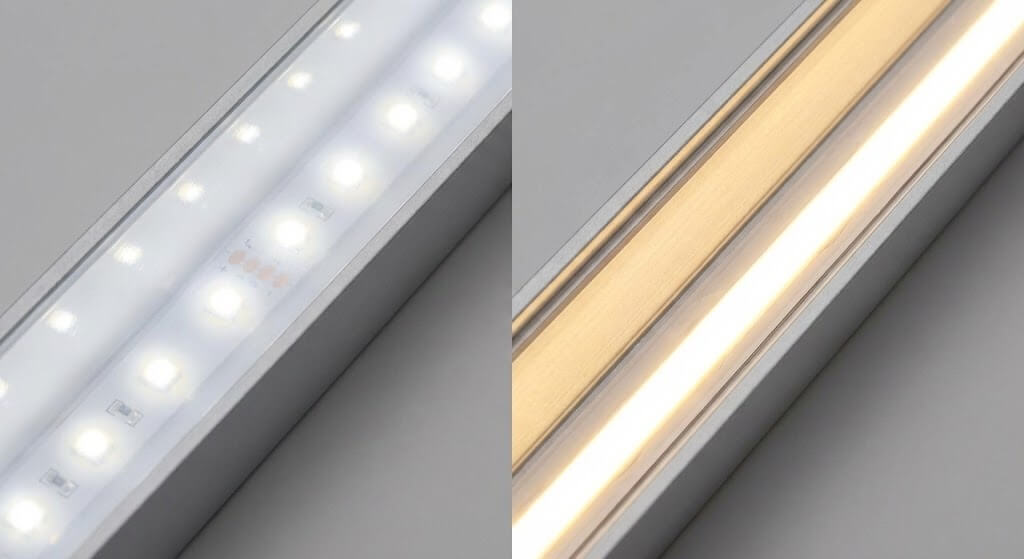
Hotspots happen when LED pitch, diffuser distance, and diffuser haze don’t match. Corners make it worse because viewers often see the line at a shallow angle, which amplifies dotting.
Three combinations that work well in the field:
- COB strip + opal diffuser: best “neon line” feel, strong uniformity on close view
- 180–240 LEDs/m SMD strip + medium opal: good for coves and long corridors
- Low density SMD + deep channel + heavy opal: workable when budget is tight, but depth must be real, not a shallow corner cap
On low-density strips (for example, 60 LEDs/m), the corner run looks acceptable only when the diffuser sits far enough from the LEDs. In shallow channels, dots show immediately on white paint.
Common myth: “A thicker diffuser always fixes dotting.”
Reality: if LED pitch is too wide, diffuser thickness alone can’t hide the pattern without killing too much light output. You end up paying in watts and still seeing artifacts.
| Strip type | Dot-free performance in corners | Power efficiency trend | Recommended diffuser approach |
|---|---|---|---|
| COB (continuous phosphor) | Excellent | Medium to high | Opal or frosted; shallow channels acceptable |
| SMD 120 LEDs/m | Good | High | Medium opal; moderate depth |
| SMD 60 LEDs/m | Weak unless deep | High | Heavy opal + deeper profile |
| Addressable pixels | Pattern intentional | Varies | Use clear/frosted if pixels are a feature |
If you need clean lines across many rooms, specify strip density and diffuser type together. Mixing later is where inconsistency starts.
4. How do corner diffusers reshape spatial perception and lines?
Designers use corner light because it visually changes geometry without moving walls. A diffuser turns that into a controlled, predictable effect.
Three spatial tricks that show up in real projects:
- Make ceilings feel higher
A wall-ceiling corner line, aimed along the ceiling plane, can visually “lift” the top edge and reduce the need for heavy decorative fixtures. - Straighten imperfect construction
Many sites have slightly wavy plaster, tile, or millwork. A diffuser in a rigid profile creates a reference line that pulls attention to a clean luminous edge. - Create wayfinding
In corridors, a continuous corner line guides people without signage overload. Consistent edge lighting also reduces harsh contrast from downlights.
Corner diffusers also control direct view. A bare strip in a corner is often in peripheral vision, which is where discomfort glare complaints start.
| Design intent | Corner placement | Suggested optic goal | Typical pitfall |
|---|---|---|---|
| “Floating ceiling” | Wall-ceiling | Wide wash, low glare | Too narrow beam creates bright stripe |
| Feature outline | Wall-wall | Crisp line, uniform | Dotting shows on matte paint |
| Night pathway | Baseboard corner | Low luminance, soft | Too bright, disrupts ambience |
5. What lighting effects can you build with corner diffusers (and what beam angles matter)?
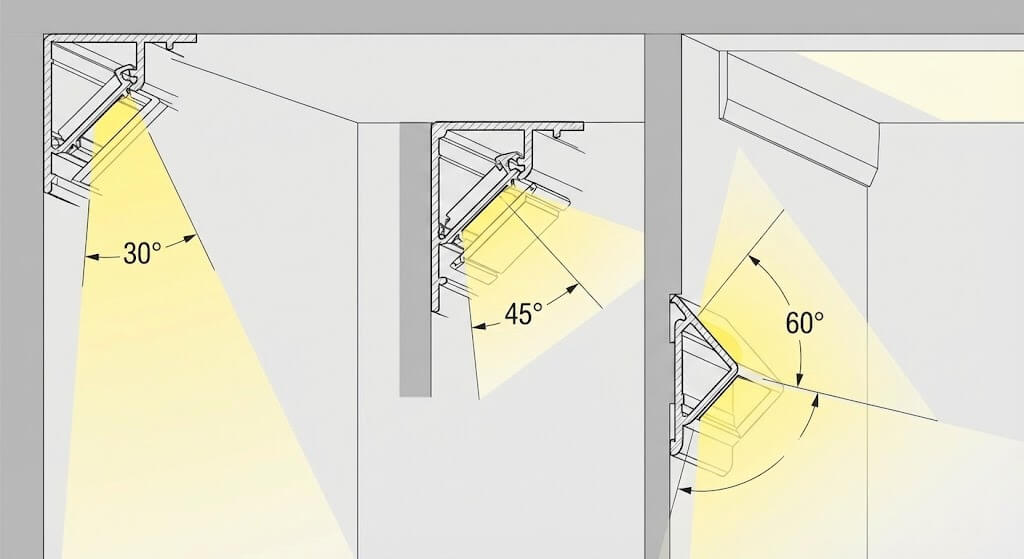
Corner diffusers aren’t just for “softening.” They are optical tools. The diffuser shape, the profile angle (30°, 45°, 60°), and the strip position change beam distribution.
Small angle changes can shift the mood because they change where the brightest part of the beam lands (ceiling, wall face, or toward the viewer).
Common effects you can design intentionally:
- Grazing: a narrow wash that reveals texture on stone, wood slats, or brick
- Washing: a broader spread for even brightness on painted walls
- Edge outlining: a linear “frame” around panels or niches
Heavier opal diffusers reduce peak intensity and spread light more evenly, which lowers perceived glare and reduces camera “sparkle” in corporate spaces.
| Profile angle / optic goal | Visual result | Where it fits | Spec note |
|---|---|---|---|
| 30° grazing | Dramatic texture | Stone, brick, feature walls | Use higher density to avoid banding |
| 45° balanced wash | Clean, versatile | Retail, offices, cabinets | Works well with frosted diffuser |
| 60° wide wash | Soft perimeter glow | Hotels, corridors | Watch lumen loss; plan watt margin |
If the design intent is “calm,” prioritize uniform luminance over raw lux numbers.
6. How do they support layered lighting plans in commercial interiors?
A good interior rarely relies on one lighting layer. Corner diffusers can serve as ambient, accent, or guidance lighting, and they work well with downlights and track heads when specified as part of the same system.
Here are three layered setups that repeat across projects:
- Ambient perimeter + task spots: corner coves provide soft base light, downlights handle desks or counters
- Accent lines + wall washers: corner lines frame the room, wall washers highlight art or brand walls
- Night mode guidance: low-level corner/baseboard lines tied to a dim channel for after-hours safety
From a project management angle, corner diffusers can reduce fixture count. One continuous line can replace multiple small fixtures, reducing drilling, wiring joints, and alignment errors.
Layering fails when dimming and color consistency aren’t planned. Mixing 3000K strips from different bins in adjacent rooms shows quickly when the corner line is the dominant element.
Examples we commonly see:
- Tunable white corner lines for scenes, with meeting-room downlights fixed CCT
- Warm-dim downlights paired with stable 2700K corner lines to avoid “color fight” on walls
- Neutral-bright corner lines in aisles, warmer perimeter lines near hospitality or food zones
Corner diffusers make layers readable, provided CCT and dimming protocol are treated as design inputs, not afterthoughts.
7. What do installers struggle with, and how do you prevent callbacks?

Installers usually don’t struggle with “LEDs.” They struggle with corners, tolerances, and time.
Common pain points on site:
- Mitre cuts that leave visible gaps at 45° joints
- Uneven substrate that twists the profile, making the diffuser pop out
- Inconsistent solder joints that fail after a few weeks
- Long runs fed from one end, causing voltage drop and brightness taper
Many callbacks trace to missing “system thinking”: strip choice, wire gauge, feed points, and profile mounting all interact.
Use this checklist early and you remove most surprises.
| Installation checkpoint | What to verify on site | Typical failure mode | Fix / prevention |
|---|---|---|---|
| Corner joint accuracy | 45° cut, no burrs | Light leak at joint | Use mitre box, deburr, test-fit dry |
| Substrate flatness | Straightness over 2 m | Twisted profile, diffuser pops | Shim, use straightedge, adhesive + screws |
| Feed points | Length vs voltage drop | Dim end section | Feed both ends or inject mid-run |
| Soldering / connectors | Strain relief, insulation | Intermittent flicker | Pre-solder leads, add mechanical support |
| Diffuser seating | Continuous snap fit | Rattling, gaps | Choose correct diffuser series; don’t force |
If you want fewer site disputes, specify who owns each checkpoint: designer, electrician, or millwork team.
8. How do corner diffusers affect thermal management and driver sizing?
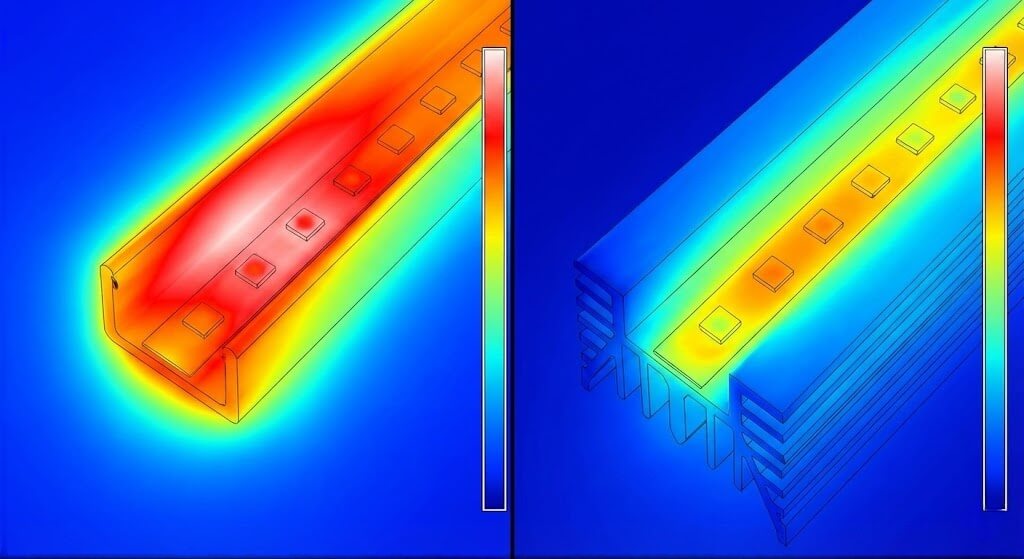
Heat is the quiet factor that decides service life. Corner profiles often sit in confined spaces (coves, millwork pockets), where convection is limited. A diffuser can trap heat if airflow is poor.
In thermal comparisons, the “same watts per meter” runs hotter when enclosed by a profile, diffuser, and sealed pocket. Higher temperature reduces lumen maintenance and can shift color over time.
Three practical implications:
- Don’t overspec watts per meter just to “push through” an opal diffuser. That adds heat and shortens life.
- Use aluminum profiles with real mass for higher power runs, not thin decorative channels.
- Driver sizing should include headroom. Drivers run at 100% load in warm ceiling voids fail earlier.
Common fixes that hold up:
- Reduce W/m and increase diffusion or LED density to keep the look while lowering temperature
- Add ventilation or avoid fully sealed coves where possible
- Use multiple injection points to reduce current per feed and keep brightness uniform
Our Chief Engineer notes: “Most heat problems aren’t from the LED. They come from choosing a diffuser/profile combo without checking airflow and mounting surface.”
9. What about moisture, cleaning chemicals, and safety compliance?
Corner lighting often lives where people clean, splash, or touch. Bathrooms, kitchens, bars, and public corridors all introduce moisture and chemicals.
Corner LED diffusers help by providing a barrier, but the sealing approach matters:
- Gaskets and end caps for splash zones
- Silicone diffusers for higher ingress protection designs
- Proper strain relief at cable exits to keep IP performance real
Many failures happen because “IP65 strip” is used inside a profile with unsealed joints or open end caps. Water enters through the ends, not through the strip surface.
Chemical exposure matters too. Some cleaners haze plastic diffusers, especially in hospitality where staff wipe surfaces daily. If the diffuser material isn’t resistant, it can turn cloudy and streaked quickly.
Safety and compliance points to track:
- UL/CE/RoHS requirements for your market
- Flame rating expectations for building interiors
- Low smoke / halogen-free cable demands in transport or public buildings
| Environmental condition | Typical risk | Suggested diffuser/profile choice | Site practice |
|---|---|---|---|
| Splash (bathroom) | Corrosion, shorts | Sealed profile, silicone or gasketed PC | Seal end caps; avoid open cable exits |
| Frequent cleaning | Haze, scratches | PC with chemical-resistant finish | Approve cleaner list with client |
| Public touch | Vandalism, cracking | Impact-resistant PC opal | Use recessed mounting if possible |
| Food zones | Grease film | Smooth diffuser surface | Plan wipe access, avoid textured traps |
The bottom line is liability: if a strip fails in a wet zone, the cost isn’t just replacement—it can become a safety incident.
10. How do you specify corner diffusers for repeatable, scalable projects?
Repeatability is where corner diffusers pay back. If you specify them as a system, you can roll the same lighting language across many rooms, floors, or stores with less variation.
A workable specification set usually includes:
- Profile geometry: corner angle, internal width, mounting method
- Diffuser type: opal/frosted/clear, material grade, transmittance target
- Strip definition: CCT, CRI, binning method, LEDs/m or COB, watt/m
- Electrical: 12V or 24V, feed plan, wire gauge, dimming protocol
Voltage choice often drives scalability more than people expect.
| Parameter | 12V system | 24V system | What it means for corners |
|---|---|---|---|
| Current for same power | Higher | Lower | Lower current reduces voltage drop risk |
| Max practical run length | Shorter | Longer | Longer continuous corner lines look more uniform |
| Wire gauge sensitivity | Higher | Lower | 24V tolerates longer leads from driver |
| Driver availability | Very common | Very common | Both fine; match to dimming system |
Three field patterns:
- Retail chains lean to 24V for long, clean perimeters with fewer injection points.
- Furniture makers sometimes use 12V for compact cabinets where drivers are standardized.
- Hospitality often standardizes one CCT and one diffuser across public spaces to keep visual continuity.
If you want fewer surprises, have a technical review of injection points, corner joints, and diffuser selection before orders are placed.
Conclusion
Corner LED diffusers change interior design outcomes because they control what people actually perceive: line continuity, glare, and how corners define space. The “look” is tied to technical choices—diffuser material, strip density or COB, profile angle, voltage drop planning, and heat handling in coves. Treat it as a system and you reduce rework.
If you’re unsure about diffuser haze level, injection spacing, or thermal margin for your corner details, send section drawings or a quick sketch to an engineering team for a fast sanity-check before ordering.
FAQ
Q1: What are corner LED diffusers?
Corner LED diffusers are covers used with corner-mounted LED strips to soften light, hide LED dotting, and protect the strip. They sit in wall-wall, wall-ceiling, or cabinet corners and create a continuous luminous line that looks intentional rather than improvised.
Q2: How do corner LED diffusers reduce glare?
They spread LED output across a larger emitting surface and lower peak intensity. Opal or frosted finishes reduce direct view of LED points, cutting discomfort glare when the line sits near eye level or in peripheral vision.
Q3: Do corner diffusers reduce brightness too much?
They can reduce delivered lumens, often 15–35% depending on material and thickness. The fix is to plan the lumen budget early and choose a more efficient strip or a better optical match, not to overdrive the strip in a sealed cove.
Q4: What’s better for corners: COB or SMD strips?
COB strips usually look more uniform at close viewing distances and tolerate shallower profiles. SMD strips can work well when density is high or the profile depth is adequate. The right choice depends on viewing distance, diffuser haze, and profile geometry.
Q5: How do I avoid failures in wet or high-cleaning areas?
Use a sealed profile system with proper end caps and cable exits, and confirm diffuser chemical resistance with the cleaning routine. Many water issues enter through unsealed ends or joints, not through the strip surface.
