
LED Strip Lights for Spiral Staircase: Complete Guide — Spiral staircases present unique lighting challenges that can leave homeowners and designers struggling with safety and aesthetics. Here’s the deal: LED strip lights offer an elegant solution that combines functionality with stunning visual appeal. This comprehensive guide covers everything you need to know about selecting, installing, and maintaining LED strip lights for spiral staircases.
1. Why Choose LED Strip Lights for Spiral Staircases?

Spiral staircases demand specialized lighting solutions due to their curved geometry and safety requirements. But here’s what makes LED strips perfect for this application: They provide continuous illumination that follows every curve and angle of your staircase.
LED strips offer several advantages over traditional lighting options. They consume significantly less energy than conventional bulbs while producing consistent light output. Their flexible design allows them to bend around curved surfaces without creating dark spots or shadows.
Safety Benefits
Proper stair lighting reduces accident risks by 60% according to safety studies. LED strips create uniform illumination that helps users clearly see each step. Their low heat output prevents burns from accidental contact during use.
Design Flexibility
LED strips come in various color temperatures and RGB options. You can create dramatic accent lighting or subtle pathway illumination. Some models offer programmable color-changing effects for special occasions.
Energy Efficiency
Modern LED strips use 80% less energy than incandescent alternatives. They last 25 times longer than traditional bulbs. This translates to lower electricity bills and reduced maintenance costs over time.
| Feature | LED Strips | Traditional Lighting |
|---|---|---|
| Energy Use | 12-24W per 5m | 100-300W equivalent |
| Lifespan | 50,000 hours | 2,000 hours |
| Heat Output | Minimal | High |
| Flexibility | Excellent | Poor |
| Installation | Easy | Complex |
2. What Types of LED Strip Lights Work Best for Curved Installations?
Ready for the technical details? Not all LED strips handle curves equally well. The key lies in understanding bend radius limitations and choosing appropriate strip types for your specific spiral staircase design.
Standard LED strips typically handle curves with a minimum bend radius of 2-3 inches. For tighter curves, you’ll need specialized flexible strips or corner connectors. The strip width affects flexibility – narrower strips bend more easily than wider ones.
Flexible Strip Options
Silicone-encased strips offer superior flexibility while maintaining waterproof protection. They bend smoothly around tight curves without damaging internal components. These strips work well for handrail installations and under-step mounting.
COB (Chip-on-Board) LED strips provide seamless light distribution without visible individual LEDs. They create smooth lighting effects perfect for architectural applications. Their construction allows tighter bending than traditional SMD strips.
Strip Width Considerations
5mm wide strips offer maximum flexibility for tight curves. 10mm strips balance flexibility with brightness output. 20mm strips provide highest brightness but require larger bend radius.
Voltage Options
12V strips work well for residential installations up to 16 feet. 24V strips handle longer runs without voltage drop issues. Higher voltage options reduce current requirements and allow thinner wire gauges.
| Strip Type | Bend Radius | Best Application | Brightness |
|---|---|---|---|
| 5mm Flexible | 10mm | Tight curves | Medium |
| 10mm Standard | 20mm | General use | High |
| COB Strip | 15mm | Smooth lighting | Very High |
| 20mm High-Power | 50mm | Maximum brightness | Extreme |
3. How Do You Plan the Perfect Lighting Layout for Spiral Stairs?
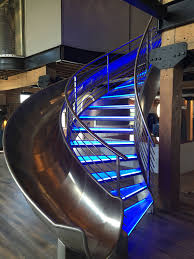
This is where strategy matters most. Effective spiral staircase lighting requires careful planning to ensure even illumination while highlighting architectural features. Poor planning leads to dark spots and uneven lighting that compromises both safety and aesthetics.
Start by measuring your staircase dimensions including step width, rise height, and overall spiral diameter. Count total steps and identify any landing areas. Note existing electrical connections and potential mounting surfaces.
Step-by-Step Planning Process
Create a detailed sketch showing each step and potential LED strip placement. Mark electrical connection points and calculate total strip length needed. Consider multiple lighting zones for different ambiance levels.
Plan for primary task lighting along step edges or risers. Add accent lighting under handrails or along the central column. Include backup lighting options for power outages or maintenance periods.
Mounting Location Options
Under-step mounting provides subtle uplighting that defines each step edge. Riser mounting offers direct downward illumination for maximum visibility. Handrail mounting creates elegant accent lighting while providing guidance.
Wall-mounted strips work well for wider spiral staircases. Center column mounting maximizes light distribution across all steps. Consider combining multiple mounting positions for layered lighting effects.
Power Distribution Strategy
Divide long runs into manageable sections to prevent voltage drop. Plan amplifier locations for RGB or high-power installations. Include dimmer controls for adjustable lighting levels throughout the day.
| Mounting Position | Visibility | Aesthetics | Installation Difficulty |
|---|---|---|---|
| Under Steps | Excellent | Subtle | Medium |
| Step Risers | Maximum | Bold | Easy |
| Handrail | Good | Elegant | Hard |
| Wall Mount | Very Good | Modern | Medium |
| Center Column | Good | Dramatic | Hard |
4. What Installation Methods Ensure Long-lasting Performance?
Here’s where proper technique makes all the difference. Professional installation methods prevent common failures like adhesive failure, water damage, and electrical issues that plague DIY installations.
Surface preparation determines adhesive longevity. Clean all mounting surfaces with isopropyl alcohol to remove dust, oils, and residues. Allow surfaces to dry completely before applying strips. Test adhesion on small sections before full installation.
Adhesive Enhancement Techniques
Use primer on porous surfaces like concrete or unsealed wood. Apply additional mechanical fasteners every 12 inches for critical installations. Consider aluminum channels for professional appearance and heat dissipation.
Heat activation improves adhesive bonds significantly. Use a hair dryer to warm strips during installation. Apply firm pressure for 30 seconds per foot of installed strip. Allow 24 hours cure time before applying full load.
Electrical Connection Best Practices
Use IP65-rated connectors for outdoor or high-humidity installations. Solder connections provide superior reliability over clip connectors. Apply heat shrink tubing over all connections for moisture protection.
Install inline fuses to protect against overcurrent conditions. Use appropriate wire gauges based on strip current requirements and run lengths. Ground all metal components properly for safety.
Environmental Protection
Choose appropriate IP ratings for your installation environment. IP20 works for dry indoor locations. IP65 handles moisture and dust exposure. IP68 provides submersion protection for extreme conditions.
Seal all entry points where wires penetrate surfaces. Use appropriate gaskets and sealants rated for your specific materials. Plan drainage paths for areas prone to water accumulation.
5. Which Control Systems Provide the Best User Experience?

Want to know the secret to professional-grade lighting control? Modern LED strip control systems offer sophisticated features that transform basic lighting into intelligent ambiance management. The right controller makes the difference between simple on-off operation and dynamic lighting experiences.
Basic dimmer switches provide manual brightness control for single-color strips. PWM controllers offer smooth dimming without color shifting. Smart controllers enable remote operation, scheduling, and integration with home automation systems.
Smart Control Features
WiFi-enabled controllers connect directly to home networks without additional hubs. Smartphone apps provide intuitive control interfaces with preset scenes and custom programming. Voice control integration works with Alexa, Google Assistant, and Siri.
Motion sensors automatically activate lighting when someone approaches the stairs. Daylight sensors adjust brightness based on ambient light levels. Timer functions provide automatic on-off scheduling for energy savings.
RGB and Color Control
RGB controllers manage red, green, and blue channels independently. RGBW models add dedicated white LEDs for better color mixing. Addressable controllers enable individual pixel control for dynamic effects.
Color temperature adjustment mimics natural daylight cycles. Warm whites (2700K-3000K) create cozy evening ambiance. Cool whites (4000K-6500K) provide alertness for task lighting.
Integration Options
Z-Wave and Zigbee protocols integrate with existing home automation systems. DMX512 controllers work with professional lighting systems. Standalone systems offer simplicity without network dependencies.
| Controller Type | Features | Best For | Price Range |
|---|---|---|---|
| Basic Dimmer | Brightness only | Simple installs | $15-30 |
| WiFi Smart | Remote, scheduling | Modern homes | $40-80 |
| RGB Controller | Color changing | Entertainment | $60-120 |
| Professional DMX | Advanced effects | Commercial | $150-400 |
6. How Do You Address Common Spiral Staircase Lighting Challenges?
Every spiral staircase presents unique obstacles. Understanding these challenges beforehand prevents costly mistakes and ensures successful installations. Professional installers encounter specific issues repeatedly across different projects.
Voltage drop affects longer strip runs, causing brightness variations and color shifts. Calculate voltage drop using strip specifications and wire gauge charts. Install amplifiers at regular intervals to maintain consistent performance.
Dealing with Tight Curves
Extremely tight curves can damage LED strips if forced beyond their bend radius. Use flexible silicone strips for curves under 20mm radius. Install corner connectors for sharp direction changes exceeding strip capabilities.
Heat buildup occurs in confined spaces without adequate ventilation. Aluminum channels provide heat dissipation while protecting strips from damage. Space strips appropriately to prevent thermal interference between parallel runs.
Structural Mounting Issues
Concrete and masonry surfaces require special anchoring methods. Use masonry screws and appropriate wall plugs for secure mounting. Pre-drill holes to prevent surface cracking during installation.
Metal staircases may require electrical isolation to prevent ground loops. Use non-conductive mounting materials between strips and metal surfaces. Ensure proper grounding for safety while avoiding electrical interference.
Power Supply Placement
Spiral staircases often lack convenient electrical access points. Plan power supply locations early in the design process. Consider distributed power supplies for long runs rather than single central units.
Hidden wiring requires careful routing through existing structures. Use flexible conduit for wire protection in curved runs. Plan access points for future maintenance and troubleshooting.
| Challenge | Solution | Prevention |
|---|---|---|
| Voltage Drop | Amplifiers | Proper planning |
| Tight Curves | Flexible strips | Correct selection |
| Heat Issues | Ventilation | Spacing design |
| Mounting | Right hardware | Surface prep |
| Wiring | Careful routing | Early planning |
7. What Safety Considerations Are Critical for Stair Lighting?
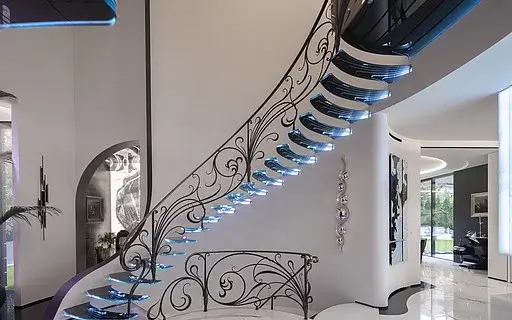
Safety can never be compromised when it comes to stair lighting. Poorly designed or installed lighting systems create serious hazards that can result in falls, injuries, and liability issues. Professional installations must meet specific safety standards and codes.
Electrical safety requires proper grounding, circuit protection, and appropriate ratings for the installation environment. Use GFCI protection for any installation near water sources. Install emergency lighting backup systems for critical stairways.
Code Compliance Requirements
Local electrical codes specify minimum illumination levels for stairs. Most codes require 10-20 lux average illumination on step surfaces. Check with local authorities for specific requirements in your area.
Emergency egress lighting must remain operational during power outages. Battery backup systems or emergency generators ensure continued operation. Test emergency systems monthly to verify proper function.
Installation Safety Practices
Turn off power at the circuit breaker before beginning any electrical work. Use proper lockout/tagout procedures for commercial installations. Test all circuits with appropriate meters before touching any wires.
Wear appropriate personal protective equipment including safety glasses and non-slip footwear. Use proper ladders and scaffolding for high installations. Never work alone on complex or dangerous installations.
User Safety Features
Motion-activated lighting provides automatic illumination when someone approaches. Gradual brightness ramping prevents sudden light changes that could cause disorientation. Red-shifted lighting preserves night vision during late-night use.
Non-slip step markers enhance visibility and provide tactile feedback. Contrast lighting highlights step edges for better depth perception. Consistent lighting levels prevent adaptation delays between bright and dark areas.
8. How Do You Select Quality LED Strips That Last?
Here’s the truth about LED strip quality: Not all strips are created equal, and cheap options often lead to premature failures and safety issues. Understanding quality indicators helps you make informed purchasing decisions that ensure long-term satisfaction.
High-quality LED chips from manufacturers like Samsung, LG, or Epistar provide consistent color and brightness over time. Cheaper chips experience rapid degradation and color shifting. Check specifications for chip manufacturer and bin ratings.
Construction Quality Indicators
Double-sided copper PCBs provide better heat dissipation than single-sided boards. Thicker copper traces handle higher currents without overheating. Look for boards with adequate trace width for the specified current rating.
High-quality strips use pure copper wires rather than copper-clad aluminum. Pure copper provides better conductivity and durability. Check wire gauge specifications to ensure adequate current capacity.
Certification and Testing
Look for strips with appropriate safety certifications including UL, CE, or RoHS compliance. These certifications indicate the products meet safety and environmental standards. Avoid uncertified products for critical installations.
Lumen maintenance ratings indicate how much brightness the strips retain over time. L70 ratings show the operating hours until brightness drops to 70% of initial output. Quality strips typically offer L70 ratings of 50,000+ hours.
Warranty and Support
Reputable manufacturers offer comprehensive warranties covering defects and performance issues. Look for warranties of 3-5 years for quality products. Shorter warranties often indicate lower confidence in product durability.
Technical support availability helps resolve installation and performance issues. Choose suppliers with knowledgeable support staff and comprehensive documentation. Good support reduces installation time and prevents costly mistakes.
| Quality Factor | Premium | Standard | Budget |
|---|---|---|---|
| LED Chips | Samsung/LG | Generic Branded | Unknown |
| PCB Construction | Double Copper | Single Copper | Aluminum |
| Certifications | UL/CE/RoHS | CE/RoHS | None |
| Warranty | 5 Years | 2-3 Years | 1 Year |
| Support | Excellent | Good | Limited |
9. What Maintenance Practices Extend LED Strip Lifespan?

Regular maintenance makes the difference between 10-year and 3-year lifespans. Simple practices prevent common failure modes and maintain optimal performance throughout the strip’s operational life. Neglected installations often fail prematurely due to preventable issues.
Dust accumulation reduces light output and increases operating temperatures. Clean strips quarterly using soft brushes or compressed air. Avoid harsh chemicals that could damage protective coatings or adhesives.
Inspection Procedures
Monthly visual inspections identify potential issues before they cause failures. Look for discolored sections indicating overheating. Check for loose connections, damaged wires, or adhesive separation.
Annual electrical testing verifies proper operation and identifies degradation trends. Measure voltage at multiple points along strip runs. Test ground fault protection and emergency systems according to manufacturer recommendations.
Preventive Replacement
Replace aging power supplies before they fail completely. Power supply capacitors typically degrade after 5-7 years of operation. Proactive replacement prevents sudden failures that could damage LED strips.
Update control systems as technology advances to maintain compatibility and add new features. Older controllers may lack security updates needed for network-connected systems.
Environmental Monitoring
Temperature monitoring prevents overheating in confined installations. Install temperature sensors in enclosed spaces with poor ventilation. Set alerts for temperatures exceeding strip ratings.
Humidity control prevents condensation damage in climate-controlled environments. Maintain relative humidity below 80% to prevent moisture-related failures. Use dehumidifiers in problematic areas.
Documentation and Records
Maintain installation records including strip specifications, installation dates, and configuration details. Document any modifications or repairs for future reference. Keep warranty information and supplier contact details readily available.
Schedule regular maintenance reminders to ensure consistent care. Use calendar systems or maintenance software to track inspection schedules. Train building maintenance staff on proper care procedures.
10. How Do You Troubleshoot Common LED Strip Problems?
When things go wrong, quick diagnosis saves time and money. Understanding common failure modes and their solutions helps restore proper operation quickly. Most LED strip problems fall into predictable categories with straightforward solutions.
Dim or flickering lights often indicate power supply issues or loose connections. Check voltage at the power supply output and at multiple points along the strip. Verify all connections are tight and properly made.
Power-Related Issues
Power supply failures cause complete section outages or erratic behavior. Test power supplies with multimeters to verify proper output voltage. Replace failed units with appropriately rated replacements.
Voltage drop creates brightness variations along strip runs. Install voltage amplifiers or additional power supplies to maintain consistent levels. Use thicker wire gauges for long runs to reduce resistance losses.
Connection Problems
Corrosion affects outdoor installations and high-humidity environments. Clean corroded connections with contact cleaner and apply protective coatings. Replace severely corroded connectors with appropriate rated alternatives.
Mechanical stress causes wire breaks and connection failures. Support cables properly to prevent tension on connections. Use strain relief boots and flexible conduit for moving installations.
LED Degradation
Color shifting indicates LED chip degradation or driver circuit issues. Replace affected strip sections if color matching is critical. Consider upgrading to higher quality strips for better color stability.
Dead sections often result from overcurrent conditions or manufacturing defects. Test remaining sections to verify proper operation. Replace failed sections with identical specifications to maintain consistency.
Control System Issues
WiFi connectivity problems affect smart lighting systems. Check network signal strength and router compatibility. Update firmware and reset controllers if necessary.
Programming issues cause incorrect operation or loss of settings. Back up controller settings before making changes. Use manufacturer software tools for complex programming tasks.
| Problem | Likely Cause | Solution |
|---|---|---|
| No light | Power failure | Check supply |
| Dim light | Voltage drop | Add amplifier |
| Flickering | Loose connection | Tighten joints |
| Color shift | LED degradation | Replace section |
| Control failure | Software issue | Reset/update |
Conclusion
LED strip lights transform spiral staircases into stunning architectural features while providing essential safety illumination. The key to success lies in proper planning, quality components, and professional installation techniques. From initial design through long-term maintenance, attention to detail ensures optimal performance and longevity.
Successful spiral staircase lighting projects require understanding the unique challenges these installations present. Voltage drop management, flexible mounting solutions, and appropriate control systems work together to create reliable, beautiful lighting systems.
Quality components and proper installation techniques provide years of trouble-free operation. Regular maintenance extends system life while preserving performance characteristics. Professional technical support helps resolve issues quickly when they arise.
Frequently Asked Questions
Q1: What is the minimum bend radius for LED strips on spiral staircases?
Most standard LED strips require a minimum bend radius of 20-30mm to prevent damage to internal components. For tighter curves common in spiral staircases, use specialized flexible strips with 10-15mm bend radius capabilities. Silicone-encased strips offer the best flexibility while maintaining protection against moisture and dust.
Q2: How do you prevent voltage drop in long LED strip runs on spiral staircases?
Voltage drop prevention requires strategic power supply placement and proper wire sizing. Install power injection points every 16-20 feet for 12V strips or 32-40 feet for 24V strips. Use 14-16 AWG wire for power distribution and consider installing multiple smaller power supplies rather than one large central unit. Voltage amplifiers boost signal strength for RGB installations.
Q3: What IP rating do LED strips need for outdoor spiral staircases?
Outdoor spiral staircase installations require minimum IP65 rating for protection against rain and dust. For areas with direct water exposure or potential submersion, choose IP67 or IP68 rated strips. Indoor installations in dry environments can use IP20 rated strips, while bathrooms or high-humidity areas need IP44 minimum protection.
Q4: How many lumens per foot are needed for safe stair lighting?
Safe stair lighting requires 10-20 lux (approximately 100-200 lumens per foot) measured at step surfaces. Spiral staircases may need higher levels due to curved geometry creating shadow areas. Use light meters to verify actual illumination levels meet local building codes. Consider adding accent lighting for improved visibility and aesthetics.
Q5: What control options work best for spiral staircase LED strips?
Motion-activated controls provide automatic operation while conserving energy. Smart controllers with smartphone apps offer convenient remote operation and scheduling features. Dimmer controls allow brightness adjustment for different times of day. For complex installations, consider DMX controllers that enable advanced programming and integration with architectural lighting systems.
