
Emergency lights are vital for the safety of a building’s occupants during power outages or emergencies, but their effectiveness depends on the condition of their batteries. Over time, batteries in emergency lights need replacement to keep the system operational when most needed. Replacing an emergency light battery can be simple with proper guidance. In this guide, we’ll walk you through the steps to replace an emergency light battery in 10 easy steps, ensuring your emergency lighting system remains in peak condition.

Whether you’re a facility manager or a DIY enthusiast, these steps will help you keep your emergency lights ready for action.
To replace an emergency light battery, the first step is to turn off the power supply to the unit. This is crucial for your safety and to prevent any electrical hazards during the replacement process.
Once the power is off, locate the battery compartment, which is usually accessed by removing a cover or panel on the light fixture. Carefully remove the old battery, paying attention to how it is connected. Most emergency lights use either plug-in connectors or terminal screws, so you’ll need to disconnect these safely.
Before inserting the new battery, take a moment to inspect the battery compartment for any signs of corrosion or damage. Clean the compartment if necessary, then carefully insert the new battery, ensuring it is connected securely and positioned correctly.
After reassembling the unit, restore power and test the light to make sure the new battery is functioning properly. Finally, perform a full system check and document the replacement in your maintenance log. By following these steps, you can confidently replace your emergency light battery and ensure your lighting system remains reliable.
Understanding Your Emergency Light Battery
Follow these steps to replace an emergency light battery, ensuring your system functions optimally. Emergency light batteries vary widely, including sealed lead-acid (SLA), nickel-cadmium (NiCd), and nickel-metal hydride (NiMH) types.
SLA batteries are popular for their reliability and cost-effectiveness, offering a long shelf life and consistent power, perfect for emergency lighting. NiCd batteries excel in extreme temperatures and are durable, but require careful disposal due to toxicity. NiMH batteries are eco-friendlier and have higher energy density, though they may not last as long as SLA batteries.

Selecting the right replacement battery is critical for your emergency lighting’s effectiveness. It’s vital to match the new battery to your system’s specifications like voltage, capacity, and size to avoid power issues or damage.
Always follow the manufacturer’s guidelines or refer to the existing battery’s specifications when choosing a replacement to ensure your emergency lights work reliably in critical moments.
Preparing for the Battery Replacement
Proper preparation is key to a smooth and successful emergency light battery replacement. Before you begin, gather all the necessary tools and materials. Typically, you’ll need a screwdriver, wire cutters, electrical tape, and of course, the new battery. Having all your tools ready before starting the process will save time and help prevent interruptions.
Safety is paramount when working with electrical components. Always start by turning off the power supply to the emergency light unit. This prevents the risk of electric shock and ensures that the replacement process can be carried out safely. If your emergency light is hardwired into the building’s electrical system, you may need to turn off the circuit breaker that controls the unit.
It’s also important to work in a well-lit and stable environment. Use a sturdy ladder if the emergency light is mounted high, and make sure you have a stable surface to place your tools and the new battery. Wearing insulated gloves can provide an extra layer of protection when handling electrical components.
By taking these precautions and planning carefully, you can replace your emergency light battery efficiently and safely, ensuring your emergency lighting system remains reliable and effective.
Step-by-Step Guide to Replacing an Emergency Light Battery
Explore our comprehensive step-by-step guide to replacing an emergency light battery. This guide offers clear instructions and essential tips, ensuring you can confidently perform replacements and maintain optimal safety.
Step 1: Turn Off the Power Supply
The first and most crucial step in replacing an emergency light battery is to turn off the power supply to the unit. This is essential for your safety and to prevent any electrical hazards. If the emergency light is hardwired into the building’s electrical system, locate the appropriate circuit breaker and switch it off.
For battery-operated units, simply disconnect the light from its power source by removing the plug from the outlet. To ensure that no power is running to the unit, try activating the emergency light after the power is off—if it doesn’t light up, you’re good to go.
Step 2: Access the Battery Compartment
Once the power supply is safely turned off, the next step is to access the battery compartment. Most emergency lights have a cover or panel that protects the battery compartment. This cover is usually secured with screws. Use a screwdriver to carefully remove these screws and set them aside in a safe place where they won’t get lost.
Gently remove the cover to reveal the battery inside. Depending on the design of your emergency light, you might need to use a flathead screwdriver or a similar tool to pry open the compartment if it’s tightly sealed. Be careful not to damage any internal components while opening the compartment.
Step 3: Remove the Old Battery
With the battery compartment open, you can now proceed to remove the old battery. Start by noting the orientation and connections of the existing battery so that you can install the new one correctly. Carefully disconnect the battery terminals, either by unscrewing them or by gently pulling apart any plug-in connectors.
Take extra care not to pull or tug on the wires, as this could damage the connectors. Once disconnected, lift the old battery out of the compartment. Proper disposal of the old battery is important, as these batteries contain chemicals that can be harmful to the environment.
Many local waste management facilities offer battery recycling services, so take the old battery there for safe disposal.
Step 4: Inspect the Battery Compartment
Before installing the new battery, it’s important to inspect the battery compartment thoroughly. Look for any signs of corrosion, dirt, or damage. Corrosion, typically seen as a white or bluish residue on the metal contacts, can interfere with the performance of the new battery.
If you notice any corrosion, clean the contacts with a small brush and a solution of baking soda and water. Dry the compartment thoroughly afterward to ensure no moisture remains.
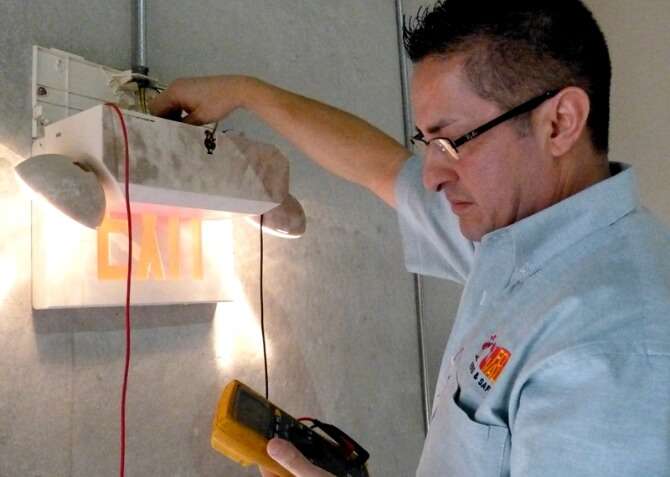
Additionally, check the compartment for any loose wires or damaged components, and address these issues before proceeding with the installation. A clean and intact battery compartment is essential for ensuring the new battery operates efficiently.
Step 5: Insert the New Battery
Now that the compartment is clean and ready, follow these steps to replace the emergency light battery. Begin by positioning the new battery to align with the orientation of the old one. Securely connect the battery terminals, either by screwing them in place or reattaching the plug-in connectors. Ensuring that these connections are tight is crucial to prevent any power interruptions.
Once you connect the battery, gently place it into the compartment, ensuring it sits firmly without movement. After installing the battery, reattach the cover or panel and secure it with the screws you set aside earlier. Double-check that everything is reassembled correctly before restoring power to the unit.
This methodical approach ensures that your new emergency light battery is installed properly and ready to provide reliable service in the event of an emergency.
Step 6: Reassemble the Unit
After installing the new battery, the next step is to reassemble the emergency light unit. Begin by carefully placing the battery compartment cover back into position. Make sure it fits snugly and aligns correctly with the housing.

Use the screws you set aside earlier to secure the cover, tightening them evenly to avoid any gaps that could expose the battery to dust or moisture. Before fully securing the cover, double-check all connections inside the compartment. Ensure that the battery is firmly connected and that no wires are pinched or out of place. This final check helps prevent any issues that might arise after reassembly.
Once you’re confident that everything is secure and correctly positioned, complete the reassembly by tightening the screws fully. A properly reassembled unit not only looks neat but also ensures the long-term reliability of your emergency lighting system.
Step 7: Restore Power and Test the Light
With the unit reassembled, it’s time to restore power and test the emergency light to ensure the new battery is functioning correctly. If you previously turned off the circuit breaker, switch it back on to restore power to the unit. For battery-operated models, simply reconnect the power source.
Once power is restored, activate the emergency light using the test button on the unit. The light should illuminate immediately, indicating that the new battery is working as expected. Observe the light for a few minutes to ensure it remains steady and bright.
If the light doesn’t turn on or if it flickers, recheck the battery connections and ensure the battery is properly seated. Testing the light immediately after installation is crucial to confirm that the replacement was successful and that the unit is ready for use in an emergency.
Step 8: Perform a Full System Check
After confirming that the individual light works correctly, it’s crucial to follow the steps to replace the emergency light battery and then conduct a full system check. This ensures the entire emergency lighting setup functions as intended.
Test each emergency light in the building one at a time to verify they all activate correctly when the power is cut. If your system includes a central control unit, use it to simulate a power outage and observe the response of all connected lights. Pay attention to any lights that do not activate or show signs of dimming or flickering.
Address these issues immediately by checking the connections or replacing additional batteries as necessary. A comprehensive system check helps ensure that every component of your emergency lighting system is operational, fully preparing your building for any emergency situation.
Step 9: Record the Replacement
Once the new battery has been installed and tested, it’s important to document the replacement. Record the date of the battery replacement in your maintenance log, along with details such as the type of battery used and any issues encountered during the process.
Keeping a detailed record helps track the maintenance history of your emergency lighting system, making it easier to anticipate future needs and schedule regular replacements. This documentation is not only useful for maintenance purposes but also for compliance with safety regulations, which often require records of all maintenance activities.
If your building undergoes inspections, having an up-to-date maintenance log can demonstrate that you are actively maintaining your emergency lighting system in accordance with regulatory standards.
Step 10: Schedule the Next Replacement
To ensure your emergency lighting system remains reliable, it’s crucial to plan ahead for the next battery replacement. Most emergency light batteries have a lifespan of 3 to 5 years, but this can vary depending on usage and environmental factors.
Based on the type of battery you installed and the usage conditions, set a reminder to check and possibly replace the battery before it reaches the end of its expected life. A digital calendar, maintenance software, or even a simple spreadsheet can be used to track replacement schedules.
Regularly scheduled replacements help prevent unexpected failures and ensure that your emergency lighting system is always ready to perform. By proactively managing the maintenance schedule, you can maintain the safety and compliance of your building without the stress of last-minute repairs.

Common Mistakes to Avoid During Battery Replacement
Replacing an emergency light battery might seem straightforward, but several common mistakes can compromise the process. One frequent error is neglecting to turn off the power supply before starting. This oversight can lead to electric shock or damage to the light’s internal components. Always ensure the power is fully disconnected before beginning the replacement.
Another common mistake is using the wrong type of battery. Installing a battery with incorrect specifications can result in poor performance or even damage to the emergency light. To avoid this, always check the manufacturer’s guidelines and match the battery type and specifications exactly.
Additionally, improper handling of the battery, such as pulling on wires or terminals too hard, can cause damage to connections.
Handle the battery and its connections with care to ensure everything remains intact. Finally, rushing the reassembly process without double-checking connections can lead to malfunctions. Take the time to ensure all connections are secure and that the unit is properly reassembled for reliable operation.
Tools and Resources
Having the right tools on hand is essential for a smooth and successful emergency light battery replacement. Basic tools you’ll need include a screwdriver (usually a Phillips or flathead), wire cutters or strippers, and electrical tape.
For more complex setups, a multimeter can be useful for checking the voltage and ensuring the battery is correctly connected. Insulated gloves are also recommended to protect against accidental electric shocks.
In addition to tools, several online resources can assist with the battery replacement process. Manufacturer websites often provide detailed guides and troubleshooting tips specific to your emergency light model.
Websites like the National Fire Protection Association (NFPA) offer guidelines and safety standards for emergency lighting systems. YouTube tutorials can also provide visual step-by-step instructions for replacing emergency light batteries. Using these resources can enhance your understanding and ensure a successful replacement.
Conclusion
In this guide, we outline the critical steps to replace an emergency light battery, ensuring your system remains functional and reliable. Start by turning off the power supply, access the battery compartment, test the light, and schedule your next replacement.
By meticulously following these steps and avoiding common pitfalls, you can prolong the life of your emergency lights and safeguard your building’s safety.
If you encounter any difficulties during the battery replacement or have doubts about the process, seeking professional help is advisable. Maintaining your emergency lighting system is essential for its performance in critical times.
Whether you manage the replacement yourself or opt for professional assistance, acting today secures your building’s safety for tomorrow.
