
Harnessing the power of the sun, solar flood lights offer an energy-efficient and eco-friendly way to illuminate your outdoor spaces. Proper wiring is essential to ensure these lights operate efficiently and provide the desired brightness. In this guide, we’ll walk you through the detailed wiring solar flood lights instructions, making it easy for any energy-conscious homeowner to set up their system.

By following these instructions, you can enjoy the benefits of sustainable lighting and enhance the security and aesthetics of your home.
Wiring Solar Flood Lights Involves a Few Straight Forward Steps.
Here’s a quick overview to get you started:
- Prepare the Installation Area:
- Choose a location with ample sunlight exposure.
- Clear any obstructions that might block the sun.
- Mount the Solar Panel:
- Secure the solar panel on a surface that receives maximum sunlight.
- Use brackets or mounts provided with the panel for stability.
- Wire the Solar Panel to the Battery:
- Connect the positive and negative terminals of the solar panel to the corresponding terminals on the battery.
- Ensure all connections are tight and secure.
- Connect the Battery to the Flood Light:
- Attach the positive and negative wires from the battery to the flood light.
- Use waterproof connectors to protect against the elements.
- Test the System:
- Once all connections are made, test the flood light by covering the solar panel to simulate darkness.
- Ensure the light turns on and functions correctly.
While the initial overview provides a basic understanding of wiring solar flood lights, there’s much more to learn to ensure a successful installation. In the following sections, we’ll delve deeper into the essential components of solar flood lights and the tools and materials you’ll need.
This detailed guide will equip you with the knowledge to effectively wire your solar flood lights, ensuring they perform optimally and last for years by following our wiring solar flood lights instructions.
Understanding Solar Flood Light Components
Solar flood lights consist of several key components, each playing a crucial role in the system’s functionality:
- Solar Panel:
- The solar panel captures sunlight and converts it into electrical energy. It’s the powerhouse of the system, ensuring that your flood lights have a consistent energy source.
- Battery:
- The battery stores the electrical energy generated by the solar panel. This stored energy is used to power the flood lights during the night or in low-light conditions. A high-quality battery ensures long-lasting performance and reliability.
- Flood Light:
- The flood light is the component that provides illumination. It is typically equipped with LED bulbs for energy efficiency and bright light output.
- Charge Controller:
- The charge controller regulates the power going from the solar panel to the battery, preventing overcharging and prolonging the battery’s lifespan.
- Cabling and Connectors:
- These are essential for connecting all the components together. They ensure that the power generated by the solar panel is efficiently transferred to the battery and flood light.

Understanding the function of each component helps in proper installation and maintenance, ensuring your solar flood lights operate effectively and efficiently.
Tools and Materials You’ll Need
Having the right tools and materials is crucial for a smooth installation process. Here’s what you’ll need:
Tools Required:
- Screwdriver set (Phillips and flat-head)
- Drill with drill bits (for mounting)
- Wire strippers/cutters
- Pliers
- Ladder (for mounting solar panel and flood light)
- Multimeter (for checking connections)
Additional Materials:
- Waterproof connectors
- Electrical tape
- Mounting brackets or clamps (usually included with the solar panel)
- Zip ties (for securing cables)
- User manual (for reference to specific model instructions)
These tools and materials will help you efficiently wire and install your solar flood lights. Proper preparation ensures a hassle-free process, allowing you to enjoy the benefits of solar-powered lighting with minimal effort.
Step-by-Step Wiring Guide
Follow these wiring solar flood lights instructions in this step-by-step guide to ensure a safe and efficient installation. From connecting the panels to securing the wiring, these instructions will help you set up your solar flood lights for optimal performance. Enjoy reliable, eco-friendly outdoor lighting with proper wiring techniques.
Preparing the Installation Area
Selecting and preparing the installation site is the first crucial step in wiring your solar flood lights. The performance of your solar flood lights heavily depends on the location and exposure to sunlight.
Choosing the Location:
- Select a site that receives ample sunlight throughout the day. Avoid shaded areas caused by trees, buildings, or other obstructions.
- Consider the area you want to illuminate and ensure the floodlight can cover it effectively from the chosen spot.
Preparing the Site:
- Clear any debris, branches, or obstacles that might block the sunlight or obstruct the installation process.
- Ensure the ground or mounting surface is stable and secure to support the solar panel and floodlight.
Tips for Optimal Sunlight Exposure:
- Position the solar panel facing true south (in the Northern Hemisphere) or true north (in the Southern Hemisphere) to maximize sunlight exposure.
- Tilt the solar panel at an angle equal to your latitude for optimal year-round performance.
Mounting the Solar Panel
Properly mounting the solar panel is essential for maximizing sunlight capture and ensuring efficient energy conversion.
Mounting Instructions:
- Assemble the Mounting Brackets:
- Use the brackets provided with the solar panel. Attach them securely to the panel using the screws and tools supplied.
- Position the Panel:
- Place the panel in the chosen location. Use a ladder if necessary to reach high spots.
- Secure the Panel:
- Drill holes into the mounting surface if required. Use appropriate anchors for the surface type (e.g., masonry anchors for brick walls).
- Secure the panel using screws or bolts. Ensure the panel is firmly attached and will not move in strong winds or adverse weather conditions.
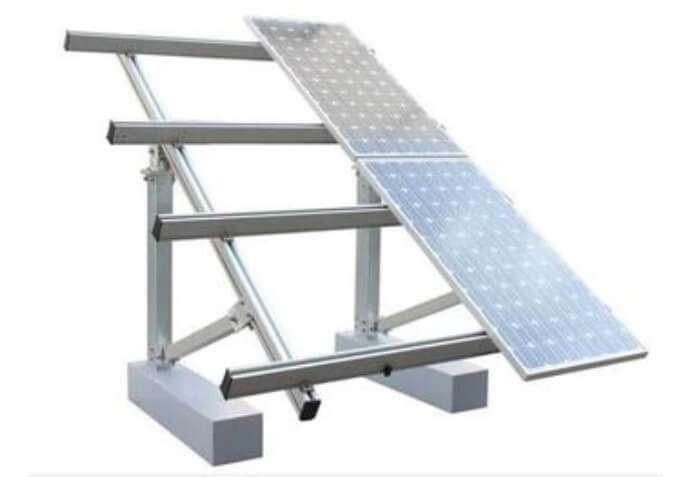
Importance of Positioning:
- Proper positioning ensures the solar panel receives maximum sunlight, which is crucial for efficient energy production.
- Avoid areas where the panel might be shaded during peak sunlight hours.
Wiring the Solar Panel to the Battery
Connecting the solar panel to the battery is a critical step that requires careful attention to detail to ensure safety and functionality.
Wiring Instructions:
- Locate the Terminals:
- Identify the positive and negative terminals on both the solar panel and the battery. These are usually marked with a plus (+) and minus (-) sign.
- Connect the Cables:
- Use appropriate gauge cables to connect the solar panel to the battery. Typically, red cables are used for positive connections and black cables for negative.
- Attach the positive cable from the solar panel to the positive terminal of the battery.
- Similarly, connect the negative cable from the solar panel to the negative terminal of the battery.
- Secure the Connections:
- Ensure all connections are tight and secure to prevent any electrical faults. Use a multimeter to check for continuity if needed.
Safety Tips for Handling Electrical Connections:
- Always wear insulated gloves when handling electrical components to prevent shocks.
- Double-check all connections before powering up the system to ensure there are no short circuits.
Connecting the Battery to the Flood Light
Once the solar panel is connected to the battery, the next step is to wire the battery to the floodlight.
Wiring Instructions:
- Identify the Terminals:
- Locate the positive and negative terminals on the battery and the floodlight.
- Connect the Cables:
- Use waterproof connectors to attach the positive cable from the battery to the positive terminal on the floodlight.
- Connect the negative cable from the battery to the negative terminal on the floodlight.
- Secure and Protect:
- Ensure all connections are secure and use electrical tape or waterproof connectors to protect them from moisture and weather conditions.
Ensuring Secure and Weatherproof Connections:
- Use zip ties to neatly bundle and secure the cables, preventing them from being damaged by wind or animals.
- Apply waterproof sealant around the connectors to protect against rain and humidity.

Testing the System
Testing your solar floodlight system is the final step to ensure everything is working correctly. This involves simulating night-time conditions and checking for any issues.
Testing Instructions:
- Cover the Solar Panel:
- Simulate darkness by covering the solar panel with a cloth or opaque material. This should trigger the floodlight to turn on.
- Check the Light:
- Ensure the floodlight turns on and provides adequate illumination. Adjust the angle and position if necessary to cover the desired area.
- Inspect Connections:
- Check all connections to ensure they are secure and there are no loose wires. Use a multimeter to verify the voltage if needed.
Troubleshooting Common Issues:
- Floodlight Does Not Turn On:
- Check if the battery is charged. Ensure the solar panel is positioned correctly and receiving sunlight.
- Verify all connections between the solar panel, battery, and floodlight are secure.
- Intermittent Lighting:
- Inspect the connections for any loose or corroded wires. Ensure the battery is in good condition and replace if necessary.
By following these detailed steps, you can successfully wire your solar flood lights and enjoy the benefits of sustainable, efficient outdoor lighting. Proper installation and maintenance, guided by these wiring solar flood lights instructions, ensure your system will provide reliable illumination for years to come.
Troubleshooting Common Issues
During the installation of solar flood lights, you may encounter several common problems. Here’s how to address them effectively:
Floodlight Not Turning On:
- Solution: Ensure the battery is fully charged by placing the solar panel in direct sunlight for at least 8 hours. Check all connections between the solar panel, battery, and floodlight to ensure they are secure and correctly aligned.
Intermittent Lighting:
- Solution: Inspect the wiring for any loose or corroded connections. Make sure the solar panel is not shaded during the day and that it is clean and free from debris. If the battery is old, consider replacing it with a new one.
Low Light Output:
- Solution: Verify that the solar panel is receiving maximum sunlight exposure throughout the day. Clean the panel to remove any dirt or dust that may be obstructing sunlight. Check the settings on the floodlight to ensure it is set to the desired brightness level.
FAQs:
- Can I extend the cable length between the solar panel and the floodlight? Yes, but ensure the cables are of appropriate gauge to handle the power load and are weatherproofed.
- What should I do if my solar floodlight still doesn’t work after troubleshooting? Contact the manufacturer’s customer support for further assistance or consider professional help.
Maintenance Tips for Solar Flood Lights
Maintaining your solar flood lights ensures they operate efficiently and last longer. Follow these best practices for optimal performance year-round:
Regular Cleaning:
- Clean the solar panel with a soft cloth and mild detergent to remove dust and debris. This ensures maximum sunlight absorption.
- Wipe the floodlight and motion sensor to prevent dirt buildup, which can affect performance.
Inspection and Adjustment:
- Regularly inspect all connections and wiring for signs of wear or damage. Tighten any loose connections and replace damaged wires immediately.
- Adjust the angle of the solar panel seasonally to maximize sunlight exposure as the sun’s position changes.
Battery Care:
- Check the battery regularly to ensure it holds a charge. Replace the battery every 1-2 years, or as recommended by the manufacturer, to maintain optimal performance.
- During winter or extended periods of cloudy weather, consider temporarily disconnecting the system to prevent battery drain.
Environmental Considerations:
- Trim any overhanging branches or vegetation that might cast shadows on the solar panel.
- Ensure the panel is free from snow or ice buildup in winter months to maintain efficiency.
By following these maintenance tips, you can ensure your solar flood lights remain efficient and reliable, providing sustainable illumination for your home year-round.

Additional Resources
These resources provide step-by-step instructions and visual demonstrations to help you through the installation process.
Recommended Online Communities and Forums:
Joining these communities allows you to connect with other solar lighting enthusiasts, share experiences, ask questions, and get advice on wiring and maintaining your solar flood lights.
Conclusion
Remember, proper maintenance ensures your solar lighting system remains effective year-round. Feel free to share your success stories or ask further questions in the comments below. With these wiring solar flood lights instructions, you can confidently wire your solar flood lights and enjoy the benefits of an energy-conscious solution for your home.
